el toro
Sr Member
Re: Sign up thread for NEW Luke V2 light saber run. Spring 2018 edition (SIGN UP CLO
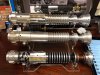
First I installed the cylindrical nub into the face of the emitter and held it in place with the short screws. This Should emulate the top of the darkened steel rod which the v2 spun around. Next, I placed the threaded portion of the steel bolt into the emitter cup and then installed the bolt into the windvane section that is part of the grenade. The lip of the bolt cup should be level with the lip of the emitter cup. If it isn't check to see if there are any shards of aluminum embedded within the windvane's female threading. Clean out any shards and then reinstall. Then I installed the aluminum heat sink into the bolt cup. Again the lip of the heat sink should be level with the lip of bolt cup. Make sure the screw holes are aligned between the bolt cup and the emitter walls. Then place the emitter face into the emitter cup and align the screw holes between the two. Thus the screw holes should be aligned between the emitter cup, emitter face and bolt cup. Then use the two longer screws to hold the emitter face, emitter cup and the bolt cup in place.
First I installed the cylindrical nub into the face of the emitter and held it in place with the short screws. This Should emulate the top of the darkened steel rod which the v2 spun around. Next, I placed the threaded portion of the steel bolt into the emitter cup and then installed the bolt into the windvane section that is part of the grenade. The lip of the bolt cup should be level with the lip of the emitter cup. If it isn't check to see if there are any shards of aluminum embedded within the windvane's female threading. Clean out any shards and then reinstall. Then I installed the aluminum heat sink into the bolt cup. Again the lip of the heat sink should be level with the lip of bolt cup. Make sure the screw holes are aligned between the bolt cup and the emitter walls. Then place the emitter face into the emitter cup and align the screw holes between the two. Thus the screw holes should be aligned between the emitter cup, emitter face and bolt cup. Then use the two longer screws to hold the emitter face, emitter cup and the bolt cup in place.
")