You are using an out of date browser. It may not display this or other websites correctly.
You should upgrade or use an alternative browser.
You should upgrade or use an alternative browser.
Rocketeer “Veepy” Jetpack 3D printable kit project.
gnolivos
Sr Member
Looking for reactions here... this is the mounting system I came up with for the engines.
The engines insert from the bottom, clear the tabs, rotate slightly and align into place and drop onto tabs.
The tabs have pockets for STRONG Magcraft 0.75in magnets. There is also an alignment pin to aid alignment.
Thoughts?


The engines insert from the bottom, clear the tabs, rotate slightly and align into place and drop onto tabs.
The tabs have pockets for STRONG Magcraft 0.75in magnets. There is also an alignment pin to aid alignment.
Thoughts?
Last edited:
gnolivos
Sr Member
Very interesting and seems sturdy for sure.
I had a better idea without magnets. I’ll post later today.
gnolivos
Sr Member
OK, so here is what I believe will be the final mounting method for the engine.
The engines insert from the bottom, clear the tabs, rotate slightly and align into place and drop onto tabs, all aligned by the 4 large posts.
There is one attachment point at the rear for a screw to hold the engines in place and prevent from sliding up and out.


No magnets.
Thoughts?
The engines insert from the bottom, clear the tabs, rotate slightly and align into place and drop onto tabs, all aligned by the 4 large posts.
There is one attachment point at the rear for a screw to hold the engines in place and prevent from sliding up and out.
No magnets.
Thoughts?
gnolivos
Sr Member
So, if I understand the concept: you`ll introduced the engine through the bottom of the tube and rotate it into place and snap it on those ledges...right?
Sort of! You insert through the bottom indeed. You then allow the entire engine structure to rest on the 4 tabs.
Finally a screw at the rear keeps it from moving up.
gnolivos
Sr Member
I have created a Fan bracket for the Jetpack. This will fit this magnificent motor from eBay ")
GET THEM WHILE THEY EXIST.


GET THEM WHILE THEY EXIST.
3000RPM 12V DC Reversible Brushed Electric Motor 38mm CCW Replacement DC Motor | eBay
Find many great new & used options and get the best deals for 3000RPM 12V DC Reversible Brushed Electric Motor 38mm CCW Replacement DC Motor at the best online prices at eBay! Free shipping for many products!
www.ebay.com
Last edited:
gnolivos
Sr Member
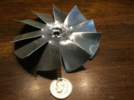
And this is the correct Fan that will fit:

10 blade aluminum cooling fan 1/4 inch mount x 3 1/2 inch x 1/2 wide set screw | eBay
Find many great new & used options and get the best deals for 10 blade aluminum cooling fan 1/4 inch mount x 3 1/2 inch x 1/2 wide set screw at the best online prices at eBay! Free shipping for many products!
www.ebay.com
Attachments
gnolivos
Sr Member
For some chrome finish reference, here are some photos of a screen used rocketpack I took a couple of years ago.


Interesting. That rocket pack has many MANY differences from the 2 main rocket packs that are out in the wild. Doesn’t look too accurate compared to the hero pack. Believe me, I’ve studied the jetpacks for 10 months straight. [emoji23]
The view inside the engine bells and the separate panels (plus the screws holding them on) point to this being one of the practical flame packs.


The proportions of the flame packs were definitely different from the other packs. They were in the ballpark, but not quite right.

So in addition to not being good reference in terms of shape, this pack is not good for finish reference either, since it was painted (I believe this might be the one that was restored, since it is very "clean" finish-wise).
Pics of the hero packs are what you should refer to - the heroes have a thin outer layer of zinc that was arc-sprayed into the mold before they were cast.

The proportions of the flame packs were definitely different from the other packs. They were in the ballpark, but not quite right.
So in addition to not being good reference in terms of shape, this pack is not good for finish reference either, since it was painted (I believe this might be the one that was restored, since it is very "clean" finish-wise).
Pics of the hero packs are what you should refer to - the heroes have a thin outer layer of zinc that was arc-sprayed into the mold before they were cast.
Similar threads
- Replies
- 14
- Views
- 2,831
- Replies
- 25
- Views
- 4,723
- Replies
- 26
- Views
- 2,173
- Replies
- 62
- Views
- 20,106