GreyGuard38
Active Member
I meant another kind of paint for the grips, not a different weapon.How about airsoft?
")
That one looks pretty similar to my air pistol, though.
I meant another kind of paint for the grips, not a different weapon.How about airsoft?
 www.therpf.com
www.therpf.com
www.therpf.com
Sorry, I don't know what the 3M things are? No 3D print options here, either.An old standby for easy coverup is 3M bump ons. Not very original but effective. Otherwise you might want to see what you have hanging around in your parts/junk box that might fit the area. Or 3D print something if that’s an option.
I am not talking about the model paint, I am talking about those small plastic bottles of craft paint. You should be able to find them at $1-3 depending on brand at any craft store or in the craft section of Target and Walmart.Where are you getting $1 acrylic? About the only well-stocked hobby store around me is Michael's, and their little bottles of acrylic are about $6.
Great job on the other projects! I'm still new to prop-building. I did build a couple hundred plastic models when I was growing up, though.
Sorry, I don't know what the 3M things are? No 3D print options here, either.
D'oh! I generally avoid Walmart, so that didn't even occur to me. haha!I am not talking about the model paint, I am talking about those small plastic bottles of craft paint. You should be able to find them at $1-3 depending on brand at any craft store or in the craft section of Target and Walmart.
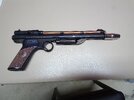
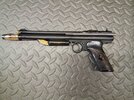
Maybe run a wire from the end and run it into greeblie like the DH-17 in A New Hope. If you do a tube on the other side, you could use it to run a wire to a scope. Check out how the wires run on this thread: Field Marshal DH-17 Rebel BlasterOh, does anyone think I should add the 3 brass rods and wire on the left side of the pistol also, or is just right side okay?
I'm thinking of some kind of short tube on the left side for a scope or something, most blasters seem to have extra tubes on them for one reason or other.
I'll check out that thread, too. btw, I love the model camshaft on the side of the DH-17!Maybe run a wire from the end and run it into greeblie like the DH-17 in A New Hope. If you do a tube on the other side, you could use it to run a wire to a scope. Check out how the wires run on this thread: Field Marshal DH-17 Rebel Blaster
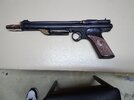
Also, I would hit the brass tubes with a black coat of paint then lightly rough them up with some steel wool.
Where are you getting $1 acrylic? About the only well-stocked hobby store around me is Michael's, and their little bottles of acrylic are about $6.
Great job on the other projects! I'm still new to prop-building. I did build a couple hundred plastic models when I was growing up, though.