I count myself VERY fortunate to be one of the first to get their hands on the much-anticipated metal PKD blaster kit from TipTop Workshop based on the amazing 3D files by Anders Pedersen. The development of this beautiful kit has been amply documented by Dave from TipTop in
this thread, and it's certainly the case that it's been most enthusiastically looked forward to.
TipTop already make a fantastic resin kit of the blaster, with some metal parts as an optional extra. I, and many others, have built blasters from that kit and loved the results. My own can be seen in
this thread. But by casting almost every one of the metal components of the blaster in actual metal, Dave and TipTop have taken this latest kit to a whole new level. Was it worth the wait and the anticipation? Oh yes! Yes, it was!
I'm going to document my build of this kit here. Hopefully, it'll be interesting and helpful to others who are lucky enough to get one of these lovely things!
Part 1: First impressions, prepping the metal parts and first rough assembly
View attachment 1694616
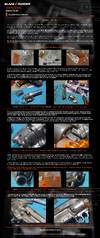
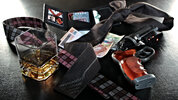
The kit arrived very safely packed in a cardboard box with all the parts wrapped and padded in bubble-wrap and newspaper. My first impression was how very comprehensive the kit is. Other than workshop tools(!) the box contains
everything you need to build the blaster down to the last detail, including all the bolts and other fixings like springs and magnets, all the electronics for the green and red LEDs, a pair of flawlessly cast clear amber grips, a set of 5 copper and brass dummy rounds, and a comprehensive illustrated step-by-step build manual that's been updated and improved from the one that Anders produced for his parts originally and that was used for the TipTop resin kit.
Two things absolutely delighted me in particular: the sighting rod is pre-drilled for wiring the green LEDs (you have no idea how much I was dreading doing that, having no pillar drill!) and many of the bolt holes are already tapped (something I could do myself but a really nice extra enhancement anyway!).
View attachment 1694608 View attachment 1694609 View attachment 1694611 View attachment 1694610 View attachment 1694613 View attachment 1694614 View attachment 1694612 View attachment 1694615 View attachment 1694627 View attachment 1694641
I was
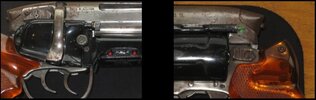
super impressed with the quality of the metal castings. Even on a first rough introduction of the parts to each other I could see there would be less cleanup and fitting to be done than there was with the resin parts (and
they were bloody good!), especially as there’s no need to make as much allowance for primer and paint thickness (unless you're planning on painting the metal parts... why would you do that!

)! That allows for much more time to be spent on preparing the parts cosmetically for your chosen final finish.
As well as the main metal parts there is a nice lathe-turned aluminum barrel, and the front support pillar and cylinder bushing are also aluminium.
View attachment 1694629
The only metal part that isn't actually cast in metal is the cylinder itself, due to technical and cost constraints, but as the gun will undoubtedly be mainly used for display and the actual cylinder will hardly be visible once the covers are on this doesn't worry me particularly. The dummy rounds give the cylinder real heft when they're inserted, and I shall try to match the finish of the actual metal parts with paint on the cylinder.
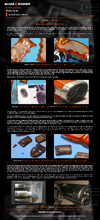
Prepping the metal parts
Obviously, there needs to be some filing, sanding and polishing of the metal parts, for two main reasons.
1. To get rid of the tiny bits of flash at the edges of some of the parts and at the mould seams. These areas are easily dealt with with careful light filing, sanding and then finishing off with scotchbrite.
My technique is to use a needle file first to flatten the raised ridge at the seam until the file starts to abrade the material on the lower side. This generally leaves a dull ‘dip’ next to the raised edge. Then I switch to sanding. I use double-sided emory boards for this in the first instance. They have a coarser side (100 grit) and a slightly finer side (180 grit). The coarse side is used to remove material until the seam has disappeared leaving a shiny but scratched surface across the whole area. Then the 180 grit side is used lightly to start to remove the scratches. I move onto to sanding sponges or pads then, using finer and finer grades to removes the scrarches from the previous pass and build up to a smoother finish.
When the scratches are very fine I alternate between the finer grades of sanding pad and scotchbrite pads. These latter are great since they either act as fine abrasive if you rub hard or a polisher if you use a lighter touch. At this stage I try to make my strokes go in one direction to replicate a machined appearance. Finally I move onto the fvery inest grade of sanding pad (8000 - 12000) with metal polish to achieve the smoothness of the finish I want. This varies from very smooth on the parts that are just going to remain polished (butt plate, outer frame and bolt interior) to marginally less ‘perfect’ on the parts of the gun that will eventually be blued. The polished parts are given a final going over with metal polish applied with a paper towel and then buffed off with a microfibre cloth.
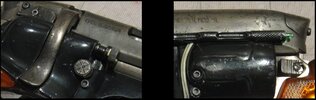
You can hopefully see the difference in the parts in these work-in-progress photos.
View attachment 1694619 View attachment 1694620 View attachment 1694621 View attachment 1694622 View attachment 1694623 View attachment 1694624 View attachment 1694625 View attachment 1694626 View attachment 1694630 View attachment 1694632 View attachment 1694633 View attachment 1694634 View attachment 1694636 View attachment 1694637 View attachment 1694638 View attachment 1694639 View attachment 1694640
At the same time this process also deals with any minor surface imperfections that you might get on the parts. I try to get rid of the worst of these, but in this case I opted to leave some light marks to eventually replicate the natural wear and tear that you’d get on a weapon that was regularly used.
2. Filing and sanding are also needed to ensure a perfect fit, especially with the parts that move against each other. This is actually much easier with the metal than with the resin version in this respect, since the metal is much more robust than resin and allows a slightly more ‘aggressive’ approach both in the adjustment and in the testing.
The areas that did need a little bit of work to get a perfect fit were the following. I should emphasise that the adjustments here were actually quite minimal as the fit of the parts is really good to begin with. Most of them could be done with a few passes of a file or some light sanding. A couple needed me to break out the Dremel.
- Where the Steyr pin passes through the Steyr ‘tip’ - the aperture needed slightly enlarging on the inner surface with a small cylindrical grinding bit and/or round needle file
- The inner front part of the receiver needed widening slightly to accommodate the barrel - you could just about push the barrel through the available gap but it was really tight, and I didn’t want to force it as the edges of the receiver are quite thin. It was so close out-of-the-box, but widening it ever so slightly made the barrel fit a lot more comfortably while still keeping it nice and snug and immoveable.
- At the bottom of the Bulldog frame the gap where the triggers sit needed enlarging very slightly to allow the front trigger to move freely. This was a bit fiddly to get at but relatively easy with a flat needle file and a cut-down sanding stick.
- A tiny amount was taken off the width of the cylinder pivot arm where it slides into the frame to allow it to swing freely without scraping the edges.
- The bolt and the interior of the receiver needed a bit of adjustment so that the bolt could rotate freely and the rear cap of the receiver fitted flush when the bolt is closed. This mostly involved filing small amounts of material away from strategic areas where the bolt was ‘catching’ slightly. I recommend investing in a bottle of Dykem layout fluid or similar to identify exactly where the rubbing is happening rather than guessing!
- The base of the bolt lever and the slot it fits down into when closed needed a tiny amount of filing and sanding for a perfect fit.
- Some drilling and work with a round needle file was also needed to open up some holes where the pins for the Bulldog handle and the hammer go through the frame. The pin holes for the triggers also needed enlarging slightly (be very careful not to overdo this as the pins still need to fit tightly into the frame!)
- The slot in the rear receiver end cap and the slot in the cylinder release button also needed opening up a bit where there was a tiny amount of excess metal.
- I also tested the bolt holes as I went along by screwing bolts into them, and I did end up re-tapping a few of them either to get a bit more depth or to ease the fit of the bolt.
All in all, it took me about 3 days of work to prep all the metal parts to the point where I felt they were ready to set aside for the final finish.
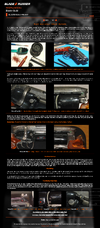
The non-metal parts
The plastic/resin parts are cast in a tough black resin so are almost good to go out of the box. As always with Dave’s products they are incredibly high-quality castings. In fact I had only three very minor flaws. There was a tiny air bubble void on one end of the cylinder and another, even smaller, one on the magazine. Unfluckily, the latter was right on one corner of the rectangular switch housing - a bit of a tricky detail to fix. But a tiny bit of black Milliput and some basic sculpting with a hobby knife did the trick on both. A tip when using Milliput to replace or fill very tiny areas like this, by the way, is to add a tiny dab of superglue before placing the soft Milliput. This fixes it firmly in place while you’re sculpting it as well as ensuring that the fix remains in place after it’s cured. The other slight casting flaw was atiny blob of surplus material inside one of the deep recesses at the front of the magazine housing; it was barely visible but easily fixed with a small grinding bit on my Dremel.
View attachment 1694642 View attachment 1694643 View attachment 1694647
I needed to give the inside of 2 of the chambers of the cylinder a couple of quick passes with a rounded file to get the supplied dummy rounds to fit, after which they slid in and out easily.
Other than that, nothing needed to be done to these parts other than a very light sanding on a couple of edges where they'd had the pouring excess neatly snipped off. Really pain-free castings!
In fact, I did wonder at first whether it was worth painting the black components since they were such good quality as they were. I thought maybe just a light going over with a scotchbrite pad and a polish where needed might actually be the only thing required for a perfect finish. But in the end, for durability and consistency, I’ve decided to paint them in the same way I did the same parts on my resin TipTop blaster with a combination of gloss and satin black. But that can wait until I do a first rough assembly of the prepped metal parts!
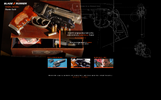
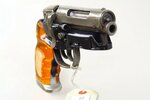
First assembly!
This is the fun part after all the prep work… the first time you see the blaster start to take shape in your hands and feel the weight of it. And it’s an absolute beast!
It all fit together incredibly well on first assembly. As I mentioned, I did re-tap some of the bolt holes to make screwing the parts together a bit easier. And as I found with the resin kit too there are a couple of places where I felt a slightly longer bolt was needed than the size stipulated in the instructions. In particular the outer grip definitely needs a longer bolt for the inner top position; I used a 20mm rather than the suggested 12mm. The top bolt on the left side cylinder cover also feels like it needs a slightly longer bolt too - I used a 16mm rather than a 12mm.
The only point at which I struggled a bit was in fitting the barrel as the front side bolt holes didn’t quite line up once the barrel was attached to the Bulldog frame. This was easily fixed, though, as the holes were
so close to being right (literally a fraction of a millimetre)I re-tapped the holes in the barrel at a very slight angle and then using 6mm bolts rather than the suggested 8mm. The barrel is just as securely held, it looks exactly the same, and you’d never know the difference. Luckily the large bolt-hole in the bottom of the barrel for the front support pillar is perfectly placed.
View attachment 1694652 View attachment 1694658 View attachment 1694660
I’m
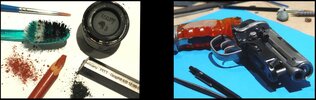
really excited with the build so far. It looks and feels amazing. Next step is the painting of the plastic/resin parts, and then a new venture for me - bluing the metal components! I admit to being a bit nervous about this. It’s something I’ve never done before. I have done some experimenting on some spare metal pieces left over from previous projects (see below - top left is untreated, bottom left is a painted weaver knob from my resin blaster, and the weaver knob and post on the right are the finish I hope will work for this one). From those experiments I think that Aluminum Black for the barrel and ‘pillar’ and either Phillips Gun Blue paste or Gorgeous Glass Black Patina for the other parts will work well. I’m hoping that scouring back through the finish with a scotchbrite pad to different degrees will allow me to get the deeper bluing on the receiver and bolt and less darkening on the Bulldog parts. We shall see! Playing with small, sacrificial parts is one thing, but doing the same thing on the bigger, more critical, irreplaceable parts is going to be a bit of an adventure. Wish me luck!
View attachment 1694644
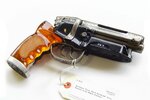
I'll sign off for now with a couple of pictures of the assembled blaster in its current state with the grips and plastic parts put in place but not attached yet. The other blaster is my assembled and painted resin TipTop/Anders kit for comparison.
View attachment 1694662 View attachment 1694663
I'm thrilled to bits with the kit, and I hope that when I come to do the final finish and final assembly I can do justice to Anders's brilliant files, and the absolute labour of love that Dave at TipTop has engaged in over the last couple of years to turn those files into such high-quality castings, and to bring the community this gorgeous kit. Thanks so much to both of them for letting me be one of the first people to play with such a wonderful creation. I hope I can be worthy of it!
More progress to follow as I embark on the painting and finishing stage!