Poikilotherm
Sr Member
deleted
Last edited:
This forum is intended for interest gauging and active runs. Due to the transient nature of this forum, please keep all research and ongoing discussion in one of our main forums so your information is not lost.
Only Premium Members can start a new run.
View attachment 1376254View attachment 1376255View attachment 1376256View attachment 1376257View attachment 1376258View attachment 1376259View attachment 1376260
I took some pictures. It was great!
View attachment 1376261
I was worried that the inside of the box would be smaller than the first run, but now everything feels great. I love them!")
Love seeing people's finished builds! Thanks for sharing guys! Awesome work, both of you.My control box is done. I used custom rails, button and arrows. and added a 3d printed detail to the chip. Card is brrogers vintage.
Thanks Enrico! I've been trying to get online to say thank you all day, but the site has been down. Really appreciate it. Thank you. Still on target to have everything out in the next week or so!Looking forward to having this incredible artwork!
The expectations are really high, day by day!
Thanks for the efforts and passion you gave into this project, Dave
Just in time for Christmas! Hi Ken.These are incredible! I'm assuming I missed out on this run by now?
 www.therpf.com
Love the tubes idea, Tom! Might have to steal that!I actually have an idea for the box that I'm diagraming. I'm putting the SPDT switch upside down in the box, and will trim the board and use it to press down the switch. Depending on the length of the leads, I'll just use hot glue or excess lead to push down on the switch. The bottom of the box will push against the snap switch and divert it.
Or I'll put it upright and use the board to click it, I just am not sure about the soldered leads being against the bottom of the box?
Either way, I'm going to glue little plastic tubes to the back of the arrows and feed the LED in there to collect the light and make sure most goes out.
Much more secure than glueing the LEDs directly on to the back of the triangles. Great idea. I like the the switch idea too. I have considered countersinking the bottom of the box and swapping out the mushroom screws to gain a little more room. It's a bit of a worry though as I'm not sure there's enough material there. Another option would be to do away with the heads entirely, and leave a couple of stumps (just to line the box up) and epoxy the box on? That would free up a bit of room. As for insulating the inside of the box, I've seen spray on electrical tape but never tried it. Aluminium shouldn't be an issue in theory, but I'm no expert in the electrical department, and I guess it can't hurt.I would use epoxy instead of superglue. And is always better not to paint the part to be glued.Received mine today! Can't wait to get started on this. Everything looks fantastic Dave! Could you please clarify, forgiving my ignorance, how to attach the T tracks, rails, and buttons? Are they all just superglued or do you have a better recommendation? Do you paint the T tracks where they get glued, or will that interfere with adhesion? This is my first serious build and don't want to F it up. Thanks again for doing this!
Hi Ryan. I can only speak from my own experience, but I use JB Weld, two part epoxy for the rails as it's the strongest glue I know of. It's no good for the triangles as it's not clear. I use a cheap modelling paintbrush to apply to the rails. I paint the rails first and then scratch off the paint where I'm going to apply the glue. You have to work fast with JB as it sets quite quickly. So it's best to do one part at a time until you're comfortable using it. You need to make sure the part is positioned exactly where you want it and hold until set too as once it's set, it's set solid!Received mine today! Can't wait to get started on this. Everything looks fantastic Dave! Could you please clarify, forgiving my ignorance, how to attach the T tracks, rails, and buttons? Are they all just superglued or do you have a better recommendation? Do you paint the T tracks where they get glued, or will that interfere with adhesion? This is my first serious build and don't want to F it up. Thanks again for doing this!
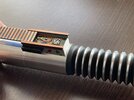
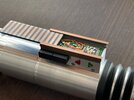
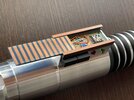
)Looking great, Andrew! Nicely done.This is my progress so far! Gold needs to be a shade or two darker, but its coming along nicely, which is easy when you have such a great kit to start with!
When its done i'll post again along side my stunt resin copy.View attachment 1377759
The only thing I'd say, is that the underside of the first emitter step was painted along with the neck. I know it's not finished though. Awesome stuff!