Beautiful Dave! So glad I was able to pick up a pair ") both finished with as many Vintage parts as possible
both finished with as many Vintage parts as possible


both finished with as many Vintage parts as possible
This forum is intended for interest gauging and active runs. Due to the transient nature of this forum, please keep all research and ongoing discussion in one of our main forums so your information is not lost.
Only Premium Members can start a new run.
both finished with as many Vintage parts as possible
**UPDATE**
Hello there!! I'm guessing some of you have seen the announcement!
Roy's levers arrived this afternoon! I wanted to wait until they actually arrive before announcing anything here.
Well, they're here, and they're perfect. Very nice indeed!
View attachment 1565788
I'm obviously going to get straight on with the job of getting outstanding kits shipped out to people, as well as installing clamps on to Batch 1 commissions.
This will not take long at all, so expect to receive a tracking number for DIY kits by the end of the week.
I'll send out invoices for finished commissions once they're complete and packaged up ready to ship
I'm so incredibly grateful for the patience and understanding that everyone has shown! I can't thank you all enough!
Not long to go now! Batch 2 is nearing completion! I will post a separate update on that soon. All going well and should be moving on to batch 3 before too long.
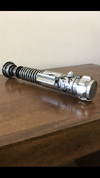
In the meantime, here are some images of some finished commissions, complete with new lever:
View attachment 1565791
View attachment 1565790
View attachment 1565792
View attachment 1565789
Thanks again everyone,
All the best and MTFBWY!
Dave
Christmas came early!!**UPDATE**
Hello there!! I'm guessing some of you have seen the announcement!
Roy's levers arrived this afternoon! I wanted to wait until they actually arrive before announcing anything here.
Well, they're here, and they're perfect. Very nice indeed!
View attachment 1565788
I'm obviously going to get straight on with the job of getting outstanding kits shipped out to people, as well as installing clamps on to Batch 1 commissions.
This will not take long at all, so expect to receive a tracking number for DIY kits by the end of the week.
I'll send out invoices for finished commissions once they're complete and packaged up ready to ship
I'm so incredibly grateful for the patience and understanding that everyone has shown! I can't thank you all enough!
Not long to go now! Batch 2 is nearing completion! I will post a separate update on that soon. All going well and should be moving on to batch 3 before too long.
In the meantime, here are some images of some finished commissions, complete with new lever:
View attachment 1565791
View attachment 1565790
View attachment 1565792
View attachment 1565789
Thanks again everyone,
All the best and MTFBWY!
Dave
Half way through though, and hopefully, by the end of tomorrow, ALL outstanding kits should be booked in and ready to leave on Wednesday. Best communication and follow-through in the industry Dave!!**Update**
Hi everyone. Just a quick curtesy update to let everyone know where things are up to since the levers arrived on Thursday...
Since they arrived I've been working flat out on the following:
It's been a lot of work to get through, but all the UK standalone levers have now been sent. International ones require scanning in the actual post office, so those are departing tomorrow morning (all packaged and labelled up)
- Checking peoples details haven't changed, and getting missing email/phone numbers for UPS
- Sending out levers to those who already have their kits (but paid to have the levers sent separately)
- Adding levers to remaining kits and booking in for collection
- Installing levers on to completed batch one commissions
- Invoicing for completed commissions
- Booking completed commissions in for collection
Roughly half of the outstanding DIY kits have been booked in for tomorrow's collection (Tue). I'll be booking in the rest for collection on Wednesday. Just the process of dropping in the lever, taping the box up, checking details, booking in with UPS, Labelling the box and attaching customs forms is incredibly time consuming. Multiply by the quantity, and it becomes a major operation.
Batch one ROTJ V2 levers have been weathered and installed, and a couple of them are booked in for collection tomorrow. It's my plan to have the rest packaged up tomorrow, along with the completed Obi Stunt commissions, ready for collection on Wednesday. Installing the levers on the Obi stunts is relatively straight forward as they don't require the additional weathering that goes in to the ROTJ V2 lever.
Thanks for your patience on this run everyone. It hasn't gone as smoothly as was planned, and I realise it's tested people's patience.
Glad to say that things are moving along at a great pace now though, with a healthy pile of boxes waiting by the door to be collected tomorrow. Soon to be followed by the rest in the coming days!
Batch two has not been forgotten! (or three for that matter) It's so very close to being completed too, and I'm itching to continue work on them and show you where things are up to! Just a brief pause while I concentrate on getting some orders shipped out to their new homes.
Thanks again for your patience everyone!
All the best and MTFBWY,
Dave
Here’s mineMine arrived yesterday! It’s amazing.
Now to find a proper way to display it. Anyone have any creative tips?
Thanks bud.What an awesome display stand for the V2, Scruffylooking!
 www.therpf.com
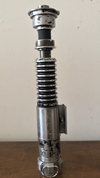
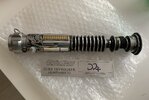
Wow, that’s some serious pommel damage. I’ve never seen any of the finished replica props look that gnarled up. Did the original look like that?My DaveP V2 just turned up! Couldn’t wait to unwrap it! It’s stunning. Thanks Dave for all your hard work. This one features a vintage clamp, vintage Transcriptor cone knob and vintage boot stud.View attachment 1567589View attachment 1567590View attachment 1567591View attachment 1567592View attachment 1567593View attachment 1567594View attachment 1567595
This is the reference I use for the pommel:Wow, that’s some serious pommel damage. I’ve never seen any of the finished replica props look that gnarled up. Did the original look like that?