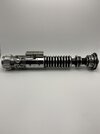
Oh geez, I’d love to see the video. LolThis is the reference I use for the pommel:
View attachment 1570205
It was pretty beat up by the time it was used for ROTJ.
There's a BTS video somewhere that shows Hamill bashing it in to the ground, pommel down during rehearsals.
-
Welcome to the Project Runs Forum!
This forum is intended for interest gauging and active runs. Due to the transient nature of this forum, please keep all research and ongoing discussion in one of our main forums so your information is not lost.
Only Premium Members can start a new run.
You are using an out of date browser. It may not display this or other websites correctly.
You should upgrade or use an alternative browser.
You should upgrade or use an alternative browser.
Interest DaveP’s Luke RotJ V2 / Obi Wan ANH Motorised Stunt Prop-Replica Run (Sign Up Closed)
- Thread starter DaveP
- Start date
I found this one:Oh geez, I’d love to see the video. Lol
I swear I've seen one where he's stood there for longer, and hits it a couple more times, but I can't find it for the life of me.

Well, it's funny you should say that.... There might be an interest thread going up in the not too distant future....With this run getting close to being fully completed I'm staring to wonder what Dave's next project might be
Well, it's funny you should say that.... There might be an interest thread going up in the not too distant future....
View attachment 1570213

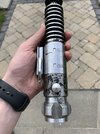
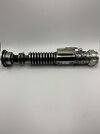
Got my Obi stunt DYI yesterday and I'm very impressed with all the work.
Thank you for the tutorial Dave.
Thank you for the tutorial Dave.
Attachments
livetoberadical
Active Member
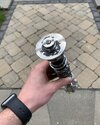
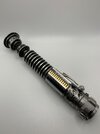
It’s here!!! Dave, thank you so much!! The holy grail of my collection.

Attachments
-
 7E153EF2-11CF-41F2-861B-FF3EF81B6A24.jpeg868.3 KB · Views: 174
 -
 D951DFC3-54FF-4B42-B8E8-382CD00DA743.jpeg827.6 KB · Views: 202
 -
 689A608C-0293-4F1B-9E27-5C9A0709AC70.jpeg737.7 KB · Views: 175
 -
 4F145462-AA91-4DC7-8B22-406D5094EEDF.jpeg549.9 KB · Views: 207
 -
 44C1ADCB-FD92-4505-9395-1CA725E302AC.jpeg684.4 KB · Views: 180
 -
 7CF441ED-E3BA-466F-929D-3946F8ABB982.jpeg647.3 KB · Views: 198
 -
 839C602B-D369-4C65-ABEE-139715A27ABC.jpeg813.7 KB · Views: 265
Srycantthnkof1
New Member
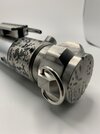
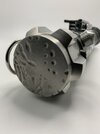
Nice of you to get that to the kyberdaddy himselfView attachment 1570719Did this one up ROTJ style for my friend Jesse at Kyberphonic Fonts! He provided a vintage clamp, knob, and boot stud! The vintage parts really makes dave’s kit feel so “in universe”! Great bit of kit!
For those looking for a tutorial for the V2 kits, there was a brief run down in this post:

Interest - DaveP’s Luke RotJ V2 / Obi Wan ANH Motorised Stunt Prop-Replica Run (Sign Up Closed)
Happy New Year Dave, Happy New Year to all of us!www.therpf.com
I'll go in to more depth in the next update.
Dave- any updates on this more in-depth V2 tutorial post?
Hey Drew.Dave- any updates on this more in-depth V2 tutorial post?
Yeah, sorry for the delay. Batch 02 is VERY close to being finished, and I've been documenting things as I go. As soon as they're finished, I'll get the update/tutorial posted.
Hope that's ok.
I'm not the fastest when it comes to typing things out, so I need to find a suitable gap in the work to sit down and put it all in to words.
If there's anything specific that isn't explained in the earlier post, please feel free to fire me a DM and I'll try to explain things in more detail.
I realise the stencils aren't as straight forward as they could have been and require a bit of working out when it comes to weeding out the correct parts. It was a choice between lower quality, printable vinyl and the one that I went with, which can't be printed unfortunately. So, it does mean that the stencil guide, and the 360 video need to be referenced closely to avoid any mistakes. I'll go in to much more detail soon (with pictures).
Cheers,
Dave
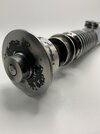
There’s a switch on the box that holds the batteries as well as the red switch on the saber.Just got my Obi Stunt commission. Looks and feels amazing. A question for those who have received theirs, how do you get it powered on? I loaded mine up with fresh AA batteries, but nothing.
Yeah, those are both on and the plugs are plugged into one another.There’s a switch on the box that holds the batteries as well as the red switch on the saber.
Just sent you a DM Scott, but figured I'd reply here too for anyone else having problems:Just got my Obi Stunt commission. Looks and feels amazing. A question for those who have received theirs, how do you get it powered on? I loaded mine up with fresh AA batteries, but nothing.
The nipple grub screws are locked to protect the mechanism when pushing the blade on (and for transit) When these are loosened the rod/blade should spin easily. If the blade is pushed on too tight, this can stop the rod from spinning too.there should be a small gap between the blade and the nipple face.
It's also worth checking the connections on the Anderson connectors. They should all be hooked over fully like this:
If one of these has slipped off, the cover can be slid back and the connector can be pushed back in with an electrical screwdriver.
Other things to check are connecting directly to the power pack (to check there isn't a fault with the lead).
Checking all combinations of the two switches.
And finally trying brand new batteries.
Hopefully one of the above should fix any problems that are encountered. If not, please do get in touch!
All the best,
Dave
Similar threads
- Replies
- 23
- Views
- 2,302
- Replies
- 2
- Views
- 1,562
- Replies
- 10
- Views
- 2,023
- Replies
- 302
- Views
- 37,768