Interest DaveP’s Luke RotJ V2 / Obi Wan ANH Motorised Stunt Prop-Replica Run (Sign Up Closed)

Just wanted to share how my motorized stunt turned out and explain some of my differences in choice for design! (Not saying mine is “correct” per se, just how I interpret
it :) )
For starters, I used 4 different paints to achieve this look on the neck, more of a burnished copper look. I also used a matte black paint on the whole body, and accented the emitter and booster chips with a satin black (all Rustoleum.) Something I couldn’t unsee from some photos was the grayish emitter, so I hit it with a bit of graphite powder before adding the satin chips on the emitter! I like how it turned out! I also made a custom lever, and opted for an SPDT switch instead of the supplied one. I believe since we see the switch resting in the center position (being off) this was likely the switch used.
Thanks again Dave, one of my favorite pieces to finish for my collection! Now I just need a d-ring!
 

Attachments

  • 82E923C8-1C3A-464D-B307-B9451ECDB627.jpeg
    82E923C8-1C3A-464D-B307-B9451ECDB627.jpeg
    4 MB · Views: 227
  • 7599B28E-A12D-4157-AE89-44511750D70C.jpeg
    7599B28E-A12D-4157-AE89-44511750D70C.jpeg
    2.3 MB · Views: 216
  • 7995AAF9-6EF1-4860-A654-CF11CB5145DD.jpeg
    7995AAF9-6EF1-4860-A654-CF11CB5145DD.jpeg
    1.4 MB · Views: 203
  • D85912DA-7B56-481F-9CBF-FEF47F9C8F38.jpeg
    D85912DA-7B56-481F-9CBF-FEF47F9C8F38.jpeg
    2.5 MB · Views: 223
**Update**

Hi Everyone. Apologies for delay in getting another update posted. I always seem to be just one small step away from being at a stage where I feel it's appropriate to break off and document where I'm up to. I realise that time is slipping by though, and always concious that people are waiting patiently to see where their commissions are up to. So here we are....

Batch two is so incredibly close to being finished! So close in fact that I'm going to start sending out shipping/commission invoices later today, so that I can get these booked in and on their way as soon as they're finished.

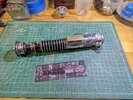
The V2s are practically finished, and I'm in the process of assembling the finished parts:

PXL_20220517_103701219.jpg


The two at the front are completely finished and ready to send out, but I'd like to have them all ready before I move on to shipping them out.

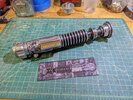
Here are some beauty shot I took, in order to compare the darkened/weathered commissions with the undarkened/idealised ones:

Light and Dark 1.jpg

Light and Dark 2.jpg

Light and Dark 3.jpg


The amount of work that goes in to the V2 commissions cannot be exaggerated! Stencilling and painting is, believe it or not, the easy part! **De-stencilling**, is FAR more time consuming in comparison.

PXL_20220506_133123406.jpg
PXL_20220506_133651693.jpg
PXL_20220506_133731064.jpg
PXL_20220509_100604324.jpg


Once the stencils are removed, and any residue is cleaned off, the edges of the paintwork has to be knocked back/weathered, so as to look natural. This is especially important on the grenade section and on the emitters. The edge of every ring section is rubbed down with a wooden stick to soften any harsh edges that are present in the paintwork.

PXL_20220509_084641688.jpg


I've been working methodically on these, so completing each individual task for the entire batch before moving on to the next task. So these have all appeared to be very nearly finished for some time now. But when you multiply each individual task by the number of commissions, even the smallest of tasks can end up taking all day.

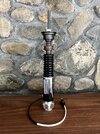
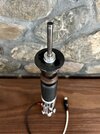
Tasks like turning these:

PXL_20220507_133707829.jpg


In to these:

PXL_20220513_083359023.jpg


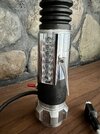
Or installing D-Rings....

PXL_20220513_153247847.jpg


All of these little tasks have added up to what has been an incredibly busy few weeks, with what might appear on the surface to be, slow progress.

The Obi Wan Stunts are now VERY close to being finished too!

They have all been painted for quite some time, but they have all now been wired up and installed too:

PXL_20220516_104052057.jpg

PXL_20220516_141719082.jpg

PXL_20220516_141800321.jpg


All the Obi Stunts now have their clamps install too, so the next step is to install the pommels, after which, the wire can be fitted with it's Anderson connection, and they're done! :)

PXL_20220517_113216113.jpg


So very, very close to the finish line! None of these steps can be rushed, as I want to deliver these to the standard you've come to expect.

I'm very much aware of the time that is passing though, and the number of people waiting on these! I REALLY appreciate the patience that everyone has shown!

Batch Three is very much in my mind also, and I have made a start on preparations for this batch. I am in the process of cutting the stencils for this final batch and very nearly have these all cut and ready to use. I've stocked up on A14 and paint too, so we can hit the ground running.

I have contacted everyone from batch three with regard to their preferences, and have now collated all of this in to a spreadsheet. This was itself quite a big undertaking, and I'm happy to say that we're good to go as soon as Batch two is out of the door. (y)

I always regret putting a time on these things, as I always seem to shoot myself in the foot and give myself far too much to do, in too little time...

There really are very few things left to do now though, so I'm confident in saying that this week will see me wrapping up Batch two, and moving on to the third and final batch!

Thanks again everyone, for your patience and support throughout this entire run. It ended up being FAR bigger than I anticipated and has encountered it's fair share of setbacks along the way. It's been an absolute pleasure to work on though, and I can't tell you how much I appreciate having had the chance to go on this journey with you all!

Looking forward to getting a few more of these out to people very soon!

Thanks again everyone, and MTFBWY!

Dave
 
Thank you very much Dave, your work is absolutely outstanding!
Looking forward to seeing the V2 in my hands and really proud to be in this epic run.
Once again thank you and all the best from your italian friend.
Enrico
 
De-stenciling is exactly why I was never too interested in doing them! haha. But despite being time consuming and tedious, your attention to detail is top notch. Some great photos
 
Just wanted to share my finished V2 from this run. I ordered the kit and wanted to finish it myself. It took me 5 and a half hours to install stencils, paint, then clean up the saber. I can't imagine how many hours it is taking Dave to do his commission builds.

This is my first V2 that I used stencils on. They are a pain in the butt, but you can't argue with the finished product.

Thanks Dave for doing this run!
 

Attachments

  • PXL_20220527_223846757.jpg
    PXL_20220527_223846757.jpg
    2.9 MB · Views: 147
  • PXL_20220527_223806338.jpg
    PXL_20220527_223806338.jpg
    3.9 MB · Views: 151
  • PXL_20220527_223737103.jpg
    PXL_20220527_223737103.jpg
    3.5 MB · Views: 161
Just wanted to share my finished V2 from this run. I ordered the kit and wanted to finish it myself. It took me 5 and a half hours to install stencils, paint, then clean up the saber. I can't imagine how many hours it is taking Dave to do his commission builds.

This is my first V2 that I used stencils on. They are a pain in the butt, but you can't argue with the finished product.

Thanks Dave for doing this run!
First V2 with stencils?? Killer job on it dude!!
 
Just wanted to share my finished V2 from this run. I ordered the kit and wanted to finish it myself. It took me 5 and a half hours to install stencils, paint, then clean up the saber. I can't imagine how many hours it is taking Dave to do his commission builds.

This is my first V2 that I used stencils on. They are a pain in the butt, but you can't argue with the finished product.

Thanks Dave for doing this run!
Awesome job Matt! Looks great! (y) And that's good going! Five and a half hours to weed out, stencil, paint and de-stencil?!? :oops:

I'm up to my eyeballs in stencils for the third and final batch right now and they are indeed a pain in the butt! :lol:

PXL_20220527_145434145~2[12560].jpg


Nearly done with weeding them all out... o_O
 
**Update**

Hi everyone. It's been a while, so I thought that an update was in order...

This last batch is made up almost entirely of V2's, save for one motorised stunt (which doesn't require starting just yet). So I'm concentrating on getting each individual task 100% complete for the entire batch. This can make it appear like progress is slow. Weeding out the stencils took the best part of a week! o_O It's nice to know that they're done though, and ready to apply as needed:

PXL_20220527_145434145.jpg


Emitters have all now been removed and cleaned up, and have had the damage applied (for those who requested it):

PXL_20220607_090343630~2[12936].jpg
PXL_20220612_085019538[12918].jpg


Booster damage has been applied to the body sections too (again, for those who requested it):

PXL_20220612_091158991[12917].jpg
BOOSTER DING.jpg


All un-darkened commissions have now had their stencils applied and are ready for painting!

PXL_20220607_155743224~3[12940].jpg
PXL_20220608_131755150~2[12939].jpg


Before moving on to painting though, I'd like to catch up with those commissions which require A14 (chemical darkening). This is the task that I'm on currently, and once these are finished, and have had their stencils applied, I'll be moving on to painting the entire batch together.

PXL_20220612_093031847[12915].jpg
PXL_20220612_093436257[12913].jpg


PXL_20220612_101938471[12911].jpg
PXL_20220612_102138728[12910].jpg


PXL_20220612_104631107[12909].jpg
PXL_20220612_112318279[12908].jpg


I plan on spending the whole day tomorrow concentrating on hopefully getting the rest of the darkening done. (y)

It's not as easy as simply immersing each piece unfortunately. Each part has to be rubbed down with wire wool first. After darkening, the black layer that you can see in the images above then has to be cleaned off, to reveal the darkened metal underneath. It's a nasty, dirty, hazardous job! :sick:

As with all of these tasks, they can't be rushed I'm afraid. It is my aim to be moving on to painting at some point this coming week though!

Until then, I'll be locked in the bathroom looking something like this:

PXL_20220612_092811238[12916].jpg


Hope progress is ok for everyone anyway. If you have any questions, please do get in touch.

Thanks for your patience everyone! And for all the kind words from those who have received their batch 2 commissions! I really appreciate it!

All the best, and MTFBWY!

Dave
 
So I didn’t realize until after my V2 was chemically aged and all stenciled up that I forgot about the scorch mark on the emitter. I think most people use aluminum black and a Q-tip to get that effect after A14 aging and before stenciling. I’d like to avoid removing the stencils at this point, though I do have a spare set. I’m wondering if anyone has used the Tamiya weathering set or dry brushing paint to get the scorch mark successfully after painting?
 
So I didn’t realize until after my V2 was chemically aged and all stenciled up that I forgot about the scorch mark on the emitter. I think most people use aluminum black and a Q-tip to get that effect after A14 aging and before stenciling. I’d like to avoid removing the stencils at this point, though I do have a spare set. I’m wondering if anyone has used the Tamiya weathering set or dry brushing paint to get the scorch mark successfully after painting?
Hi Drew.

I use Tamiya Powder for the scorch marks. As well as the dirt in the grenade section and under the clamp overhang.. It's obviously not as hard wearing as applying Aluminium Black before the paint. I've found that applying it using makeup applicators and then rubbing off with cotton pads, and repeating until it eventually doesn't rub off works well. Also, if left exposed long enough, it hardens over time too (like oil paints I guess?). I use the powder, as visually, I like that its clearly above the paint. It can be locked in with clear coat of course, but I prefer to avoid that. I kind of see it as a real addition of dirt, which would rub off in the most exposed areas, and remain in the harder to reach areas.

Awesome, thank you Dave!
 
**update**

Hi everyone. just a quick update to let you all know that the first five commissions from Batch 3 are finished and booked in for collection! I was hoping to have them go out Friday, but JUST missed it. :rolleyes:

288933879_458078369482267_718970389939466368_n.jpg
288643052_1665259760524969_5562095029046429550_n.jpg

289523302_586580673185560_2788464771229665500_n.jpg
289645418_328068102857657_925798803475755323_n.jpg


These first five had a slight head start as they are in the shiny on-set style, so no darkening. All darkening has been long finished though, and I'm working my way through getting the remaining commissions painted and finished.

287692428_10224458306639445_1073928087221047297_n.jpg
287526542_10224458306599444_4810414555494873490_n.jpg

287686108_10224458306679446_4074185885729632356_n.jpg
288994004_10224458306719447_1833558228539100420_n.jpg


There are a handful of V2 commissions that have Batch 1 & 2 Obi Stunts waiting to be sent out with them. These will be my next priority, and should have those finished this next week hopefully. (y)

I'm still very conscious that people have been waiting a long time now for this final batch to be completed, but obviously giving each and every commission the time and attention it deserves (as you'd expect). The finish line is very much in sight though, and I'm looking forward to everyone receiving theirs. :)

Thanks again for your patience everyone!

All the best and MTFBWY!

Dave
 
I still need to do some weathering, and a little bit more paint cleanup, but I’m calling this 95% done. Really, really happy with how this turned out. Thanks for another awesome run Dave!

9ABAD658-8880-4888-AADD-E0FF88699EC7.jpeg

3DAD8E9E-E58B-443F-B129-351E77597763.jpeg

With friends:
E4E834A5-8BBF-46D0-A1C4-4E67C1E89824.jpeg

From Left to Right: DaveP Yuma, ISYHCANL, Hero, V2, PPP V3 Exhibition, PPP V3 Stunt, and of course DaveP V2 ANH Stunt on bottom.
C767A123-2476-46F9-BEB1-1A854F53EF7B.jpeg
 
Well I finished painting and wiring up my ANH stunt, but I’m confused as to how I’m supposed to wire up the battery pack to connect to the saber. Here is everything I have left:

D5F4A6A4-8908-4A94-8C67-ECE944987812.jpeg
 
Well I finished painting and wiring up my ANH stunt, but I’m confused as to how I’m supposed to wire up the battery pack to connect to the saber. Here is everything I have left:

View attachment 1594585
Hey Drew.

Great job on the painting. The jack on the battery pack needs to be cut off and replaced with Anderson connectors. Then the wire you have left needs the connectors at each end too. The kit should have enough connectors and covers, but let me know if you're short of anything.

The positive wire on the battery pack is the one with the long dashes along it. If you always keep the positive wire to the left when joining the connectors together, it should keep the polarity correct.

Hope that makes sense.


Cheers,

Dave
 
Hey everyone! Needing some help. I am having trouble attaching the Graflex clamp to both my Obi stunt AND my Luke V2. Its like I can't quite get them tight enough to not just fall off of the saber.

I am really struggling. Any help or tips would be so appreciated!

Also: the square nut sits on the outside of the left clamp bar, correct?


-Thanks!
 

Your message may be considered spam for the following reasons:

If you wish to reply despite these issues, check the box below before replying.
Be aware that malicious compliance may result in more severe penalties.
Back
Top