You are using an out of date browser. It may not display this or other websites correctly.
You should upgrade or use an alternative browser.
You should upgrade or use an alternative browser.
New Luke ROTJ hero lightsaber model-Check out pics
- Thread starter Anakin Starkiller
- Start date
CrankyScorpion
Active Member
Yeah, the red LED looks sunken in in some of the other photos.
Looks great! Maybe they're right and were not quite there, but it looks great. Also nails the ISYHCANL for me, imagine yours a little blurry and the shadows/silhouette match!So, yeah I threw this together over the last couple hours. Went ahead and printed a couple proto T rails and cut some angle brass from C channel.
It's an old Rylo hilt I've had for years and years.
Also did the ISYHCANL setup for a sec earlier. That was pretty straightforward.View attachment 973426 View attachment 973427 View attachment 973429 View attachment 973432 View attachment 973433 View attachment 973434 View attachment 973435
Joek3rr
Master Member
Is the plate there too?! Guys I see a light pixel in the far corner - is that the gap between the box and the plate with triangle LEDs? It's just under the far Brass rail corner, dead center.
View attachment 973344
I also edited the other one I posted, doesn't look like it helped.
View attachment 973345
I believe the LED's and plate were added on for Cave Build scene. I wouldn't be surprised if there was switch inside the box that Mark activated with the little tool he has.
I thankee kindly, sir!
And as I type this, yet another version of rails and black buttons just finished printing!
Ugh, I tell you whut, it don't ever eyund!!
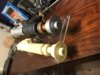
One thing that would be nice, if we could get Slothfurnace or someone else to make us all a more accurate edge connector card!
One with the Blue/Green base/backing lines with gold contacts.
Or is it actually copper? It's difficult to tell. This Rylo hilt I've got actually originally came with a copper card with dark green (painted, I think) lines, and it does look really close. Unfortunately, the green paint chipped away over the years, and I was forced to polish it away and cut thin strips of tape to use instead.
Apologies for the quality of this pic, the cards weren't what I was focused on when I took it!

And as I type this, yet another version of rails and black buttons just finished printing!
Ugh, I tell you whut, it don't ever eyund!!
One thing that would be nice, if we could get Slothfurnace or someone else to make us all a more accurate edge connector card!
One with the Blue/Green base/backing lines with gold contacts.
Or is it actually copper? It's difficult to tell. This Rylo hilt I've got actually originally came with a copper card with dark green (painted, I think) lines, and it does look really close. Unfortunately, the green paint chipped away over the years, and I was forced to polish it away and cut thin strips of tape to use instead.
Apologies for the quality of this pic, the cards weren't what I was focused on when I took it!
Last edited:
I was thinking the same thing, but if it is any wider, it ain't by much.
Just look at the pic with the control box guts showing. It's pretty narrow.
The gold card I'm using at the moment is 15.9mm wide, I'd say the real card probably isn't any wider than 16.5-17mm, but that's just my guess.
Just look at the pic with the control box guts showing. It's pretty narrow.
The gold card I'm using at the moment is 15.9mm wide, I'd say the real card probably isn't any wider than 16.5-17mm, but that's just my guess.
So I did some more messing around with the rails last night, it's impossible to find K&S angle brass in this town!
I did, however, find some Plastruct (stupid expensive for what it is!) and Evergreen shapes and some rectangular brass tubing.
There's an online store, hobbylinc,
Plastruct I Beam ABS 5/8 (3) Model Scratch Building Plastic Sheet Rod Tube Strip #90031
that's based here in Atlanta, but there's no storefront. I ordered some angle brass and some shapes in grey ABS, so we'll see what that's like. I wonder if it was grey ABS that they actually used (leaving no need to paint the white styrene), since it's available to model builders in the same shapes as white styrene.
But I managed to cut some new brass rails and tried to figure out what they could've thrown together to do the reveal box with the styrene I got.
I didn't take pics when I was finished, but I will this afternoon. I ended up adjusting my models and printing new plastic rails, and filed the brass so each L was about equal in length and width. It turned out looking better than my cut-up C channel, so I'm happy with that.
Also, the newest version of printed rails holds the card pretty snug, so there's very little wiggle, and it's a good pressure-fit for "revealing" the box guts. Not too loose, not too tight.
Promise I'll take more pics later!


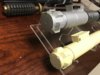
This last pic shows what I think whoever built the rails might have done. Use one T section to hug the corner of the box, and another smaller one to create a track for the card. Part of the smaller T section could've simply been cut away, making an L (or they could've simply USED an L), but I don't show that here. But my model is basically that, if you break it apart into separate shapes.
I did, however, find some Plastruct (stupid expensive for what it is!) and Evergreen shapes and some rectangular brass tubing.
There's an online store, hobbylinc,
Plastruct I Beam ABS 5/8 (3) Model Scratch Building Plastic Sheet Rod Tube Strip #90031
that's based here in Atlanta, but there's no storefront. I ordered some angle brass and some shapes in grey ABS, so we'll see what that's like. I wonder if it was grey ABS that they actually used (leaving no need to paint the white styrene), since it's available to model builders in the same shapes as white styrene.
But I managed to cut some new brass rails and tried to figure out what they could've thrown together to do the reveal box with the styrene I got.
I didn't take pics when I was finished, but I will this afternoon. I ended up adjusting my models and printing new plastic rails, and filed the brass so each L was about equal in length and width. It turned out looking better than my cut-up C channel, so I'm happy with that.
Also, the newest version of printed rails holds the card pretty snug, so there's very little wiggle, and it's a good pressure-fit for "revealing" the box guts. Not too loose, not too tight.
Promise I'll take more pics later!
This last pic shows what I think whoever built the rails might have done. Use one T section to hug the corner of the box, and another smaller one to create a track for the card. Part of the smaller T section could've simply been cut away, making an L (or they could've simply USED an L), but I don't show that here. But my model is basically that, if you break it apart into separate shapes.
Last edited:
View attachment 974443
This last pic shows what I think whoever built the rails might have done. Use one T section to hug the corner of the box, and another smaller one to create a track for the card. Part of the smaller T section could've simply been cut away, making an L, but I don't show that here. But my model is basically that, if you break it apart into separate shapes.
I don’t know dan, I think you nailed it here on the left!
It looks freak’n perfect!
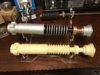
Here's the updated pics, so sorry they aren't on the usual "Picture-takin' Stump" in my carport, I'm not at home, but I have the hilt with me in the car!
Can't wait till the stuff I ordered from hobbylinc comes, so I can do it all over again!


One thing I'm trying to figure out is whether my control box is too short, or if the triangle LEDs were glued on too high up the side, or what.
Because there's more space between the triangle LEDs and the bottom of the grey rail on the real prop.
Oh, and here's a pic of the updated model!

Can't wait till the stuff I ordered from hobbylinc comes, so I can do it all over again!
One thing I'm trying to figure out is whether my control box is too short, or if the triangle LEDs were glued on too high up the side, or what.
Because there's more space between the triangle LEDs and the bottom of the grey rail on the real prop.
Oh, and here's a pic of the updated model!
Last edited:
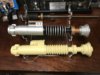
Here's the updated pics, so sorry they aren't on the usual "Picture-takin' Stump" in my carport, I'm not at home, but I have the hilt with me in the car!
Can't wait till the stuff I ordered from hobbylinc comes, so I can do it all over again!View attachment 974511 View attachment 974512 View attachment 974513 View attachment 974514 View attachment 974515
One thing I'm trying to figure out is whether my control box is too short, or if the triangle LEDs were glued on too high up the side, or what.
Because there's more space between the triangle LEDs and the bottom of the grey rail on the real prop.
Oh, and here's a pic of the updated model!View attachment 974579
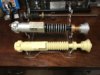
Beautiful work dann... remind me who’s made this hero?
Thanks man! This was from a run that Rylo did years ago.
The pommel cubes are too narrow and too long, and I had to fake the uneven rings with paint, but overall it's still a nice hilt.
Oh, and the neck is actually copper, I just painted over it.
The tri-ring is also not what it originally had on it. The original was too big and the wire it was made from was too thin. This new one is from Roman, but it's too big, too. Though the wire diameter is closer to correct.
And the control box is a few millimeters too short, but it's close.
Last edited:
Here's the updated pics, so sorry they aren't on the usual "Picture-takin' Stump" in my carport, I'm not at home, but I have the hilt with me in the car!
Can't wait till the stuff I ordered from hobbylinc comes, so I can do it all over again!View attachment 974511 View attachment 974512 View attachment 974513 View attachment 974514 View attachment 974515
One thing I'm trying to figure out is whether my control box is too short, or if the triangle LEDs were glued on too high up the side, or what.
Because there's more space between the triangle LEDs and the bottom of the grey rail on the real prop.
Oh, and here's a pic of the updated model!View attachment 974579
Wow—that is outstanding work!
Try to ignore that guy, speaking to you , telepathically, when you fiddle with innards of the control box, saying:
“Dan...Daaaaaaaann..join me on the dark side...it is the only way...Daaaaaann...Daaaaaaaaaaaaaann...”
")
Last edited:
Dann, maybe see if someone can send you some nice pictures of the control box from the resin castings that are out there. I sold my untouched one a while back, and don’t see any good pictures saved, but there are some good details cast into it.
Attachments
-
 2CC2F957-6AE0-42FB-B274-EF7F97F32BBF.jpeg2.9 MB · Views: 210
 -
 0869AF1F-9950-46BA-86C7-E3B0E8B27CF1.jpeg2.5 MB · Views: 197
 -
 484FBA0E-FBEF-4EF6-9C4F-7A38CE14BB1F.jpeg2.6 MB · Views: 195
 -
 E734426B-CCA3-4E5A-BBE2-9DA694B548B2.jpeg2.8 MB · Views: 197
 -
 742726D1-53DA-47EE-B6C3-6209B5CD5A8C.jpeg2.9 MB · Views: 200
Similar threads
- Replies
- 25
- Views
- 4,253
- Replies
- 316
- Views
- 63,063
- Replies
- 326
- Views
- 56,171