I need advice on finishing a 3D printed Babylon 5 PPG

modelnut

Active Member
Hello all!

I just got a 3D printed Babylon 5 PPG off of Etsy today. The scan lines really show. I have some high build primer that I will start applying tomorrow to try to fill those lines. But I need some advice an making it look like smooth metal. What should I do?

I plan on hollowing out the plastic and putting lead inside to give it weight to make it seem more like a real handgun.

Any advice would be helpful.

- Leelan

il_1140xN.957950502_l3ft.jpg


I would like to get as close to this as possible.

7b79917ce4cd09dc6b61866f10d1b698.jpg
 
Last edited:
What I did with mine was replace the outermost side faces with thin styrene sheet, then used Molotow chrome paint to get a (hopefully) convincing finish. If I can find pics, I'll post.

Here's a pic from my old thread:

img_20190614_085804127-jpg.jpg
 
You will have to sand down the exterior, but that will only get you part way. Sanding also removes detail, or at least rounds it off if not careful. You can also purchase photopolymer resin meant for 3d printers, and dip the part in, and allow to drip off, then cure with a UV light.

Cutting into PLA probably won't go as you would hope. The stuff melts very easily, and most likely you will destroy all the support structure under the skin of the PLA. It is possible, you just have to be very careful.

TazMan2000
 
I am a big fan of xtc resin for cleanup. Apply thin layers. You can even add pigment or metal mica dust powder to the xtc. Sand with 180 or higher grade sand paper.

Once it is smooth, Rustoleum aluminum is pretty good, or if you applied metal mica powder you can just pretty it up with clear coat.

Depende8ng on how overboard you wanna go....

Make this one pretty then use it to make a mold and cold cast copies out of resin and metal powder.
 
I printed one out of Petg a few years ago but it has gone nowhere because conventions banned even fake weapons.
 

Attachments

  • 20211112_210238.jpg
    20211112_210238.jpg
    4 MB · Views: 94
I am a big fan of xtc resin for cleanup. Apply thin layers. You can even add pigment or metal mica dust powder to the xtc. Sand with 180 or higher grade sand paper.

Once it is smooth, Rustoleum aluminum is pretty good, or if you applied metal mica powder you can just pretty it up with clear coat.

Depende8ng on how overboard you wanna go....

Make this one pretty then use it to make a mold and cold cast copies out of resin and metal powder.
A similar trick is to apply 3D printing resin, cure it with a UV light, and then sand that smooth.

Just be careful applying the resin as you can lose detail if applied too thick.

Sean
 
A similar trick is to apply 3D printing resin, cure it with a UV light, and then sand that smooth.

Just be careful applying the resin as you can lose detail if applied too thick.

Sean

I have not found a uv resin that comes in metallic. That would be super cool! I know someone had a thread about a spray paint resin that looked like metal, and even had bits of metal in it. UV resin has all those cautions associated with it as well!

PLAs , like silky, print shiny metallic, but are soo delicate!

Thinking about it now, I would prolly use my printed PPG as a reference to make a metal one, like out of aluminum.

I have a thread where I made a Fallout 4 Gamma Gun , with narration sung like John Bolton!) Showing how I modelled a gamma gun out of paper and made out of aluminum.
 
That all sounds good. Not sure which ones I can swing. I thought that it might be good to replace the molded screws and bolts with real ones. That would make plating the gun easier. And the real deal would not need painting. I wonder if Lowes would get excited if I brought pieces of my "ray gun" into the store? :(

- Leelan
 
Cutting into PLA probably won't go as you would hope. The stuff melts very easily, and most likely you will destroy all the support structure under the skin of the PLA. It is possible, you just have to be very careful.

TazMan2000

I think I would only drill in just so far. I bought ten packs of lead bobs used for fishing. Once I have the parts hollowed out enough to put them in I was thinking about securing them with 5-minute epoxy. That would keep them from rattling around and make the piece more solid.

- Leelan
 
Progress.

F1ZCI6WyJ1cm46c2VydmljZTppbWFnZS5vcGVyYXRpb25zIl19.jpg


dWQiOlsidXJuOnNlcnZpY2U6aW1hZ2Uub3BlcmF0aW9ucyJdfQ.jpg


Those spaces are filled with lead sinkers and sealed. I will check tomorrow afternoon to see if they are heavy enough. I want it to have heft. But I don't want it so heavy that bits might break if it falls to the floor. It is plastic after all.

- Leelan
 
I've never had much luck in drilling large holes into 3d prints. The internal supports usually guide my drill to where I don't want it to go. Looks like you have better luck than me.

TazMan2000
 
Last edited:
I use glazing spot putty, or miliput to fill holes, cover up imperfections in the print, or to smooth out some of the step patterning.

I use Rustoleum 2 in 1 sandable primer to start. Don't use regular primer, you want a particulate "filler" primer. I use automotive style. Works for me.

You can sand the PLA before priming if you want to. I don't. I do 2 to 3 coats. Sand it with waterproof 220 grit. I clean up edges and rougher spots with needle files (they work great on PLA, especially smaller prints) then do another coat or 2 of primer. Sand it again, file more if needed.

Give it a hit of black, see what looks smooth and what does not. Repeat smoothing as needed. You might find with 3D printed stuff you need to do it twice over.

I like ultra flat black from krylon as a black base for my silver paints. For Chrome/Silver I use Rustoleum Imagine mettalic silver. It's only sold through Target, so I order it online because we don't have a target store where I live.

Anyhow, for a rattle can it's the best metallic silver I have seen. Highly reflective without being mirror like and it can be handled once it's fully cured with no fingerprints or dulling.

A few examples of this process:

silverhand5.jpg
silverhand1.jpg
silverhand3.jpg
silverhand4.jpg


Hops this helps! Molotow is great for a mirror chrome finish as well.
 

Attachments

  • silverhand2.jpg
    silverhand2.jpg
    630.1 KB · Views: 63
  • silverhand3.jpg
    silverhand3.jpg
    582.6 KB · Views: 65
  • silverhand4.jpg
    silverhand4.jpg
    747.5 KB · Views: 65
  • silverhand3.jpg
    silverhand3.jpg
    582.6 KB · Views: 61
Thank you!

I was planning to use Vallejo Chrome Silver through my airbrush. But I don't know how durable that acrylic might be. Not that this ray gun will get much handling once it is finished. I will take it to my model club meeting at the end of the month hopefully. I wonder if I could eventually work up a travel case for it? That's a thought.

- Leelan
 
NICE!

I cut one more space to add weight to my prop. My Dremel did create two depressions that need filling. I covered them with Bondo Spot Filler. Should sand smooth tomorrow. Then I will start applying the High-Build Primer.

- Leelan

F1ZCI6WyJ1cm46c2VydmljZTppbWFnZS5vcGVyYXRpb25zIl19.jpg
51QB4HcyzoL._AC_SS450_.jpg
 
OK. This the model with numerous coatings of Bondo Glazing and Spot Putty and a can and a half of high build sandable primer. The kit did not come with the gunmaker's crest that is supposed to be on the grip. I will attempt that with putty this weekend. Then I will think about weathering.

It isn't as good as I had hoped. But it is better than one I bought on eBay several years ago. I wish I could get a "hero" version. But if any are out there they would probably be out of my budget.

BTW the cap is removable. It is held in place by friction and two magnets. I havent used any glue at all. The pieces fit together so tightly that I don't need to use any glue.

- Leelan
 

Attachments

  • Gun 008.jpg
    Gun 008.jpg
    606.7 KB · Views: 75
Last edited:
Noeland,

I used Rustoleum Imagine Mettalic Silver over black primer as you suggested. It worked a treat! Thank you for the tip. :D

- Leelan
 
OK. I thought I would take a shortcut and bought a Pachmayr 03252 grip on Amazon. It is supposed to be what was used on the show according to an old post on this board. But it appears to be a significant percentage too small for my 3D printed gun.

See?
F1ZCI6WyJ1cm46c2VydmljZTppbWFnZS5vcGVyYXRpb25zIl19.jpg


What went wrong?

- Leelan
 
Last edited:
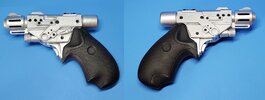
New account - thought I'd post something since I've come across this very thing and have been poking at this for the past few days. I like the feel of the Pachmayr grips (added weight, texture), as well as adding some "practical" components to the mostly printed plastic build - but I wouldn't describe using 03252 grips as a "shortcut" by any means.

"What went wrong?" I'm not sure about "wrong" so much as "different". I believe the printed grip is indeed upscaled a bit to work better with the 3d printed body. BUT, with a bit of creative cutting, I think I'm much closer to adapting the 03252 Pachmayr grips and the body to work with each other.

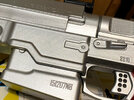
On the grip side - these grips are designed to work with a particular pistol frame, where the 3d printed design is mostly flat in those areas. That means cutting out a lot of material to make the inner surfaces of the grip mostly flat. Keep in mind, there's metal in those grips, so there's only so much you can cut before you hit metal. Here's how much I've cut out of mine so far to get my current "starting to get into the ballpark" state:
ppg-03252grips.jpg

(Ignore that angle cut in the inside top curve of the left grip, I was... overly aggressive there early on.)

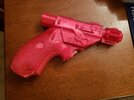
On the 3d pistol body side - First of all, props and respect to these model designs, I used the krismcewan remix (Babylon-5 PPG Pistol Remixed. by krismcewan) of metaform3d's model (
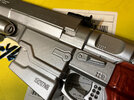
Babylon-5 PPG Pistol by metaform3d). I'm pretty happy with this model... except for the fact that it's designed for using the 3d designed grip which, again, appears to be upscaled. Since it's designed to work with the matching 3d designed grip, it's missing the curve at the top of the right-hand grip - without this curve, it simply won't work with the Pachmeyr. So... we remove material and make it curvy again (pardon the rough hand dremel work).
ppg-allhailthecurve.jpg


Clamp in place, and the now flat interior of the grip lies flat against the 3d body
ppg-pachyright.jpg


Get the other side clamped flat and... lo and behold, we have a gap that appears to be in parity with that "fin" of metal in the center of hero props/Nicksdad replicas.
ppg-datfin.jpg


In short, with a little bit of work, it looks 03252 Pachmayr grips can be made to work w/ 3d printed pistol bodies as well.

Fun things to remember:
Rubber resists and flexes during cutting - makes cutting the grips interesting, especially around edges. Take it slow and give yourself time to figure out the feel.

TO DO:
1. Figure out how I'm going to fill the above gap.
2. Fine tuning cuts and figuring out the right "grip angle".
 
Last edited:

Your message may be considered spam for the following reasons:

If you wish to reply despite these issues, check the box below before replying.
Be aware that malicious compliance may result in more severe penalties.
Back
Top