The grenade neck has been updated. Thanks to a youtube video I saw that there were actually two holes in the side for pins that hold the detonator pin in place. That was pretty hard to see from pictures. Also that those holes are not threaded.

Again, ANY help in this project would be much appreciated. Even if it's just a length or a width or a diameter.

Thanks!

Sabs
 
Good work on this.
One thing to keep in mind is that because of the era in which many of these pieces were designed and manufactured, many single items were rushed in one or more of those areas as well as due to necessity, often being produced by different manufacturing houses. We had the same thing going on in WWII here in America with four separare manufacturers producing the M1911-A1 pistol. There are vast differences in build quality between the four houses and between individual houses by year.
I mention this most specifically regarding the grenade as there might be some sections with great variation not to mention the MOD was also continuously tweaking each grenade design as the war progressed and as word from the front came back. With the Hales grenades, each new model was not a close but different variation on the previous model but usually had an entirely different effect that was desired, thus there are an incredible number of model designs as well as variations in shape, delivery type, launch type, propellant/explosive used, etc.
I say none of this to dissuade you as this is a great project, but just as a notice that you may get various measurements from different members and they could all be correct.
Yes I know. This grenade was only used in 1915 and then they moved onto the MK.2 because this was too hard to make. But if there is variations that’s also a great reason to do this, to find the minimum and maximum of each part. And even how much corrosion has taken away from a fresh and still painted parts I saw some people have.

As of yet the support for this project has been nearly only encouraging words but no contstructive measurements. But even if this takes a very long time it will eventually be finished.
 
Last edited:
I've found the data sheet for the TO-99 motorola transistors and have uploaded it (page 18 of 22 in the pdf), so I don't have to redo the technical drawings for it, but I did model it :)
 
This puzzles me. Why would they do that? I wouldn't think there's a big enough market to make something like that even remotely worthwhile.
They sold it cheaper, but according to the Graflex Bank website, it's been resolved (unless it's a different issue). I think there are a lot of people not on this forum that are dueling with these replicas not just displaying them, and that's the larger market for the Chinese.
 
Hey Joe! To be honest, all of them. This whole project is guess work from images. My ultimate wish would be for a very patient person to print out all the drawings I’ve posted, and correct the numbers in red ink after comparing measurements to the real parts. Then scan the pages and send them to me so I can update the files and post them here.

I know it’s a lot to ask of one person which is why if even a few parts are corrected over time by the whole community, it would be great. Also then we could see the tolerances of parts if many ppl corrected things independently.

So in short, anything you want to measure would help!

Thanks,
Sabs
Do you still need someone to do this? Or has Joe got you covered?
 
Do you still need someone to do this? Or has Joe got you covered?
I haven’t heard from joe, but the more measurements the better! Then I can add tolerances and can see how much each part varies!

Best bet would be to print out the pages and try your best to duplicate each number on the page.

I made the file in millimeters but since all the parts are English and American there’s a good chance the parts will have rounder numbers in inches.

Thanks for your help!
 
As I suspected. The question is which thread type did they use, because the British have a few to choose from.
 
Hey Sabs ! The British were probably using the B.S.W. (British Standard Whitworth), but the grenade parts do line up with S.A.E. guages, and S.A.E. was around back then as well.

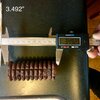
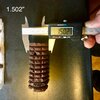
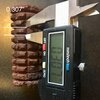
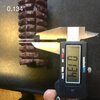
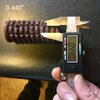
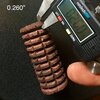
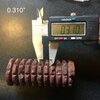
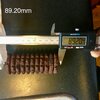
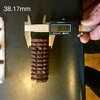
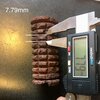
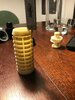
The Ti's were probably all inch measurements too since they were from Dallas Texas. Though the only solid fractional measurement on the stupid thing is that the Bubble Strip is 1/2" in width. Then there's the 2.5mm spacing on the circuit board, but nothing else measures out to a solid metric measurement. Texans, they do it their own dam' way. GO FIGURE!

The A.S. knobs are equally strange! I don't think a single measurement was used to create them. I'd bet they were hand spun, milled, modelled onto, and then cast from that original part.

Now, in stark contrast, our hallowed Grand Master, Oscar Steiner, was a man of measurement. Everything on a GRAFLEX lands on a solid fraction. Thank the Maker!

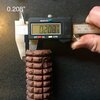
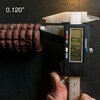
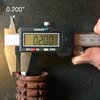
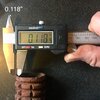
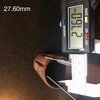
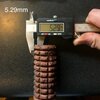
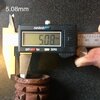
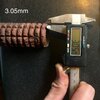
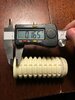
And just to echo what others have already stated, most of the major original Obi-Wan Lightsaber parts were made from items that were created using inches as their unit of measure. I think it's sad that you're doing all this work in the metric system, it just doesn't feel correct. For all the time and effort you've put in to the drawings of this project, they really should be in inches. I think it would be all the more impressive if the drawings you are recreating were accurate to their creators' system of measure. The accuracy would therefore be the intent of the creator, rather than the inaccurate result of the manufacturer. For instance, if you measure a cylindrical part at 16+ places, you might get 16+ different measurements if you're using 1000ths of an inch, but if you were using fractions of an inch you might get half or even fewer different measurements. Not to say that you couldn't take all those 1000ths/in measurements to get the average and then try and figure out what the intended fractional size was supposed to be, but it wouldn't be right to say that an object was 95/128" when it was designed to have been 3/4". Even if you said it was 19.05mm, it would still be wrong. Now if you wanted to say it was 3/4" +/- 0.0025"(or whatever the average variance seems to be), that'd be spectacular!

Anywho, the soapbox I created there seems to measure out at 3' L x 2' H x 2' W, but I made it out of wood 2x4's sooo.... ;)

It'd be really neat to see all of the different parts in a single drawing! Kind of like an assembler's guide/exploded view, with each part in order of its place on the lightsaber.

Good Luck with the rest of the project!

p.s. you have the drawing names for the Balance Pipes misspelled as "Balence".
 
Thanks for the suggestion. I can of course convert everything to inches with a click of a button and provide the drawings in both. Not possible to write them as fractions I’m afraid. Once I get some real number from ppl I will put it out.

Good catch on the spelling. Thanks!
 
Here you go inches:
 

Attachments

  • E8868FA3-653F-4DDB-90FD-E8A8D8C764B2.jpeg
    E8868FA3-653F-4DDB-90FD-E8A8D8C764B2.jpeg
    916.9 KB · Views: 206
  • 949E3425-D975-4099-AE6C-21F7DC434211.jpeg
    949E3425-D975-4099-AE6C-21F7DC434211.jpeg
    945.9 KB · Views: 197
  • D86A6EEB-381D-4C31-A9B5-E5BD5BF4888C.jpeg
    D86A6EEB-381D-4C31-A9B5-E5BD5BF4888C.jpeg
    684.5 KB · Views: 191
  • 36F7079B-D400-43E0-B7A2-A061736BEABB.jpeg
    36F7079B-D400-43E0-B7A2-A061736BEABB.jpeg
    685.1 KB · Views: 190
  • 51A3C8E7-4DCA-442C-A967-F3D38806221B.jpeg
    51A3C8E7-4DCA-442C-A967-F3D38806221B.jpeg
    736.8 KB · Views: 181
  • 94AE5284-C31C-4CD7-9069-9BA2E514AB8F.jpeg
    94AE5284-C31C-4CD7-9069-9BA2E514AB8F.jpeg
    974.7 KB · Views: 185
  • 7E024824-EF9B-4298-A9E4-E60FFD8857DC.jpeg
    7E024824-EF9B-4298-A9E4-E60FFD8857DC.jpeg
    791.4 KB · Views: 174
  • 976566F6-A879-479C-95B9-058024E5F249.jpeg
    976566F6-A879-479C-95B9-058024E5F249.jpeg
    885 KB · Views: 181
  • 8A2B9DF3-68A9-4590-9CD5-6F579BE80189.jpeg
    8A2B9DF3-68A9-4590-9CD5-6F579BE80189.jpeg
    839.8 KB · Views: 177
  • AEBD628F-6F1B-4A62-99F9-A7BA6B8124D2.jpeg
    AEBD628F-6F1B-4A62-99F9-A7BA6B8124D2.jpeg
    718.1 KB · Views: 168
  • 869FE528-E966-487E-A172-F0CAA81FA64D.jpeg
    869FE528-E966-487E-A172-F0CAA81FA64D.jpeg
    831.5 KB · Views: 173
  • 993BDD50-11D4-4B05-AEBA-2A0116A2B204.jpeg
    993BDD50-11D4-4B05-AEBA-2A0116A2B204.jpeg
    689.9 KB · Views: 170
  • 904F493C-75A5-4F32-B6CC-57177931C245.jpeg
    904F493C-75A5-4F32-B6CC-57177931C245.jpeg
    744.3 KB · Views: 169
  • 52CDB878-F32C-4FFF-8EC5-5335908ED842.jpeg
    52CDB878-F32C-4FFF-8EC5-5335908ED842.jpeg
    770.1 KB · Views: 173
  • 1EFE56FE-FBF9-45FE-8581-C2E06E7D47A7.jpeg
    1EFE56FE-FBF9-45FE-8581-C2E06E7D47A7.jpeg
    817 KB · Views: 184
  • ECD59B16-BCC0-404A-91DF-75728D5459BE.jpeg
    ECD59B16-BCC0-404A-91DF-75728D5459BE.jpeg
    800.8 KB · Views: 189
Here you go mm:
 

Attachments

  • 9D0B9F5B-52C1-41C8-8EF8-0EFFCFC57618.jpeg
    9D0B9F5B-52C1-41C8-8EF8-0EFFCFC57618.jpeg
    908.7 KB · Views: 211
  • 803416A5-9381-45AF-9722-15AEA233D7C9.jpeg
    803416A5-9381-45AF-9722-15AEA233D7C9.jpeg
    895 KB · Views: 213
  • 307C9E1A-9628-450C-B1FE-014C857D39EF.jpeg
    307C9E1A-9628-450C-B1FE-014C857D39EF.jpeg
    849.1 KB · Views: 202
  • 700E609F-4F1E-4F55-9EA7-F49FA7CF99FA.jpeg
    700E609F-4F1E-4F55-9EA7-F49FA7CF99FA.jpeg
    682.2 KB · Views: 197
  • 35E28FD2-FDD8-4075-83C9-E402E20F91CD.jpeg
    35E28FD2-FDD8-4075-83C9-E402E20F91CD.jpeg
    731 KB · Views: 159
  • 316E879B-BAB5-4EF6-B9E7-098E23717403.jpeg
    316E879B-BAB5-4EF6-B9E7-098E23717403.jpeg
    872.2 KB · Views: 202
  • 39685FBB-1584-4DE4-9FB9-91B546FC8BBF.jpeg
    39685FBB-1584-4DE4-9FB9-91B546FC8BBF.jpeg
    771.1 KB · Views: 191
  • 59AE770D-3BDE-4234-B6E2-78419620B38B.jpeg
    59AE770D-3BDE-4234-B6E2-78419620B38B.jpeg
    779.2 KB · Views: 152
  • D0AC8E8D-07AB-45EF-B68B-1ECF1E01B0C4.jpeg
    D0AC8E8D-07AB-45EF-B68B-1ECF1E01B0C4.jpeg
    852.4 KB · Views: 157
  • 447A9CAC-75D7-4BB2-A448-D874A3670963.jpeg
    447A9CAC-75D7-4BB2-A448-D874A3670963.jpeg
    750.9 KB · Views: 154
  • 2D7EA5C1-AD04-4579-A94C-45F957542666.jpeg
    2D7EA5C1-AD04-4579-A94C-45F957542666.jpeg
    906.6 KB · Views: 151
  • F9A209B2-4CDD-42D8-A90B-875149D1543D.jpeg
    F9A209B2-4CDD-42D8-A90B-875149D1543D.jpeg
    754 KB · Views: 144
  • BD78B76A-EBB6-4426-A064-75589EEDAF33.jpeg
    BD78B76A-EBB6-4426-A064-75589EEDAF33.jpeg
    788.9 KB · Views: 146
  • 7506A662-C3B4-4ADE-B15F-381CD4F22C84.jpeg
    7506A662-C3B4-4ADE-B15F-381CD4F22C84.jpeg
    780.4 KB · Views: 155
  • B3E26A34-7AF1-4732-8A53-102E7600D3CD.jpeg
    B3E26A34-7AF1-4732-8A53-102E7600D3CD.jpeg
    817.5 KB · Views: 161
Woo! Thanks Mugatu, I’ll update it tonight!

Sabs

No problem. I tried to cut down on variation as much as possible by attempting to only use the most “still complete” points to measure. Still, for some odd reason it was way more difficult than it should have been to take photos with one hand and hold a calipers with the other. Haha

Let me know if you have any issues figuring out what I was measuring.
 
Last edited:
Here you go inches:
These are great, I'm rounding them to the nearest fraction as Ridire Firean suggested. Many of them are coming out to near perfect fractions as it is.

But can I ask for four more measurements?

Inside front (threading) depth
inside back (threading) depth
Length of last knuckle edge to edge
length of first knuckle to edge.


If you use the back of your calipers you can get depth. Can you tell me what these measurements on the real one are? Best practice for taking depth measurements is to extend the calipers more than needed and then bottom the back edge out on the higher surface.

Thanks again for being the first one to help!

Sabs
 

Attachments

  • image1.jpeg
    image1.jpeg
    768.5 KB · Views: 169
  • image2.jpeg
    image2.jpeg
    837.4 KB · Views: 182
  • image3.jpeg
    image3.jpeg
    543.2 KB · Views: 179
  • IMG_7896.jpg
    IMG_7896.jpg
    64.9 KB · Views: 191

Your message may be considered spam for the following reasons:

If you wish to reply despite these issues, check the box below before replying.
Be aware that malicious compliance may result in more severe penalties.
Back
Top