1:1 Wall-E Build - 2014 Halloween Appearance

Re: 1:1 Wall-E Build (WIP) - Pics from his first event

This past week I took a slight detour and revisited an old project. It's not a prop, but a jukebox I built a few years ago that I was never entirely happy with.

For those interested here's a few before/after and progress shots

Original jukebox as built (2x1 interior framework, MDF skin, white Christmas light string for illumination):
10025508453_3ef8fc81fd_c.jpg


Created side and top accent pieces and primed/re-primed all pieces that would look metallic
10025434175_d6d04bb7cc_c.jpg

10025467726_0bdfceb9d3_c.jpg

10025457796_dafa4e36e9_c.jpg


Hit all metallic pieces with gloss black
10025513293_3c3026dc30_c.jpg


Airbrushed the front with a lightening scheme (not sure if Wall-E likes it...)
10025479756_d2913fd35c_c.jpg

10025411224_eb613b7bab_c.jpg


Swapped out the lighting for blue LEDs and rehooked up the electronics/touchscreen
10025442836_8435c5acbc_c.jpg

10025468545_ecefa88541_c.jpg

10025495726_04aa777438_c.jpg


It finally looks like my original "mental picture". Time to turn my attention back to Wall-E (don't these types of mental breaks help reinvigorate your enthusiasm for a project?)

More to come...
 
Re: 1:1 Wall-E Build (WIP) - Pics from his first event

Hey that's great! Post video of it working. I would love to see how the touch screen works.
 
Re: 1:1 Wall-E Build (WIP) - A little detour (done)

Hey that's great! Post video of it working. I would love to see how the touch screen works.

Ask and you shall receive ;)

Wow, looks awesome, both the Wall-E and the jukebox! :)
Thank you very much!

Sorry for the delay in posts. I'm four months through six month of chemo and the aggregate affects are starting to catch up with me -I'm tired a lot and I run out of steam a lot faster than I used to (boohoo, right?) ;)

Also, and probably more of a factor, I was a little burned out on Wall-E -a few weeks break makes a world of difference.

I started working on the tread infrastructure last night. This piece needs to be load bearing, so I went with real wood instead of MDF.

Rough-cut pieces:
10441387566_c820d2f6f1_c.jpg


Rough assembly:
10441552983_06c1e349f0_c.jpg


Bracket details added:
10441395406_345a3db282_c.jpg


Shocks added:
10441385024_f22cd785e3_c.jpg


First coat of primer:
10441419275_2d6eeffa9d_c.jpg


Rough paint and weathering (like the rest of Wall-E, repainting and detailing will happen after full assembly)
10441393854_5a9a066e5d_c.jpg

10441545333_ed5270d158_c.jpg

10441398504_e30d272d93_c.jpg


Thanks for looking, more to come...
 

Attachments

  • 10441387566_c820d2f6f1_c.jpg
    10441387566_c820d2f6f1_c.jpg
    339.4 KB · Views: 70
  • 10441387566_c820d2f6f1_c.jpg
    10441387566_c820d2f6f1_c.jpg
    339.4 KB · Views: 76
  • 10441552983_06c1e349f0_c.jpg
    10441552983_06c1e349f0_c.jpg
    304.6 KB · Views: 68
  • 10441552983_06c1e349f0_c.jpg
    10441552983_06c1e349f0_c.jpg
    304.6 KB · Views: 65
  • 10441395406_345a3db282_c.jpg
    10441395406_345a3db282_c.jpg
    277 KB · Views: 56
  • 10441395406_345a3db282_c.jpg
    10441395406_345a3db282_c.jpg
    277 KB · Views: 53
  • 10441419275_2d6eeffa9d_c.jpg
    10441419275_2d6eeffa9d_c.jpg
    342 KB · Views: 59
  • 10441385024_f22cd785e3_c.jpg
    10441385024_f22cd785e3_c.jpg
    307.1 KB · Views: 57
  • 10441385024_f22cd785e3_c.jpg
    10441385024_f22cd785e3_c.jpg
    307.1 KB · Views: 61
  • 10441393854_5a9a066e5d_c.jpg
    10441393854_5a9a066e5d_c.jpg
    327.5 KB · Views: 61
  • 10441393854_5a9a066e5d_c.jpg
    10441393854_5a9a066e5d_c.jpg
    327.5 KB · Views: 72
  • 10441419275_2d6eeffa9d_c.jpg
    10441419275_2d6eeffa9d_c.jpg
    342 KB · Views: 57
  • 10441545333_ed5270d158_c.jpg
    10441545333_ed5270d158_c.jpg
    382.6 KB · Views: 59
  • 10441545333_ed5270d158_c.jpg
    10441545333_ed5270d158_c.jpg
    382.6 KB · Views: 54
  • 10441398504_e30d272d93_c.jpg
    10441398504_e30d272d93_c.jpg
    339.9 KB · Views: 62
  • 10441398504_e30d272d93_c.jpg
    10441398504_e30d272d93_c.jpg
    339.9 KB · Views: 62
Last edited by a moderator:
Re: 1:1 Wall-E Build (WIP) - Starting on the Treads

A very productive evening last night. Started on the tread tensioners.

A couple of different size PVC pipes and left over rubber stair treads:
10458632763_24aa15aa37_c.jpg


…and primed
10458628923_9f8aa9c091_z.jpg


Gears cut and sanded
10458636603_84297fc37c_z.jpg


Gear detail cut from pink sheet insulation
10458456904_ecc72c23d0_z.jpg


Gear detail shaped with a palm sander and sanding block
10458649283_d249c0a4a5_z.jpg


Gear detail covered with Modge Podge to protect it during painting
10458468314_2b6e065284_z.jpg


Next up: light sanding of the detail pieces and another coat of Modge Podge -then on to assembly.

More to come...
 

Attachments

  • 10458628923_9f8aa9c091_z.jpg
    10458628923_9f8aa9c091_z.jpg
    227.1 KB · Views: 128
Re: 1:1 Wall-E Build (WIP) - Starting on the Treads

Made a Home Depot run and picked up the PVC T-Connectors and other bits and pieces I need to move forward. Hoping for good progress today.

A little more progress on the gears
10476940634_401384f0cd_c.jpg
 
Re: 1:1 Wall-E Build (WIP) - Starting on the Treads

He's really coming along! Looking forward to seeing those gears all finished up.
 
Re: 1:1 Wall-E Build (WIP) - Starting on the Treads

He's really coming along! Looking forward to seeing those gears all finished up.
Thanks SK, me too. BTW, I'm gobsmacked at how stunning your MF cockpit is. Absolutely brilliant work.

More progress on the gears.

PVC "axels" added to the gears and PVC T-joints added to the tensioners
10504929326_80b84e45eb_c.jpg


Lower gearing assembled
10505131543_b6752638b2_c.jpg


Inner gear pieces glued in place
10504938086_6ab603570b_c.jpg


Inner gear brackets added
10504960754_593564736a_c.jpg


Another round of Modge Pode to seal the foam
10505139823_992406e715_c.jpg


…and started to get it all primed
10504927035_a25e4d7323_c.jpg


More to come...
 
Re: 1:1 Wall-E Build (WIP) - Starting on the Treads

So Sunday, between family affairs and the daughter's birthday party, I figured I'd do a mad push to get the tread infrastructure done.

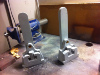
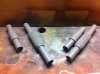
Cut 3" PVC into 2" lengths and cut scrap wood to fill the center of each
10534739855_48d054d9b3_c.jpg


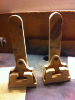
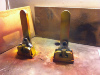
Added the PVC T-adapter to the upper tensioners and added detailing to the outer, upper gears
10534743405_9b0465363e_c.jpg


Added 1" PVC "axels" to each of the gears and joined them to the tensioner (I think they look like the light car from the recent Tron movie)
10534772506_a98cf1f0ab_c.jpg

10534994713_f020513946_c.jpg


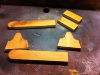
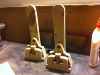
When I built the tread "feet" I miscalculated their width -the lower gear assembly was too thick to fit. So, let's fix them…

I cut off the back post for the two pieces, added an additional center piece, and cut and attached a new support post
10534785876_1479dbd0eb_c.jpg

10535005123_14b562a0db_z.jpg


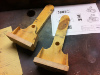
Test fitting of the upper and lower gear assemblies on the tread foot and support piece
10535005123_14b562a0db_z.jpg

10534823544_2bec19e1a3_c.jpg


After reviewing screenshots I'm not at all happy with the color and weathering on the gear assemblies, next task: do them again.

More to come...
 
Re: 1:1 Wall-E Build (WIP) - Starting on the Treads

OH MAN! That is too cool! Very inventive. Excellent stuff! Have you considered doing a second Wall-E but this time as he would look right off the assembly line. :)
 
Re: 1:1 Wall-E Build (WIP) - Starting on the Treads

Seeing this makes me think what my next project should be. Looks great!

-Eric
 
Re: 1:1 Wall-E Build (WIP) - Starting on the Treads

OH MAN! That is too cool! Very inventive. Excellent stuff! Have you considered doing a second Wall-E but this time as he would look right off the assembly line. :)
Heh, heh -you make me laugh. I've got to the part of the project where I can't wait to be done. I can't even wrap my head around the idea of doing another one. How have you managed to maintain your enthusiasm through your MF build?

Seeing this makes me think what my next project should be. Looks great!

-Eric
Thank you!
 
Re: 1:1 Wall-E Build (WIP) - Starting on the Treads

How have you managed to maintain your enthusiasm through your MF build?

I really don't know. I cannot think of ANY project I've worked on where I've maintained this level of excitement for this amount of time. But then again, it is the cockpit of the fastest hunk of junk ever! :) I have to admit, there have been a few times I've wanted to chuck the whole thing into the street and be done with it... but when I stand back and look at the overall project... I am amazed. It's almost become an integral part of my life.

I will say that changing the focus to the quad and the soon to be created display stand really helps.

Now... about your assembly line of Wall-E's? ;)
 
Re: 1:1 Wall-E Build (WIP) - Starting on the Treads

is it this feeling "wow, was it really ME who builds this whole beauty piece of sh.. from nothing?" ?! ;).

EXACTLY! I think we all feel that way during and after a build. :)
 
Last edited:
Re: 1:1 Wall-E Build (WIP) - Starting on the Treads

Great detail on the Wall-E project. how did you come up with the files to cut it out?
 
Re: 1:1 Wall-E Build (WIP) - Starting on the Treads

Great detail on the Wall-E project. how did you come up with the files to cut it out?
Thanks for the compliment. I got my plans/dimensions/measurements from the Yahoo Wall-E Builders Club.

More progress (I'm actually a little further along, but this is what I have pictures of at the moment).

Repaint of the gears and tread tensioners
10534827114_ab080552ce_c.jpg

10534834734_edb47b4186_c.jpg


…and assembled
10534735485_941384bf19_c.jpg

10567087934_53ae501715_c.jpg


More to come...
 
This thread is more than 8 years old.

Your message may be considered spam for the following reasons:

  1. This thread hasn't been active in some time. A new post in this thread might not contribute constructively to this discussion after so long.
If you wish to reply despite these issues, check the box below before replying.
Be aware that malicious compliance may result in more severe penalties.
Back
Top