Hi everyone.
Update for today.
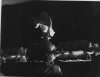
Let me start by saying...airbrushing??? Holy awesome. I thought I had used one before, but I think it may have just been one of those Testors ones that essentially turns their normal paint into spray paint...the cheap one with the propellant can that attaches to it...but this thing?? Wow...it's just amazing. I've never used one like this before and with just a few minutes of practice I was spraying it pretty well...it's just so...natural...I guess. It feels like an extension of your hand. Really cool.
Anyway, I started by painting one of the pieces that will mount to the back of the collar piece. It turned out pretty well.
That tape underneath it was to hold it in place while I used the airbrush. It's a very lightweight piece, and I didn't really want it flying around the painting box I set up. That was just my first go at it...I'll give it another coat to finish filling in the little areas where not much paint ended up.
Next up I started on the control module. I wanted to do this just to see how it would look...the control module connects with the collar piece with glue on the INSIDE of the whole thing, so painting the outside will make no difference in how it attaches to the spine tube or the rest of the model.
It was at this point that I realized I was going to need more paint...so I'll be ordering more of that this evening...probably quite a bit more. The color came out exactly how I hoped it would...very light gray. It's a 3:1 mix of that Tamiya acrylic, so it's easy to get it mixed up in correct amounts.
The nature of the 3D printed parts means that I have to paint from two angles...almost like you were painting a staircase...one pass for the vertical boards, and one for the horizontal boards. The print lines make this necessary, and I didn't realize it at first. Once I started painting from the top down as well as from the side, the color really started to pop. What's really cool is that with the paint on it, from just a few feet away, the lines virtually disappear...so for my purposes, and the fact that I'm happy that I've been able to get this far with this model, I'm going to not worry at all about the print lines.
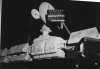
This is the final cargo pod assembly. You can see here how I got them all lined up. I would put the three nuts on the rod, then get them the correct distance apart. I'd then place epoxy on the side that connects to the cargo pod, and then I'd set the pod on top of the whole thing. The rod through the nuts is a good way of making sure that the piece will slide on and off of the rod. I haven't had any issues sliding anything onto or off of the tube that will be getting used as the spine.
Finally, here is my collection of cargo pods...all nine of them that were done, while the last one was on the rod curing. They're numbered because they'll be going on in a specific order.
One thing that I've noticed is that the reference material shows one side of the Discovery having almost no different pods. They are all the ones that have a separation, but with one very small piece. It's also odd that this side of the ship is the hardest side to find any reference material for. It's almost as if they just threw the same parts on that side because it wasn't going to be regularly shown. Typically the ship seems to be shown from the starboard side, and the port side is much more difficult to find reference photos for. For this reason, I'll be using my own artistic license to pick cargo pods that would match the rest of the ship, instead of just using the same ones over and over again.
Finally, I did a really rough mock up of the pods with the couplings, and from my just eyeballing it, everything looks like it's pretty straight. Soon I'll be starting the process of trying to get everything onto the spine rod and straight...that should be...fun.
Anyway, sorry for the lack of pictures the last few days...I'd been printing and reprinting the cargo pods it seemed over and over again. Now I'm at a point where there's not too much I can do until I get the paint for the airbrush again.
***EDIT***
I ordered a lot more paint tonight. I ended up ordering from a different seller, so it might take a bit longer, but it was about half the price. I'm hoping that it will be enough to finish the model.
")