Much appreciated! I was going to release it tomorrow but I'll hold off until I hear from you.
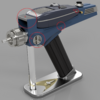
Here's a full STL of the model in it's current state if you want to see it from different angles:
https://www.dropbox.com/s/dinzo8s13x4lng3/Star Trek TOS - Type 2 Phaser v55.stl?dl=1
Here's my "two cents" on your phaser model. Hopefully, you can make sense of it all. Let me know if you have any questions.
Here is a website were you will find great photos:
www.startrekpropauthority.com
And here is a direct link to an actual screen used hero phaser:
Rare Photos of the Greg Jein TOS "Hero" Type II Pistol Phaser
Here are my notes (all "see photos" are in reference to the website listed above. And the below refers to the photos attached):
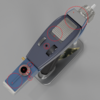
Phaser_Fix_001
1. This top piece was made from a thin piece of aluminum or tin. It actually wraps around the top from back to front. You show this as being inlaid... nope.
2. This "button" was actually the flat side of a piece of acrylic that rotated up to raise the "crispy" (deflector) aluminum grid. It looks inset, which is good, but it doesn't look like enough of the "button" is visible. In this image, it should look a bit "taller" as opposed to "wider." (width is good).
3. This jewel was set on a gold gear-looking like piece. Check out "watch jewel."
4. This piece is VERY specifically ribbed (two down the middle with a ribbed edge on each side) – and that motif continues all the way to the end of piece 7.
5. This knob was notched -- four separate hubs.
6. "The Ten Turn" - This dial was numbered in a circle 1 to 10 - each number separated by 10 tick marks, the fifth "tick" being a line between each number. Each "tick" of the dial would increase the value by 0.1 -- i.e. 4, 4.1, 4.2, 4.3.....etc. Therefore, the dial has 100 total “ticks.” (this may be hard to create, so many modelers leave this out).
7. Once again, this piece has the two ribs down the middle and ribbed edges like piece 4 (It is essentially the same piece, with a hole drilled in it for the Ten Turn. It also terminates at the end of the phaser, not here as in the image.)
8. These look BEAUTIFUL! But, unfortunately, no phaser ever had those fins look so good! They are rounded here, but bend to a right angle before they enter the "body" of the phaser.
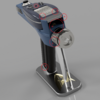
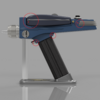
Phaser_Fix_002
1. There is a definite rounded inset "void" area in front of the fins here (see photos). While it looks great, the fins never butt directly up against the phaser body wall as you have them do here.
2. This is NOT the correct shape for this piece! (See photos). Also, this piece fits into a ring that lined the hole. This allowed for it to be turned on the Hero model, so it looked like it did something.
3. YOU'RE MISSING THE BOTTOM CAP AND BRASS PLATE! There was a large brass screw head for the long screw that held the battery pack (handle), an end cap that covered it and a brass plate that covered all of that. Gotta have those if you want to look "authentic."
Phaser_Fix_003
1. "Watch Jewel" -- This jewel looks inset. Nope. It sat on top of a gold "gear."
2. The aluminum "crispy" looks great, but it lay on top of a copper plate (painted black) that raised it when you turned the brass dial. This opening in the top of the P1 was rectangular. So... The crispy shape is fine, but it should look like it is sitting on TOP of this plate and not inlaid like you show it. The corners (2 & 3) under this crispy should be squared, not round (so you have a squared off "shelf" underneath a "crispy" that has rounded corners. Make sense?)
3. See (2) above.
4. The thickness of this side wall of the phaser body looks a bit thin to me. They should be a little thicker.
5. LOOKS GREAT! But... nope. There is a clear plastic (acrylic) window here and it sits in a "ledge" that goes all around the inside. The P1 then just sits behind it... no receptacle looking notch like this.
5A. (Sorry, I miss numbered here) This pattern looks GREAT, but it's not correct. There are no convex parts of the outer rings. And the “ribs” aren't quite right, either. (See photos).
6. It looks like this "trough" between the Popsicle sticks (yes, that's what they're called, because that's what they were -- actually Popsicle sticks slit down the middle and glued onto each side of the battery pack!) is rounded -- convex. Nope. The space between the Popsicle sticks was flat.
Phaser_Fix_004
1. Once again, there is a rounded, inset void area in front of these fins.
2. The P1 was hollow with a top and bottom shell. The side "trim" looks like it's sitting a little too high on the side, and there is no shell seam. We should see a seam here that runs all the way around, front to back. It runs directly under the trim.
3. This seam looks a little too forward and it should be more pronounced. It's a seam, not an edge.
4. Nozzle rings -- These are VERY SPECIFIC -- but this is close (See Photos).
5. Again, no rounded trough, and you're missing the whole bottom cap and plate (Which should be incorporated into this handle's length, not added, because that looks good).
Phaser_Fix_005
1. Top Plate -- made of thin metal -- lays on top and folds over from back to front. NOT INLAYED.
2. This piece lays inside a ring and the "knob" shape is wrong.
3. There is a weird dip in your model's body shape here. Don't know what it is but it makes the side ribs here look like they curve downward -- the body shape doesn't "dip" (curve inward) and the ribs never appear as if they they curve down when they terminate.
4. Nice touch -- the reflection of the brass in the side rib of the P1. NOPE! The ribs were made of aluminum and would never have reflected things like a mirror would have!
Phaser_Fix_006
1. Seams -- one under the side rib from front to back -- the bottom seam looks a little too forward and needs to be more pronounced. It's a seam, not a line.
2. The rounded inset void in front of the fins here.
3. The edges here look fine, but they are a bit too perfect. It's a prop made of fiberglass -- slightly round those sharp edges!
4. (See 3 above).

 www.instagram.com

 www.thingiverse.com


") .
.