You are using an out of date browser. It may not display this or other websites correctly.
You should upgrade or use an alternative browser.
You should upgrade or use an alternative browser.
Show your custom Lightsabers!
- Thread starter GreenCircleCube
- Start date
-
- Tags
- custom highrepublic lightsaber
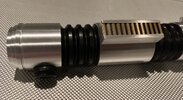
I like it better with the black!Something I've been playing around with. View attachment 1590913
Im just playing with colors right now but i am thinking about stripping the copper and anodizing it black it places.I like it better with the black!
BobasBounty
Sr Member
So I got really bored one weekend and modified one of my custom lightsabers. I showed it here before but since I changed it I figured I would show it off again. This was orginally a comission by Jeff Parks back in 1997. I changed it over the years but recently decided to go back to the original vision (sort of). Anyway, below is my newest (oldest) custom lightsaber. The "gear" button was made by me from an aluminum thumbscrew. I used rattail files to get the shape. The ridged areas are Delrin (original). The thin neck is bronze, though in the photos it looks copper. It had a d-ring on it but I went with a covertech knob (also made of Delrin) instead. Can't remember where I got the control box from. Maybe Custom Saber Shop, years ago. The aluminum is some tubing I cut to size and the emitter, along with the bronze neck are from an old Luke ROTJ saber I got in the early 2000s. Can't remember the maker.
Attachments

iv the mercy
Member
She's a beauty Clark.
Paul Andrew
Master Member
This is the first hardware build I've done in like 20 years. Much better than previous efforts, but now that I have adult money I'm probably looking to get better greeblies next time.
Among the things I used are the wand to a gallon weed sprayer from home depot (handle is inside the cutout section, button and lever cannibalized for knob and activation plate), a very old and cheap shower head that I took apart and jammed back together in the wrong order for the emitter, some pvc pipe that I cut and painted for the grip section, and yet more pvc for the pommel. This was also my first foray into any kind of weathering, which frankly I'm more happy with than the rest of the build. I feel like it could use some more fine details, like miscellaneous screws or rivets or something, but I'm not sure what.
Frankly, I'm just happy to have finally done it. Some of these parts have been sitting in my project bucket for a decade or more.
Joek3rr
Master Member
Hardware build? Could have fooled me.This is the first hardware build I've done in like 20 years. Much better than previous efforts, but now that I have adult money I'm probably looking to get better greeblies next time.
Among the things I used are the wand to a gallon weed sprayer from home depot (handle is inside the cutout section, button and lever cannibalized for knob and activation plate), a very old and cheap shower head that I took apart and jammed back together in the wrong order for the emitter, some pvc pipe that I cut and painted for the grip section, and yet more pvc for the pommel. This was also my first foray into any kind of weathering, which frankly I'm more happy with than the rest of the build. I feel like it could use some more fine details, like miscellaneous screws or rivets or something, but I'm not sure what.
Frankly, I'm just happy to have finally done it. Some of these parts have been sitting in my project bucket for a decade or more.
View attachment 1594564
View attachment 1594565
View attachment 1594561View attachment 1594562View attachment 1594563
Paul Andrew
Master Member
I'm flattered.Hardware build? Could have fooled me.
The damn thing is just slightly overly long to boot, so it doesn't fit in any of my ikea shelves with the rest of my collection. For now it hangs out on my desk.
Thank The Maker
Jr Member
Turned out great, nice job
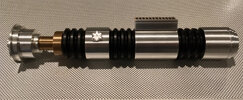
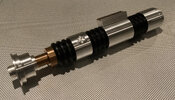
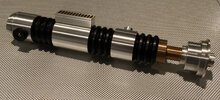
After a ridiculous drought thanks to work and other inanity, I've done my first install of 2022. Here is my latest Canon Flashbody saber, this time an alternate universe Obi-Wan Ep 3/4 hilt. Threaded extensions were ground down and epoxied in place in the flashbody itself, allowing use of MHS thin neck and Obi parts. I used a brass tactile behind the existing red button for activation and some gold-tone mesh + diffusing material + 8 3535 pixels in the sync cutout. The chassis is bone-simple: a speaker holder 6 from TCSS held in place with retention screws with removable 18650 battery and Proffieboard v2. Pixel connector is from CR sabers and the speaker is a random 28 mm from aliexpress. The bubble strip is cut down from a WannaWanga part and snugged with a bit of scotch tape.
It's got a solid heft and there's _just_ enough blade engagement in the TCSS holder that the blade doesn't wobble. There's some minor surface damage (pitting, slight dent in the windvane) and liberal use of Jax aluminum blackener for weathering. The flashbody itself is in really good shape, with very minimal pitting and scratching present from it's 70 year life as a camera accessory before being co-opted here.


It's got a solid heft and there's _just_ enough blade engagement in the TCSS holder that the blade doesn't wobble. There's some minor surface damage (pitting, slight dent in the windvane) and liberal use of Jax aluminum blackener for weathering. The flashbody itself is in really good shape, with very minimal pitting and scratching present from it's 70 year life as a camera accessory before being co-opted here.
HMSwolfe
Master Member
I really like that, like it was Obi-wan’s before ANH, and the outer shroud has the grenade underneath. Really nice job!After a ridiculous drought thanks to work and other inanity, I've done my first install of 2022. Here is my latest Canon Flashbody saber, this time an alternate universe Obi-Wan Ep 3/4 hilt. Threaded extensions were ground down and epoxied in place in the flashbody itself, allowing use of MHS thin neck and Obi parts. I used a brass tactile behind the existing red button for activation and some gold-tone mesh + diffusing material + 8 3535 pixels in the sync cutout. The chassis is bone-simple: a speaker holder 6 from TCSS held in place with retention screws with removable 18650 battery and Proffieboard v2. Pixel connector is from CR sabers and the speaker is a random 28 mm from aliexpress. The bubble strip is cut down from a WannaWanga part and snugged with a bit of scotch tape.
It's got a solid heft and there's _just_ enough blade engagement in the TCSS holder that the blade doesn't wobble. There's some minor surface damage (pitting, slight dent in the windvane) and liberal use of Jax aluminum blackener for weathering. The flashbody itself is in really good shape, with very minimal pitting and scratching present from it's 70 year life as a camera accessory before being co-opted here.View attachment 1594916
View attachment 1594917View attachment 1594918View attachment 1594919
Very cool! I have a Graflex extension and that's something like what I was thinking of doing with it.
Man I really like the look of this!!Working on a new mashup using MHS V1/V2 parts and a Canon flash clamp (though I may replace the clamp with an activation box from OneReplicas. I really do love the sur-fin brass patina, it’s perfect for thin neck builds like this. View attachment 1596098
Joek3rr
Master Member
Well the install on my personal saber is mostly done. Needs some refinement. I think I have a bad speaker because it's pretty crackley (my first saber build had a bad speaker too). I need a new pixel for the crystal (colors are backwards except for blue) and I want to swap out the Luke style card for a bubble card, so I get some of the crystal shining though. But it's done-ish. Been tinkering on this for about 4 years now.
Joek3rr
Master Member
Thanks!Nice work man!
4str0m3ch
Well-Known Member
Interesting that SA22C and yourself both designed a variation on a similar concept, independently. Both are cool designs, though!View attachment 1596764View attachment 1596765
Well the install on my personal saber is mostly done. Needs some refinement. I think I have a bad speaker because it's pretty crackley (my first saber build had a bad speaker too). I need a new pixel for the crystal (colors are backwards except for blue) and I want to swap out the Luke style card for a bubble card, so I get some of the crystal shining though. But it's done-ish. Been tinkering on this for about 4 years now.
Joek3rr
Master Member
Well I would say that's evidence that great minds think alike!Interesting that SA22C and yourself both designed a variation on a similar concept, independently. Both are cool designs, though!
In reality. When I decided to do a lightsaber that would be "mine" and not a character lightsaber. I wanted to take elements from two lightsaber toys I had as a kid. One was Qui-Gon style and the other an Anakin style. Admittedly there isn't much Qui-Gon. I wasn't brave enough to do a shroud, and too cheap to have have Tim at TCSS make me one. But I have ideas....
Along the way it took some elements of other lightsabers I liked as a kid. It's has some of Luke's, particularly with the red and green buttons. And a kind of a Starkiller vibe. And a bit of Kyle Katarn, being a longer then an average saber.
Similar threads
- Replies
- 312
- Views
- 50,787
- Replies
- 327
- Views
- 52,589
- Replies
- 367
- Views
- 53,940