A couple questions:
Did OP ever post a painting tutorial? I went through several pages and couldn't find anything. His weathering is incredible.
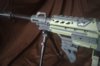
And how are you guys sealing the guns to protect the paint? Seems that they're nearly functionless unless you're okay with paint scraping off around the primers and pumps (I'll probably end up chopping the primer off this one and making it display only)
I don't think JA has ever done a tutorial - I for one would have watched the bejeezus out of it! The best we've been able to hope for is WIP photos...
The best way to get a good, damage-resistant finish is to start with thorough preparation; sanding to give the paint something to hold onto, followed by a bath in warm soapy water to remove oils, dust and grime and then air-drying.
If you're going to use the blaster as originally intended, there's nothing on earth that will magically stop the paint scratching, chipping and stripping over time. The most that clear-coats can do is mitigate damage. I have heard that paying a little more for automotive quality paint improves the durability, but be warned: any clear-coat can just as easily destroy a paintjob as protect it if certain physical and environmental circumstances are not met when using them. I personally tend try to steer clear of them if possible by using enamel paint for my work wherever possible, unless it's a potentially high-wear area of the shell that will need a greater degree of permanence.
An alternative and/or backup for clear-coats is a good polish with a wax-coat furniture- or floor-polish. It contains a thin acrylic/silicone solution that smooths the paint while at the same time reducing friction between moving parts - especially where paint is completely dry but hasn't fully cured and still retains a degree of tackiness when rubbed against other painted surfaces. Most of my blasters get this treatment around slides, triggers, priming handles and pump grips. Even though you'll see a lot of people say that painting moving parts is a bad idea, I paint everything that shows from the outside, even internals in some cases, and using this technique serves me well - I very rarely need to resort to sandpaper to remedy binding.
Although my blasters are primarily display pieces, they are all 100% functional (some even more so). They do get primed every so often and stripping is something I don't see very often in my later works. In saying that, I did a Switchshot a little while back, and there was no power on earth that could make the paint stick to the priming handle (not the shaft - the loop!), I went through the entire process twice with super-thorough sanding and it still wouldn't stick (it must have been something ingrained in the plastic), so there will always be bugbears... Those T-pull primers are notoriously bad.
 The MEGA logo on the pistol though was larger than most Nerf logos and I did not want to risk putting a hole in the side to remove it.