You are using an out of date browser. It may not display this or other websites correctly.
You should upgrade or use an alternative browser.
You should upgrade or use an alternative browser.
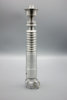
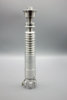
Lineage Foundry Cast ANH Kenobi Stunt Hilts
Very cool!
And what if some of us wanted to do the machining ourselves?
I will be offering "blanks," raw casts straight from the mold, if anyone is so inclined to try and machine it themselves.
Along a similar note, now that I've managed to machine these, my attention now is on seeing if I can't remedy the bite marks all together.
This is remarkable. Thank you for sharing, and detailing some of the observations you've made about the process and how they ended up with the product they did. I'm subscribed to this thread, and will be one of the first in line should you do more than the original run
I honestly almost can't believe the detail right out of the mold!
I'm a little shocked myself!
And most definitely I'll be doing more runs. In fact, I may have to change the thread to "UNLTD RUN." I've sunk waaaaaaaaaaaaaaaaaaaaaaaaaaaaaaaaaaaaaaaaaaaaaaaaaaaaaaaaaaay too much money in this. I'd be dumb not to.
")
Sweet!!I will be offering "blanks," raw casts straight from the mold, if anyone is so inclined to try and machine it themselves.
Along a similar note, now that I've managed to machine these, my attention now is on seeing if I can't remedy the bite marks all together.
The only thing I don't have the tooling for is cutting the pommel cubes.
If I can sell that Yoda saber in the JY, and maybe a few other things, I may be able to remedy that, but for the moment, ain't got a rotary table, indexing blocks, nothing.
Sweet!!
The only thing I don't have the tooling for is cutting the pommel cubes.
If I can sell that Yoda saber in the JY, and maybe a few other things, I may be able to remedy that, but for the moment, ain't got a rotary table, indexing blocks, nothing.
Is that what someone needs to do this right? Because I don't have any of that.
I just make due with my benchtop mill and a vice grip that's much too big for it.It's really primative what I do, but it works for me. I mark the pommel with sharpie where to cut, lock my pommel in the vice, and mill the channels first; after that, I mill the angles of the cubes.
Wow, that's impressive! You're making me wanna try this, now!It's really primative what I do, but it works for me. I mark the pommel with sharpie where to cut, lock my pommel in the vice, and mill the channels first; after that, I mill the angles of the cubes.
You do it all with a regular old straight end mill?
Yep. I use the same bit to do the channel and angles, too. Looking at the results of the V2 and V3, I don't believe anyone bothered enough to swap out bits. The milling mark on the V2's pommel is pretty much the same width as the channel it sits in.
Mouse Vader
Sr Member
The more I do with my saber experiment builds & the more I research these OT hilts the more I find 'speed is king' in how they were made. Photo's & on screen hides an awful lot of sins that you just can't get away with if these were for commercial 'in your hand' products. It actually makes reproduction more difficult as you are trying to redo chance 'errors' & on the go mod's.
I'd like to start on some more "test" hilts before actually starting on the run, so I finished up the V3 I have on hand in hopes of parting it off so I have funds to continue.
Here are some pics. It came together surprisingly quick.


Here are some pics. It came together surprisingly quick.
Mouse Vader
Sr Member
Cool.
SixthScaleMan
Active Member
Just popped in to say, the lightsaber looks amazing...and you have the best username.[emoji106][emoji106][emoji2]
My latest and greatest V2 to date, what I finished recently.


It's got all the features of my previous trials (four piece construction: nipple, emitter, hilt/body, pommel) but now incorporates John Bunker's drawings, and the collar that Mr. Alinger quotes into the final design.

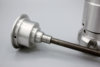
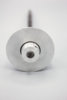
I've used paper shims to pressure fit the bearing and collar (steel in my current set-up) together, and then another to fit the bearing/collar set-up to the emitter, and the results are...miniscule. It could easily not have been there at all and wouldn't have made a difference in the ease of the emitter's spin. As a matter of fact, it spins better on just the collar alone. When I wedged another paper shim into the windvane to pressure fit the collar into it, it actually caused the center rod/drive shaft more difficulty in spinning the entire assembly. Nothing that I don't think the original motor couldn't handle but I worry such a set up would tear the threads out in the soft aluminium for the grub screws.
Speaking of, there are two each in the emitter for securing the nipple. One to hold the nipple in place, and then another on top of them to keep those grubs in place. Considering how often my threads have torn in previous trial hilts, the prop guys must've done something similar to keep them in place, resulting in the grub screws sitting near-flush to the surface of the emitter.
I'm debating whether or not to actually try and motorize this piece but the problem is that I hate having duplicates. If I turn this into a functioning stunt, I'd have to keep it that way and make another V2 for my collection as the RotJ belt-hanger. I'd hate to do that, but I'm really curious about how well it'd function as it was originally intended. Decisions, decisions...
In any case, the run is one step closer to happening. I'm considering applying this set-up to the V3 but I'm hesitant as we don't know much in how that was made.
It's got all the features of my previous trials (four piece construction: nipple, emitter, hilt/body, pommel) but now incorporates John Bunker's drawings, and the collar that Mr. Alinger quotes into the final design.
I've used paper shims to pressure fit the bearing and collar (steel in my current set-up) together, and then another to fit the bearing/collar set-up to the emitter, and the results are...miniscule. It could easily not have been there at all and wouldn't have made a difference in the ease of the emitter's spin. As a matter of fact, it spins better on just the collar alone. When I wedged another paper shim into the windvane to pressure fit the collar into it, it actually caused the center rod/drive shaft more difficulty in spinning the entire assembly. Nothing that I don't think the original motor couldn't handle but I worry such a set up would tear the threads out in the soft aluminium for the grub screws.
Speaking of, there are two each in the emitter for securing the nipple. One to hold the nipple in place, and then another on top of them to keep those grubs in place. Considering how often my threads have torn in previous trial hilts, the prop guys must've done something similar to keep them in place, resulting in the grub screws sitting near-flush to the surface of the emitter.
I'm debating whether or not to actually try and motorize this piece but the problem is that I hate having duplicates. If I turn this into a functioning stunt, I'd have to keep it that way and make another V2 for my collection as the RotJ belt-hanger. I'd hate to do that, but I'm really curious about how well it'd function as it was originally intended. Decisions, decisions...
In any case, the run is one step closer to happening. I'm considering applying this set-up to the V3 but I'm hesitant as we don't know much in how that was made.
Attachments
I think I'm ready to get this thing going...For real this time. I've found the solution to my bite marks, and I'm fairly confident in my machining and casting skills, now.
It won't happen unless anyone cares, so I'm letting folks know here and in the run thread, too.
It won't happen unless anyone cares, so I'm letting folks know here and in the run thread, too.
Thomas J Newton
New Member
Hi PPP, sorry a little late here too - but awesome work - the casts look great! Out of interest - I presume (with the V3 at least) the cast pretty much weighs the same as a solid aluminium lathed version? A little under a kilo? If this wasn't originally drilled out to fit a motor I'm thinking its on the weighty side? I would definitely be interested if you are offering casts for sale too. Any idea on what it would be to ship to the UK? Thank you
Hi PPP, sorry a little late here too - but awesome work - the casts look great! Out of interest - I presume (with the V3 at least) the cast pretty much weighs the same as a solid aluminium lathed version? A little under a kilo? If this wasn't originally drilled out to fit a motor I'm thinking its on the weighty side? I would definitely be interested if you are offering casts for sale too. Any idea on what it would be to ship to the UK? Thank you
One can only speculate that the V3 was nearly solid. The pommel for it looks to have been machined to be "stunt" ready but the body of the V3 lacks almost everything that the V2 had to house the motor and switch. Not saying that it couldn't have been, but considering the amount of material comparable to the raw cast that the V3 still sports, all extant information point to it being something quickly put together at the last minute. Much of it isn't even machined, but the surface only sanded/filed down with a rasp.
I'm currently working on filling the current run of the first four, right now. If you're genuinely serious about owning one, you can check out my listing in the Project Runs section.
Similar threads
- Replies
- 2
- Views
- 823
- Replies
- 3
- Views
- 1,229
- Replies
- 3
- Views
- 1,864
- Replies
- 2
- Views
- 1,585
- Replies
- 13
- Views
- 2,949