You are using an out of date browser. It may not display this or other websites correctly.
You should upgrade or use an alternative browser.
You should upgrade or use an alternative browser.
Dewy and Anakin Starkiller's Accurate Qui-Gon Jinn Lightsaber Design
- Thread starter Dewy
- Start date
That's somewhat of an illusion because that corner has a radius on the hero prop that I don't currently have in my model. With a corner radius it looks something like this:One thing to note - the gap on the OTHER side of the washer (nearer the emitter) is a bit smaller on most of your reference images above. Nearly touching the edge of the button flat in some cases. That would alleviate the issue you’re describing of washer overlap even at smaller sizes.
I'm using 18.5mm there.
I've found there are actually a bunch of different versions of both the washers AND the buttons on top. Only the smallest ones seem to match the parts used on the sabers and various PT props. The ones that come separately as "lamp bulb" replacement assemblies seem larger (I have multiple examples of each type).
Here's the version that seems to match the best with all the references I've been able to directly compare them to:
Attachments
Those smaller ones (above) match the props better as far as I've seen.
The very slightly larger ones (see this grey one) better match the dimensions you're citing above, but they don't match my references as well (neither the washer nor the button on top).
The very slightly larger ones (see this grey one) better match the dimensions you're citing above, but they don't match my references as well (neither the washer nor the button on top).
Attachments
That's interesting, my 2 that came as part of an actual component are significantly larger than the bulk order of replacement ones I got for this project. However, those 2 also appear to be much older. However the one on the QGJ saber is also clearly much more squished than when these are used as intended.
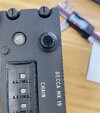
Yeah there's actually a pretty wide variety of these things. At least 3-4 that I've seen, I think. That part -- the "DECCA MK 19" has what I believe are the correct parts, at least insofar as they match everything I have been able to compare to.That's interesting, my 2 that came as part of an actual component are significantly larger than the bulk order of replacement ones I got for this project. However, those 2 also appear to be much older. However the one on the QGJ saber is also clearly much more squished than when these are used as intended.
Disclaimer: We are really getting into the weeds now!
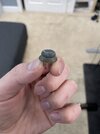
It's hard to tell from your pictures, but to me it looks like both of those versions are slightly different than the one on the hero. The widest point of the rubber washer should be a very small lip. When viewed from the side the height of this lip should be approximately 1/3 to 1/2 the height of the next section. In your picture the one on the left appears to be missing that lip and the one on the right appears to have a lip that is the same height as the next section. Here is what I mean:

The red box is the height of the lip I'm referring to, the blue box is the height of the next section.
This thinner lip becomes more pronounced when the washer is squished down and is clearly visible in the high resolution hero images. You can also see it well in a couple of the public references such as these:

It's hard to tell from your pictures, but to me it looks like both of those versions are slightly different than the one on the hero. The widest point of the rubber washer should be a very small lip. When viewed from the side the height of this lip should be approximately 1/3 to 1/2 the height of the next section. In your picture the one on the left appears to be missing that lip and the one on the right appears to have a lip that is the same height as the next section. Here is what I mean:
The red box is the height of the lip I'm referring to, the blue box is the height of the next section.
This thinner lip becomes more pronounced when the washer is squished down and is clearly visible in the high resolution hero images. You can also see it well in a couple of the public references such as these:
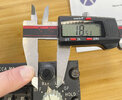
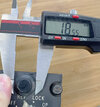
I also have this one, which seems to have a lip to very closely match what you’re pointing out above. It also measures about 17.6 mm uncompressed, matching the dimensions of my other ones. Anyway, that is to say, it all matches with the 18.5 mm compressed dimension that I used.
Attachments

Well **** - good eye for detail there Dewy, I can't unsee that difference now.
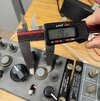
I do have a feeling that.. with a lot of soft mass made parts at the time, there was some variation with production. For the purposes of this project I'm glad we're nailing down the right kind. I'll dig through my spares today to see if I have the variations too. I got a new expensive pair of calipers for christmas, gonna put them to good use
I do have a feeling that.. with a lot of soft mass made parts at the time, there was some variation with production. For the purposes of this project I'm glad we're nailing down the right kind. I'll dig through my spares today to see if I have the variations too. I got a new expensive pair of calipers for christmas, gonna put them to good use
I have come up with what I think is a fairly clever way to get overall length measurements from different reference images. Below is a brief summary of the method I am using.
Given some example reference image:

I first determine what known feature I'm going to use to scale from. In this case it is obviously the diameter of the red button. In my 3D model I then project the end points of the saber to the same plane I am going to scale from:

I then generate as best an overlay as I can, making sure the projected endpoints are included in the overlay. I can then scale the overlay/reference image overlay based on the known geometry (red button in this example) and measure the distance between the projected points to get an overall length:

In reality there are a couple more steps, I've actually been hiding the red button from the model once I'm happy with the overlay to make sure the model edges don't interfere with the scaling. I've also been mostly doing this with much higher resolution images that have less lens & perspective distortion. Finally, I try to focus on images that have both the red button and the cover tech knob in them. I can then scale based on one and use the other as a sanity check.
Using this method I have been getting surprisingly consistent results, which I'm going to hold off on sharing until I've done more work!
Given some example reference image:
I first determine what known feature I'm going to use to scale from. In this case it is obviously the diameter of the red button. In my 3D model I then project the end points of the saber to the same plane I am going to scale from:
I then generate as best an overlay as I can, making sure the projected endpoints are included in the overlay. I can then scale the overlay/reference image overlay based on the known geometry (red button in this example) and measure the distance between the projected points to get an overall length:
In reality there are a couple more steps, I've actually been hiding the red button from the model once I'm happy with the overlay to make sure the model edges don't interfere with the scaling. I've also been mostly doing this with much higher resolution images that have less lens & perspective distortion. Finally, I try to focus on images that have both the red button and the cover tech knob in them. I can then scale based on one and use the other as a sanity check.
Using this method I have been getting surprisingly consistent results, which I'm going to hold off on sharing until I've done more work!
AnubisGuard
Master Member
Using this method I have been getting surprisingly consistent results, which I'm going to hold off on sharing until I've done more work
Really interested to hear what you've come up with.
How are we coming on the progress of this yo he beautiful Qui Gon saber???
Unfortunately, all the rain in Los Angeles has caused some major issues with my house that I have been dealing with. I haven’t made much progress on the model, but this project is still happening! As I see it the remaining steps are as follows:
- Finish scaling exercise and determine overall length
- Scale “flexible” Solidworks model to final dimensions
- Complete assembly engineering
- Use dimensions from #2 to re-model in production grade fashion with assembly features from #3
- Put finishing touches on model (fillets/rounds/chamfers), ensure tolerances allow for clearance for assembly, obsess over the most minor of details, etc.
- Don’t look at model for 72hrs, then with fresh eyes and mind give the model one final thorough review (this step is key)
- Send model to Anakin Starkiller for him to do what he does (prototyping and production!)
You could always do what I do. Send it to the shop. Begin production, then follow up two days later with a series of panicking emails asking for last minute changes. The shop really loves that. HahahaDon’t look at model for 72hrs, then with fresh eyes and mind give the model one final thorough review (this step is key)
Last edited:
Similar threads
- Replies
- 390
- Views
- 36,263
- Replies
- 43
- Views
- 3,482
- Replies
- 2
- Views
- 537