"Obsess over the minor details" this step is key!! "I have spoken"Unfortunately, all the rain in Los Angeles has caused some major issues with my house that I have been dealing with. I haven’t made much progress on the model, but this project is still happening! As I see it the remaining steps are as follows:
- Finish scaling exercise and determine overall length
- Scale “flexible” Solidworks model to final dimensions
- Complete assembly engineering
- Use dimensions from #2 to re-model in production grade fashion with assembly features from #3
- Put finishing touches on model (fillets/rounds/chamfers), ensure tolerances allow for clearance for assembly, obsess over the most minor of details, etc.
- Don’t look at model for 72hrs, then with fresh eyes and mind give the model one final thorough review (this step is key)
- Send model to Anakin Starkiller for him to do what he does (prototyping and production!)
You are using an out of date browser. It may not display this or other websites correctly.
You should upgrade or use an alternative browser.
You should upgrade or use an alternative browser.
Dewy and Anakin Starkiller's Accurate Qui-Gon Jinn Lightsaber Design
- Thread starter Dewy
- Start date
You're ahead of the game nowIs it too late to jump on this run please? Missed the OWK and don't want to make the same mistake with this one")
Haha phew, at least I can keep a keen eye out for the run thread nowYou're ahead of the game now
UPDATE:
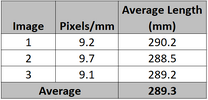
Scaling Exercise Results:
I have finally reached the point where I am comfortable with the overall length measurements I am getting. Using the process outlined in Post #116 of this thread I took the three best reference images and carefully scaled each one several times:

Range based on averages from above table: 1.7mm
Max single measurement from all images: 291.3
Min single measurement from all images: 288.1
Overall Measurement Range: 3.2mm
As you can see I am working with very pixel dense images (>9 pixels per millimeter) which helps to lower uncertainty. This means the majority of the uncertainty is in the perspective matching itself (which is where it should be). However, we have now reached the point where the measurement uncertainty is in the same range as the manufacturing uncertainty due to tolerance stack-up.
So, I am going to say the ideal overall length of the hero is 289.3mm. What does that mean for this replica? Well I like to include some extra thickness on the steel emitter washer so it and the threaded rod can be sanded flush together with the emitter bezel. So the nominal overall length of this replica will be 289.8mm.
Finish scaling exercise and determine overall lengthCOMPLETE 4/8/23- Scale “flexible” Solidworks model to final dimensions
- Complete assembly engineering
- Use dimensions from #2 to re-model in production grade fashion with assembly features from #3
- Put finishing touches on model (fillets/rounds/chamfers), ensure tolerances allow for clearance for assembly, obsess over the most minor of details, etc.
- Don’t look at model for 72hrs, then with fresh eyes and mind give the model one final thorough review (this step is key)
- Send model to Anakin Starkiller for him to do what he does (prototyping and production!)
Scaling Exercise Results:
I have finally reached the point where I am comfortable with the overall length measurements I am getting. Using the process outlined in Post #116 of this thread I took the three best reference images and carefully scaled each one several times:
Range based on averages from above table: 1.7mm
Max single measurement from all images: 291.3
Min single measurement from all images: 288.1
Overall Measurement Range: 3.2mm
As you can see I am working with very pixel dense images (>9 pixels per millimeter) which helps to lower uncertainty. This means the majority of the uncertainty is in the perspective matching itself (which is where it should be). However, we have now reached the point where the measurement uncertainty is in the same range as the manufacturing uncertainty due to tolerance stack-up.
So, I am going to say the ideal overall length of the hero is 289.3mm. What does that mean for this replica? Well I like to include some extra thickness on the steel emitter washer so it and the threaded rod can be sanded flush together with the emitter bezel. So the nominal overall length of this replica will be 289.8mm.
Attachments
AnubisGuard
Master Member
I have a Larbel Qui-Gon from 2002 or so, and it's beat to crap from multiple moves and suboptimal display situations. I'm excited just to replace it with something I'll have to take better care of.
Last edited:
AnubisGuard
Master Member
Very cool Dewy. I'm glad you took the time to dial this in - now our efforts are just ~6mm apart rather than ~17mm! Project Q is 283.5mm, so we are quite close. I'll be curious to see them next to one another.
Someone needs to break into Liam Neeson's house to check for sure.
I believe Liam Neeson owns a resin cast, so measuring his hilt would be no more definitive than when I measured the resin cast which was the principal reference for Project Q. And it would likely be closer to the 282.5mm I got than the 289.3mm that Dewy calculates for the machined hero. Resin can shrink when cast, so it is reasonable that Dewy is getting slightly larger numbers as he tries to determine the length of the original prop.Someone needs to break into Liam Neeson's house to check for sure.
Someone needs to break into Liam Neeson's house to check for sure.
I don't know who you are. I don't know what you want. If you are looking for ransom, I can tell you I don't have money, but what I do have are a very particular set of skills. Skills I have acquired over a very long career. Skills that make me a nightmare for people like you. If you return my lightsaber now, that'll be the end of it. I will not look for you, I will not pursue you, but if you don't, I will look for you, I will find you and I will kill you.
A number of stunts had fender washers in the emitter. I think it's any easy way to finish off the pour spout
Hah, thank you!!!
Once the project is completed, Anakin Starkiller will post a sign up thread in the project runs. At that point, you will be able to sign up.Hi is it possible to put my name down for this run please? Many thanks.
UPDATE:
Flexible model has been scaled:

With a friend (aligned at pommel end):

The odd overall length with too many decimal places (289.31mm) is because I just used a dumb scaling feature in Solidworks to scale everything but the parts that should not be scaled (red button, covertech, threaded rod, etc.). As I move on to steps 3 & 4 I will re-model everything by taking dimensions from this scaled model. At this point I will incorporate manufacturing tolerances to make sure things fit together. My goal is to have the tolerance stack-up for the overall length of the saber end up in the range of overall lengths from my previous post.
I still need to put some thought into the assembly of this saber. A couple random thoughts:
Finish scaling exercise and determine overall lengthCOMPLETE 4/8/23Scale “flexible” Solidworks model to final dimensionsCOMPLETE 4/12/23- Complete assembly engineering
- Use dimensions from #2 to re-model in production grade fashion with assembly features from #3
- Put finishing touches on model (fillets/rounds/chamfers), ensure tolerances allow for clearance for assembly, obsess over the most minor of details, etc.
- Don’t look at model for 72hrs, then with fresh eyes and mind give the model one final thorough review (this step is key)
- Send model to Anakin Starkiller for him to do what he does (prototyping and production!)
Flexible model has been scaled:
With a friend (aligned at pommel end):
The odd overall length with too many decimal places (289.31mm) is because I just used a dumb scaling feature in Solidworks to scale everything but the parts that should not be scaled (red button, covertech, threaded rod, etc.). As I move on to steps 3 & 4 I will re-model everything by taking dimensions from this scaled model. At this point I will incorporate manufacturing tolerances to make sure things fit together. My goal is to have the tolerance stack-up for the overall length of the saber end up in the range of overall lengths from my previous post.
I still need to put some thought into the assembly of this saber. A couple random thoughts:
- In an earlier post I showed a concept with an aluminum core in the emitter. This gave a solid anchor to attach the red button and the threaded rod. In reality I don't think this is very accurate to the original prop. My guess is that maybe there was a hole drilled for the red button, but they just glued it in place since there isn't that much thread length. They then used the rubber piece under the red button to cover up the messy hole/glue job.
- I'm also thinking about incorporating a short section of steel threaded rod to attach the pommel to the saber. This would help balance out the weight of the heavy threaded rod and fender washer in the emitter.
Knowing how a lot of props are made I have a sneaking suspicion that your thought is correct on the installation of the button.
Re: threaded rod for the pommel, the added counterweight makes perfect sense. Do we have any evidence of how the original sleeve was installed over the resin? In first glance it seems that either the whole emitter section has to come off, or the pommel. Pommel certainly seems more likely, and easier to hide the joint.
Re: threaded rod for the pommel, the added counterweight makes perfect sense. Do we have any evidence of how the original sleeve was installed over the resin? In first glance it seems that either the whole emitter section has to come off, or the pommel. Pommel certainly seems more likely, and easier to hide the joint.
Similar threads
- Replies
- 413
- Views
- 37,473
- Replies
- 43
- Views
- 3,601
- Replies
- 2
- Views
- 547