You are using an out of date browser. It may not display this or other websites correctly.
You should upgrade or use an alternative browser.
You should upgrade or use an alternative browser.
2001: ASO Clavius Suit
- Thread starter pkashukjr
- Start date
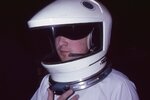
HNY!! Sorry for the delay in updates, but the holidays got in the way. During the time, I was able to make new workspace. My wife let me take over a bedroom in the house so I wouldn't leave stuff everywhere.
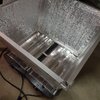
I also spent some time setting up to vacuum form the visor. proppin I bought the bed of ebay, and I saw some designs people made for heating boxes and I constructed my own version. Initial tests worked great with black ABS. (not pictured). It's been 20 years since I did any vacuum forming...lol
Just waiting on the plastic to arrive.
I will also be posting updates (hopefully completion) of the interior pad work later this week...
Attachments
1. HNY!!HNY!! Sorry for the delay in updates, but the holidays got in the way. During the time, I was able to make new workspace. My wife let me take over a bedroom in the house so I wouldn't leave stuff everywhere.
I also spent some time setting up to vacuum form the visor. proppin I bought the bed of ebay, and I saw some designs people made for heating boxes and I constructed my own version. Initial tests worked great with black ABS. (not pictured). It's been 20 years since I did any vacuum forming...lol
Just waiting on the plastic to arrive.
I will also be posting updates (hopefully completion) of the interior pad work later this week...
2. Your Wife is wonderful.
3. Very much looking forward to seeing this develop.
Wow your helmet looks great so far! I've seen that others making this helmet have had trouble with the clear visor, I was wondering what is your plan for recreating
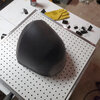
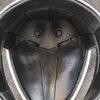
The buck is a casting of a 3d print made with a thick shell of urethane resin and backed with dense urethane foam. It held up great to the ABS test.Great news! What kind of material/medium did you use to build your buck?
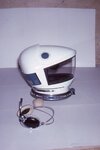
I just found this online...never saw these before. http://www.mastermodels.co.uk. the company that made the original helmet. Never saw these images. I thought I saw the black paint behind the data cartridges in the shot of Floyd walking in the shuttle, but thought it was shadow. Also confirms the black paint on the top of the neck ring.
Attachments
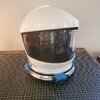
Finished the padding inside. Not thrilled with my first attempt at EVA foam, but I can't spend anymore time on it. I will now mask it and spray one more coat of Plastidip to even out the shene, but should look good behind the visor...
Attachments

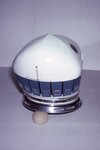
Got the plastic yesterday for the visor. I didn't think the first pull would come out so good. It's almost usable. Visability isn't too bad, but I think some additional wetsanding on the buck will dial it in for my goal. Hopefully after some surface work, I can pull the final this coming week. I have enough plastic for 5 more tries, but am cautiously optimistic.
Attachments
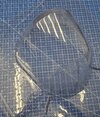
Thanks. This first time I heated the plastic a bit too much, and could have dusted better but I was testing the rest of the set up and expected to see blemishes. I could see mostly some of the sanding marks transferred from the buck, and I have some ideas on how to address that as well as a few additional tricks I'm going to try. fingers crossed.Always difficult to pull very clear visors...good luck with the other pulls")
A couple of tricks you can try:Thanks. This first time I heated the plastic a bit too much, and could have dusted better but I was testing the rest of the set up and expected to see blemishes. I could see mostly some of the sanding marks transferred from the buck, and I have some ideas on how to address that as well as a few additional tricks I'm going to try. fingers crossed.
You can pull a layer of .030 styrene over your pattern, then your clear over that. This will help with some of the blemishes. (Just trim the styrene around the base of your pattern so as not to block air flow)
If your clear plastic has a plastic scratch protectant film on it, leave the film on the plastics pattern side when you heat and form it, you can peel the film off after the piece is formed. This will also aid in getting a clearer visor. If you leave the film on, you can talc the plastic and pattern thoroughly, this will help with mark-off caused by the plastic cooling and dragging along the pattern when it's formed.
I was going to try the styrene trick, but I never heard about leaving the plastic on. I will definitely try all those suggestions!A couple of tricks you can try:
You can pull a layer of .030 styrene over your pattern, then your clear over that. This will help with some of the blemishes. (Just trim the styrene around the base of your pattern so as not to block air flow)
If your clear plastic has a plastic scratch protectant film on it, leave the film on the plastics pattern side when you heat and form it, you can peel the film off after the piece is formed. This will also aid in getting a clearer visor. If you leave the film on, you can talc the plastic and pattern thoroughly, this will help with mark-off caused by the plastic cooling and dragging along the pattern when it's formed.
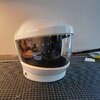
I know it's been a while but I needed an ideal set of circumstances before trying to pull the visor. It has some imperfections but this is the best pull I was able to get. I have plastic left, but I can live with this one for now but will revisit trying again in the future. I will mount it in a way I can swap it out later. I plan on finishing the helmet this week.
Attachments
Looks amazing.I know it's been a while but I needed an ideal set of circumstances before trying to pull the visor. It has some imperfections but this is the best pull I was able to get. I have plastic left, but I can live with this one for now but will revisit trying again in the future. I will mount it in a way I can swap it out later. I plan on finishing the helmet this week.
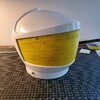
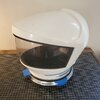
I didn't finish the helmet as planned this weekend, but in the home stretch. I just have to attach the data cards, antenna, and decals. I ran into some complications with my magnet idea and for the cards so I think I'm going to use velcro for now, until I sort it out...I just want this done...lol. hopefully finished by tomorrow. Then I can move on to the chest and back packs.
Attachments
Last edited:
Similar threads
- Replies
- 110
- Views
- 16,284