The Veepy rocket pack builders thread (hijack friendly)

I'm thinking this thread should be merged with the VEEPY BUILDERS thread:
Good idea;)
 
Did anyone order the rivets part number TSC0608.1 from Hanson Rivets? I am in need of an additional 20 rivets and they have no stock. Someone help me!?
 

Attachments

  • IMG_0606.jpeg
    IMG_0606.jpeg
    3.3 MB · Views: 135
Does anyone have advice about mounting/positoning of the harness relative to the JetPack? Anything you would do differently?
I don't want it too high or too low. Also, I don't want it to sag.

I have the SouthBeach Leather harness.
 
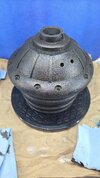
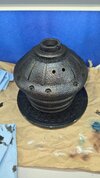
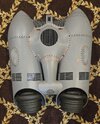
OK, so while building my very own Veepy, I realized that the rods at the flaps, joining up to the rear egg, have some awkward interference unless you apply some clever engineering.

Here is what I came up with and works perfectly.

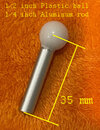
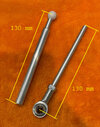
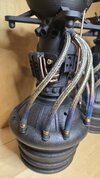
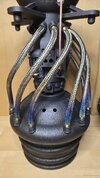
The images show what you will need to assemble. You need to build the 2 separate parts. Very easy stuff.

PARTS:
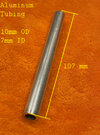
- Grab 1/4" aluminum rod.
- Grab 10mm OD, with 7mm ID aluminum tubing from here: Amazon.com
- Grab 1/2" diameter plastic balls from here: Amazon.com
- Grab tie rod ends of your choice.

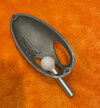
Assemble everything with proper dimensions shown... I actually tapped a thread into one end of the small rod, and screwed into the ball. Pay close attention to final dimensions, it will ONLY work with these dimensions.

Also, I opened up a large hole in the hull behind the egg, so that I can insert or remove the rod (the part with the ball) from inside even after the egg is glued in place. Otherwise you cannot remove the rod if you ever need to.

THERE IS A VIDEO ATTACHED
 

Attachments

  • flaps1a.jpg
    flaps1a.jpg
    450 KB · Views: 150
  • flaps2a.jpg
    flaps2a.jpg
    409 KB · Views: 154
  • flaps3a.jpg
    flaps3a.jpg
    471.4 KB · Views: 159
  • flaps5a.jpg
    flaps5a.jpg
    484.2 KB · Views: 164
  • IMG_0721.mov
    44 MB
Last edited:
That's really clever, and I wish I had that a month ago :lol: I struggled with the stainless braid on my build and getting it into the fittings without it flaring out all the time. I finally figured out a method using some metal snippers and a Dremel. First I crimped the hose using the snippers, going around the circumference of the hose first, mashing it in but not fully cutting it. This pinched the stainless inward at the cut spot... and then I used a Dremel cut off tool to finish it off. Worked a charm. I'm sure there are specialized tools out there for cutting these braided hoses, but for us mere mortals in a garage, it would be very frustrating.

1729791094192.png
 
It's getting there! Painted the pack with gloss black today. I added a texture to the engines to make them look more like cast iron. I used a technique that Adam Savage asavage talked about. Using spray adhesive and primer. Did a pass on the engines with an airbrush and transparent paints for the heat discoloration. The engines look great under a lot of light, but is more subtle without, which is unfortunate.

Anyone try electroplating? I can't stop thinking about trying it myself on the pack.
 

Attachments

  • 20241025_155954.jpg
    20241025_155954.jpg
    1.2 MB · Views: 79
  • 20241025_160036.jpg
    20241025_160036.jpg
    1.4 MB · Views: 72
  • 20241020_181734.jpg
    20241020_181734.jpg
    1.8 MB · Views: 75
Been working on the lights and sounds for the jetpack. Still needs some adjustments and the fan. Waiting on another amp/mp3 player to try and reduce the lag between the sound clip for the shut down sequence. Also been painting the engines and adding some details.
 

Attachments

  • 20241109_175022.jpg
    20241109_175022.jpg
    1.4 MB · Views: 57
  • 20241109_175013.jpg
    20241109_175013.jpg
    1.4 MB · Views: 62
Looking great! Very interested in what silver paint people are going with for the pack.
 
Hey everyone, I have been working on the electronics for the pack...It took 3 months and 450 lines of code. I've never really coded before but knew a little bit. I was able to use multiple AIs to help. A lot of back and forth. It has 1 speaker for the fan noise in the center hull, 2 4in speakers for the engines, 2 amps for controlling the fan and engine noises separately as well as fade in and outs and 61 leds per engine. I still have to wire the other lights for the right engine and motor for the fan. Well here is the result!
 
Back
Top