You are using an out of date browser. It may not display this or other websites correctly.
You should upgrade or use an alternative browser.
You should upgrade or use an alternative browser.
SPIDER GWEN Build (Pic Heavy)
- Thread starter HendoArt
- Start date
-
- Tags
- costuming spider-man
SpideyQueue
Member
That sounds perfect, I think my plastic is about 1/8". Do you know what kind of scissors they are? I have some that cut through my splatter screen, but not the thick plastic. And not like butter, more like a baboon hitting a coconut against a rock until it splits, lol

Wescott for the win! We usually keep about 2-3 pairs in the shop incase we have to do some last minute trimming with our soft plastics. I can get these guys through 1/8 acrylic but I think the thickness you're working with is about 1/16 max so you shouldn't have a problem. These are my go to for styrene as well. I've found that nothing cuts it cleaner then the titanium scizzums (our word here for scissors. It's coined *shakes fist* lol)
We have snips as well but they're just hand held bolt cutters.
HendoArt
Active Member
Ahh those look way easier to use than what I had. I think mine might have been to strong, they just sort of cracked through the plastic. I think I'm just not the best at plastic materials, I need a sensei. Thanks for sharing, I will definitely look for these for when I work up the courage for plastic again!
HendoArt
Active Member
Update: Painted Frames
Painted these up with Montana Gold brand paint. I also decided to paint in the inside of my shell black for visibility, since I can kind of see the edges of the eyes from inside. Visibility is much improved by an all black inside

I wish the faceshell had come out cleaner, but I had a hard time dremeling through so much tape and cardboard. It should still look good under the mask anyway!


In other news, although I was supposed to get my print two days ago from Fabric on Demand, I have been assured that they will have their machines fixed tomorrow and I will get my print tomorrow. I'm now down to about 9 days to paint and sew that thing together, so hopefully it actually comes...
Todogut
New Member
I have a question about the Neodymium rare earth magnets that are used to hold the eye frames to the face shell. Exactly what kind of magnets should be used? Regular magnets or super magnets? How powerful (in terms of surface field and/or pull force)?
The reason I ask is, I want to use magnets to hold a face mask to a face shell. I am worried about the mask, which is cast plastic, falling off of the shell and being damaged. Hence, I figured I would need strong magnets.
I researched online and went to Home Depot and bought Super Neodymium Magnet Discs by Master Magnetics, Inc. (Part No. 07047, size per piece: .709" dia. x .118" thk., 3 pieces per package). But, I just tried assembling the magnets and found they are way too powerful.
It took a great deal of effort just to slide apart the stacked magnets. After attaching three to the inside of the mask and 3 to the outside of the shell, I tried putting them together. The magnets are so strongly attracted, it would very difficult for me to remove the mask from the shell, which is something I want to be able to do fairly easily.
Clearly, the super magnets that I bought are too powerful for my application. Hopefully, I can return them to Home Depot and exchange for less powerful magnets.
I want the magnets to hold the mask securely to the shell; and still allow me to remove the mask fairly easily. Additionally, I should mention, the shell will be covered by a Lycra spandex hood, so there will be a layer of cloth between the magnets.
Any suggestions on what strength I should get? What strength do you use?
HendoArt
Active Member
Exactly what kind of magnets should be used? Regular magnets or super magnets? How powerful (in terms of surface field and/or pull force)?
I chose the strong neodymium kind because if my lenses fall off, they will probably shatter so I need them to really stick on there. If you found that yours are too powerful, I'd try out some with a smaller diameter. Mine were only 0.25" in diameter and were 0.125" thick and were plenty strong with a pulling force of about 3lbs. Yours seem about twice the size and have a force of about 7lbs. I like the strength that mine are: any stronger and I would probably crack my clay frames, but any weaker and they might fall off. Regular magnets are far too weak, in my opinion, and it is better to experiment with smaller sizes of the neodymium/rare-earth magnets.
It took a great deal of effort just to slide apart the stacked magnets. After attaching three to the inside of the mask and 3 to the outside of the shell, I tried putting them together. The magnets are so strongly attracted, it would very difficult for me to remove the mask from the shell, which is something I want to be able to do fairly easily.
Even my little ones were pretty difficult to pull apart. Keep in mind that removal is probably helped by how secured the magnets are to your items; mine are set in epoxy. I'd test with tape so that you can avoid damage in case you need to return them, but experimenting is your best bet.
It's hard to say what you need, since I'm not sure how large or heavy your mask is, but it seems like you can afford to get much smaller diameter magnets. I suppose it's possible that you just get smaller thickness, but again it depends on how you're affixing them to your items.Any suggestions on what strength I should get?
Todogut
New Member
I chose the strong neodymium kind ... Mine were only 0.25" in diameter and were 0.125" thick and were plenty strong with a pulling force of about 3lbs. Yours seem about twice the size and have a force of about 7lbs... Regular magnets are far too weak, in my opinion, and it is better to experiment with smaller sizes of the neodymium/rare-earth magnets.
Thank you for the feedback. That's what I needed to know. I'm headed to Home Depot to hopefully exchange for smaller, less powerful magnets.
HendoArt
Active Member
Thank you for the feedback. That's what I needed to know. I'm headed to Home Depot to hopefully exchange for smaller, less powerful magnets.
Let us know how it goes!
HendoArt
Active Member
Update: 2nd Print
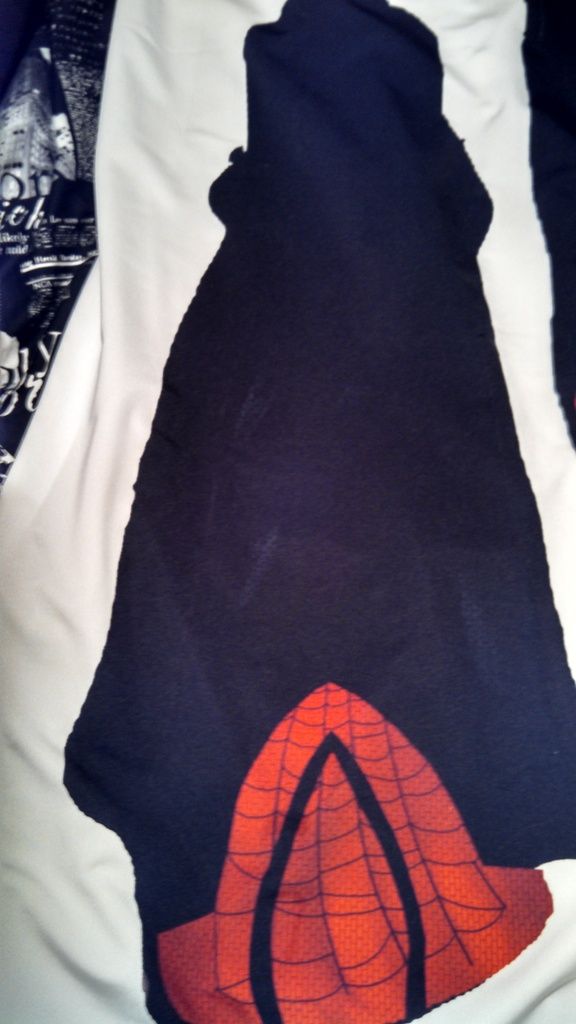
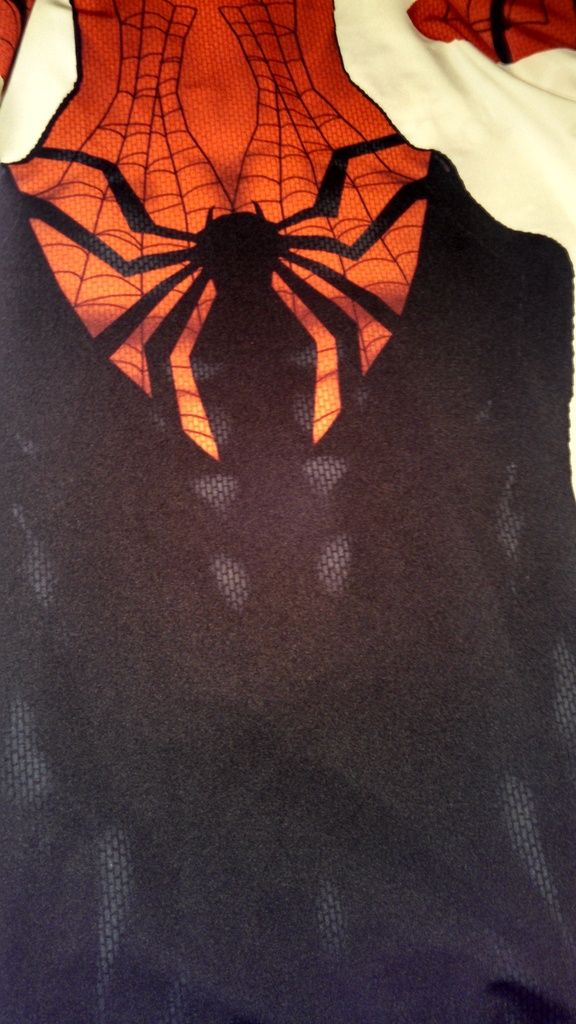
My reprint arrived today! Unfortunately, I still can't see most of the muscle pattern and a lot of the hexagonal patter is still missing. :cry
This print was 4 days late and still not right, even after consulting with their design team. Totally at a loss and pretty sure I won't finish in time for Wondercon now...

SpideyQueue
Member
Ouch, sorry it ended up a strike 2 girl. Try tho. Try and make the most out of what ya gotUpdate: 2nd PrintMy reprint arrived today! Unfortunately, I still can't see most of the muscle pattern and a lot of the hexagonal patter is still missing. :cry
This print was 4 days late and still not right, even after consulting with their design team. Totally at a loss and pretty sure I won't finish in time for Wondercon now...
View attachment 457088
think of it as a challenge to never say die!RiotJavelinDX
Sr Member
They never quite got mine right either. I'll post pictures of the one I kept versus what they sent me earlier. Certainly not a fun experience but FOD seems to have a hard time contrasting similar shades (or maybe just the tech overall is limited). If you think you can pull it off with the new print, go for it, but it you don't have time regardless you may want to get yet another print and save it for Halloween.
Last edited:
thejoeba
New Member
Update: 2nd PrintMy reprint arrived today! Unfortunately, I still can't see most of the muscle pattern and a lot of the hexagonal patter is still missing. :cry
This print was 4 days late and still not right, even after consulting with their design team. Totally at a loss and pretty sure I won't finish in time for Wondercon now...
That's really a bummer. If you aren't returning it, you could still build it with what you have, I think the design of the suit is much more important than the shading and patterns.
HendoArt
Active Member
That's really a bummer. If you aren't returning it, you could still build it with what you have, I think the design of the suit is much more important than the shading and patterns.
Try and make the most out of what ya got
I'd say:go with the better print and continue your build ! It doesn't need to be perfect,just good enough.
They never quite mine right either. I'll post pictures of the one I kept versus what they sent me later. Certainly not a fun experience but FOD seems to have a hard time contrasting similar shades (or maybe just the tech overall is limited). If you think you can pull it off with the new print, go for it, but it you don't have time regardless you may want to get yet another print and save it for Halloween.
Thanks all! I am definitely going to ask for a reprint, hopefully they will give me a good discount since I'm pretty annoyed. But you guys have re-motivated me, so now I'm going to sew this thing out of spite, lol. Maybe I can sell it and try to get my money back once the better print arrives. This one will be a practice round, so no puffy painting.
HendoArt
Active Member
Update: Angrily Sewing the Not-So-Great Print Anyway!
I haven't ever sewn stretch before (or really anything...), but winged it based on a fair amount of internet research on what to buy. Looked up the manual for my sewing machine; would have been 100% clueless without it.
So the tools here are:
1. Polyester thread
2. Brother EX-660 sewing machine (if that means anything?)
3. Walking foot (see below)
4. Stretch needle
5. This pattern guide from I have no idea where:


Sewing the Damn Thing
1. Played around with the stitch settings from the manual and settled on stretch overlock, which looks slightly better than zig zag from the right side.
2. The most tedious part is the "basting" which is just lining up everything with a shotty stitch. It's easiest to do it right on the lines.
3. Once you're good and basted, sew over it, a little inside of the basting seam, then pull the basting stitch out. Good basting saves your life. Call me the masterbaster, loool.
4. The lycra really doesn't fray at all, but I left a fair allowance and cut it off afterwards.
Below you can see how the seam looks before I pull the baste out.


1. So this suit is a bit small for even me; woulda workout out more if I thought it'd be so tight.
2. Detaching the feet might help the fit, but sewed one for comparison.
3. Next will be the gloves, which will probably help decide if I want to have the feet attached or not.
4. For some reason, the sides don't line up well, so I can fix that in the next print at least.


5. For the hip darts, the one on the left is from the pattern; the one on the right is me making the dart a little straighter, which looks better. I won't fine tune these until the full body is ready.


RiotJavelinDX
Sr Member
Making quick work of it. I'd like to try and sew mine and save $300 but at the same time I'm terribly afraid of messing it up. As discussed, here's a snippit of what I sent to FOD:

...and here's what they sent me three times in a row:
Almost all the detail was washed out, very frustrating, but they did eventually improve. My suit is currently being worked on by El Fett (silicone spider) so I can't show you what the "better" print looks like it, but it WAS a pretty big improvement.
SpideyQueue
Member
This link helped out my friend a ton!Update: Angrily Sewing the Not-So-Great Print Anyway!
I haven't ever sewn stretch before (or really anything...), but winged it based on a fair amount of internet research on what to buy. Looked up the manual for my sewing machine; would have been 100% clueless without it.
So the tools here are:
1. Polyester thread
2. Brother EX-660 sewing machine (if that means anything?)
3. Walking foot (see below)
4. Stretch needle
5. This pattern guide from I have no idea where:
View attachment 457419 View attachment 457418
Sewing the Damn Thing
1. Played around with the stitch settings from the manual and settled on stretch overlock, which looks slightly better than zig zag from the right side.
2. The most tedious part is the "basting" which is just lining up everything with a shotty stitch. It's easiest to do it right on the lines.
3. Once you're good and basted, sew over it, a little inside of the basting seam, then pull the basting stitch out. Good basting saves your life. Call me the masterbaster, loool.
4. The lycra really doesn't fray at all, but I left a fair allowance and cut it off afterwards.
Below you can see how the seam looks before I pull the baste out.
View attachment 457421 View attachment 457423 View attachment 457422
1. So this suit is a bit small for even me; woulda workout out more if I thought it'd be so tight.
2. Detaching the feet might help the fit, but sewed one for comparison.
3. Next will be the gloves, which will probably help decide if I want to have the feet attached or not.
4. For some reason, the sides don't line up well, so I can fix that in the next print at least.
View attachment 457424 View attachment 457425
5. For the hip darts, the one on the left is from the pattern; the one on the right is me making the dart a little straighter, which looks better. I won't fine tune these until the full body is ready.
View attachment 457426 View attachment 457427
https://youtu.be/BJvSxyEkWTE
Shows the stitching of an entire spidey suit!! Hope it helps
HendoArt
Active Member
Making quick work of it. I'd like to try and sew mine and save $300 but at the same time I'm terribly afraid of messing it up. As discussed, here's a snippit of what I sent to FOD:
http://i1130.photobucket.com/albums/m536/RiotJavelinDX/Untitled.png
...and here's what they sent me three times in a row:
http://i1130.photobucket.com/albums/m536/RiotJavelinDX/IMG_20140809_213140_078.jpg
http://i1130.photobucket.com/albums/m536/RiotJavelinDX/IMG_20140809_213325_766.jpg
Almost all the detail was washed out, very frustrating, but they did eventually improve. My suit is currently being worked on by El Fett (silicone spider) so I can't show you what the "better" print looks like it, but it WAS a pretty big improvement.
Oh wowww, yours looks like it was even worse. I'm hoping that the third time is the charm, good to know they can actually improve though :/ Did you have to improve the file yourself or did they just sort of finally understand what it is that you wanted?
- - - Updated - - -
This link helped out my friend a ton!
https://youtu.be/BJvSxyEkWTE
Shows the stitching of an entire spidey suit!! Hope it helps
LOL that suspense music is something else, but this video looks like it'll be super useful for the gloves especially, thanks!!
RiotJavelinDX
Sr Member
Luckily I never had to change the fileOh wowww, yours looks like it was even worse. I'm hoping that the third time is the charm, good to know they can actually improve though :/ Did you have to improve the file yourself or did they just sort of finally understand what it is that you wanted?
SpideyQueue
Member
Luckily I never had to change the file

That's mine from FOD. I have my other mask there for the colour comparison. Under lights it's burgundy and in the sun it's almost purple. Still gonna have at it and do my best for Anime North in May. I even tried to brighten it up.
Similar threads
- Replies
- 1
- Views
- 196
- Replies
- 3
- Views
- 486
- Replies
- 1
- Views
- 273