Show your custom Lightsabers!

Have been sitting on this canon flash for a while and finally got around to putting something together.

PXL_20211025_101408516.PORTRAIT.jpg


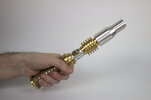
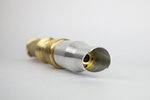
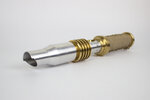
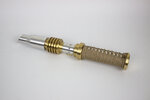
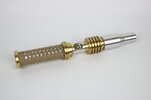
I really liked all the original buttons and things so I wanted to keep all of that. I decided the simplest way was to build an emitter section which could just click directly into the sprung latched end. It's made from the booster section of a 3d printed Obi wan saber which had warped in the sun, plus the flash reflector attachment and some odd parts.

PXL_20211025_101451866.PORTRAIT.jpg


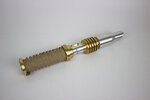
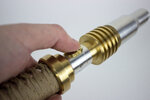
The pommel is a selection of lens parts and some kind of (metal) toy pommel I had in a box of bits. I bolted through the lot and into the flashguns threaded endcap.

PXL_20211025_101424239.PORTRAIT.jpg


Clamp has a section of PCB which I liked the details on then topped with a cut down lens from an old laser hair removal machine.

Everything is either pressure fit or bolted together so it may evolve but for now I like where this has ended up.

PXL_20211025_101201037.PORTRAIT.jpg

PXL_20211025_101147750.PORTRAIT.jpg

PXL_20211025_101235582.PORTRAIT.jpg


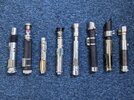
Here's a shot of my latest creation with the rest collection (although only the three on the left are "done")

PXL_20211025_101748122.jpg
 

Attachments

  • PXL_20211025_101748122.jpg
    PXL_20211025_101748122.jpg
    4.5 MB · Views: 119
  • PXL_20211025_101201037.PORTRAIT.jpg
    PXL_20211025_101201037.PORTRAIT.jpg
    1.5 MB · Views: 110
Beautiful work Wolfe.

Has there ever been talk of anyone organizing a hardware store custom lightsaber build project? Everytime I go to Lowes/Home Depot I get so tempted to start my own custom saber using parts found there, but I never do.
Like a group build of a specific design? Or just a “show your hardware saber tricks” thread?
 
WIP_2.jpg


I'm working on a lightsaber using the dreaded Graflite, lol. Here are the parts that I have used so far:
  • Emitter: These parts are from a flash diffuser that came with a King Sol camera flash unit.
  • Clamp: This is a naturally weathered Graflex clamp.
  • Circuit Card: This is from a broken Gameboy cartridge.
  • Lower Half and Endcap: Both are also from a King Sol camera flash unit.
I plan on painting the Graflite black and adding grips to the middle section. I have ordered and will be using six Nintendo Switch Joy Con replacement slider brackets.
51MMagd7yHL._SL1000_.jpg
 
Boy, I'm sure surprised to see how much this thread has grown since my last post in here, let alone how large it's become since I started my customs. Oh, how I remember the days before we artificially inflated all the prices of vintage flashes that had nothing to do with the movies. ;)

I've not had much time to do anything personal and was itching to do something quick and to keep my machining skills from rusting. I had been acquiring material gradually to rebuild one of my customs and finally got around to do something about it before the Thanksgiving holiday. As a matter of fact, I've made this saber twice before and each time unhappy with the results, but edging ever closer to what I was genuinely happy with.

Like the previous attempts, I want it to look very PT in design, without being overly manufactured, and incorporated real-world, pre-existing parts. My problem was that I've never been able to settle on the actual design of it; I've only ever managed to do parts of it. I've been playing Knights of the Old Republic a lot lately, and I just realized that I have been shying away from just straight up replicating the generic, low-poly tin cans that I was basing the overall look on.

I said, "the-hell-with-it," and decided to just replicate the generic, low-poly tin cans from the game and port over the components that I've liked most through my rebuilds.

I want it clean and lean, simple in color and design, without excessive flash and flourish; but like all my custom hilts, the story it conveys has to be simpatico with the owner. This is someone that presents themselves has humble and understated, but there's a streak of vanity through her---a certain level condescension and snobbery. She'll wear simple, muted clothing but made of the finest, most luxurious fabrics. This hilt has to be reflective of that on top of my previous stipulations.

This is what I've built:

DSC00129.JPG
DSC00132.JPG
DSC00134.JPG
DSC00135.JPG
DSC00137.JPG
DSC00138.JPG
DSC00139.JPG


I machined the hilt body out of cold-rolled aluminium tubing (keeping the silhouette of the sink tube) and imported all my previous greebles with a few extra washers. Nuts in the base and emitter of the hilt hold the entire thing over a threaded rod. Unlike my other iterations, this is actually built (fairly) well. The only new things are the two led cases from a pack I've been saving for a cast-metal Palpatine hilt I want to do in future. They take the detail that pop rivets added before and I think it works a lot better now.

The "pearl" inlay is UV resin mixed with pearlescent powder mix and layered in thin layers with a small brush to create a sense of depth, and then sanded down on my lathe to an even and reflective surface. It's not perfectly clean or even, you see the spots where air-bubbles formed and trapped dirt and oil; and other areas where the resin ran or there wasn't enough powder mix, but there's not much that can be done about that now. Same for the depth cuts for the inlays, they're not all that finessed either (due to my lack of tooling and skill).

In any case, I'm beyond thrilled with what I've done with this and it ticks all the boxes I wanted from the start---finally! It took three cracks at this to finally get what I wanted out of it but third time's the charm, as they say...


...Especially when you've six years in-between to practice!
 
Looks great! I like the use of Heiland greebles. The whole thing has a prequel clan-saber vibe, but less overdesigned.


Oh, how I remember the days before we artificially inflated all the prices of vintage flashes that had nothing to do with the movies. ;)

A friend of mine has gotten into film photography recently, and he's told me there's been something of a resurgence of interest in old film equipment and methods over the past few years. So it may not all be our fault. :D
 
Looks great! I like the use of Heiland greebles. The whole thing has a prequel clan-saber vibe, but less overdesigned.

I suppose the thinking behind it is similar, it has to look like something from a distance...Only I wanted the hilt to actually look like someone cared for it and lovingly built the thing.

A friend of mine has gotten into film photography recently, and he's told me there's been something of a resurgence of interest in old film equipment and methods over the past few years. So it may not all be our fault. :D

Just mostly. ;)
 
I recently made this custom design lightsaber. Would love to hear what people think.

I came up with the design as a 3D model in fusion 360 before machining each part on the lathe, mill and a little bit of CNC. The idea behind the design was that this would be a lightsaber from the High Republic era belonging to a Jedi named Tanis. This is what the acid etched Aurebesh says. There is a working switch which activates a flickering orange LED in the open end, and the handle has a parachord wrap.
 

Attachments

  • Lightsaber Hi Res 7.jpg
    Lightsaber Hi Res 7.jpg
    6.4 MB · Views: 136
  • Lightsaber Hi Res 6.jpg
    Lightsaber Hi Res 6.jpg
    9 MB · Views: 123
  • Lightsaber Hi Res 5.jpg
    Lightsaber Hi Res 5.jpg
    8.9 MB · Views: 114
  • Lightsaber Hi Res 4.jpg
    Lightsaber Hi Res 4.jpg
    3.5 MB · Views: 113
  • Lightsaber Hi Res 3.jpg
    Lightsaber Hi Res 3.jpg
    4.5 MB · Views: 106
  • Lightsaber Hi Res 2.jpg
    Lightsaber Hi Res 2.jpg
    7 MB · Views: 114
  • Lightsaber Hi Res 1.jpg
    Lightsaber Hi Res 1.jpg
    4.2 MB · Views: 144
  • My Movie 10.mp4
    2.9 MB
Here's my latest custom saber, this one came about whilst sorting through my box of saber-related parts and pieces. I noticed that one of the MHS emitters I had picked up looked vaguely like the business end of Mara Jade's hilt if I coupled it with some t-track.

That got me thinking... What if I took the design for Mara Jade's saber and reimagined it using a flashgun as the base?! I've always quite liked the MJ hilt, the grip section and emitter fins in particular, but I wanted to tweak a few details to give it a more OT feel and tie it in with the flashgun body.

PXL_20211220_133833962.PORTRAIT.jpg


I used a minicam flash as the base of the build. It's nice and clean with just enough flash gun details in the area not covered by the grips or activation box. I figured these details could take the place of the usual machined lines whilst keeping some interest. Simple steel flat bar sections were used for a Mara style grip. Trying to maintain any kind of precision when cutting and drilling steel by hand is easier said than done so things are a little.... organic :p. Plus my inherently impatient nature means I probably didn't take the time I should have, but it's not a total wreck.

MaraSaber_Grips.png


The emitter is the aforementioned MHS one which I built up using a piece of old dyson vacuum adapter and some trimmed down t-track grips. I added a few thumbscrews, including one with a bumpon to simulate the button (which I remember reading on here was how the original Parks was done?)

MaraSaber_emitter.png


The activation box was one place that I decided to hark back to a more OT look. I used the clamp from a Ziess Ikon flash. It's so bulky I thought it had a similar feel the fairly boxy one on the MJ saber.

As there are already plenty of circular/button/knob looking things on this hilt and as I've always liked clamp cards and bubble strips I opted to explore that route. Whilst looking through some of the circuit board pieces I have I found a ridged ceramic heatsink. I cut it to size and really liked the way it looked . It keeps the monotone colour scheme but the deep ridges emulate the stripes of the PCB clamp cards, I think I'll use this in future builds. The gaping voids in the Ziess clamp were filled with some satisfyingly well sized caps from a USB stick.

MaraSaber_Box.png


One thing I'm still undecided on is the brass knob/covertec. A covertec just doesn't feel OT enough so if I do add anything I suspect it'll be more like the functional looking knob on the original Parks. For now I'm happy with results and it's got me thinking what other existing hilt designs could get a flashgun makeover.

Thanks for looking

PXL_20211220_112106007.PORTRAIT.jpg
 
I recently made this custom design lightsaber. Would love to hear what people think.

I came up with the design as a 3D model in fusion 360 before machining each part on the lathe, mill and a little bit of CNC. The idea behind the design was that this would be a lightsaber from the High Republic era belonging to a Jedi named Tanis. This is what the acid etched Aurebesh says. There is a working switch which activates a flickering orange LED in the open end, and the handle has a parachord wrap.
That is extremely well done. I love the High Republic vibe, color scheme and wrap with nice etching touch!
 
Here's my latest custom saber, this one came about whilst sorting through my box of saber-related parts and pieces. I noticed that one of the MHS emitters I had picked up looked vaguely like the business end of Mara Jade's hilt if I coupled it with some t-track.

That got me thinking... What if I took the design for Mara Jade's saber and reimagined it using a flashgun as the base?! I've always quite liked the MJ hilt, the grip section and emitter fins in particular, but I wanted to tweak a few details to give it a more OT feel and tie it in with the flashgun body.

View attachment 1522336

I used a minicam flash as the base of the build. It's nice and clean with just enough flash gun details in the area not covered by the grips or activation box. I figured these details could take the place of the usual machined lines whilst keeping some interest. Simple steel flat bar sections were used for a Mara style grip. Trying to maintain any kind of precision when cutting and drilling steel by hand is easier said than done so things are a little.... organic :p. Plus my inherently impatient nature means I probably didn't take the time I should have, but it's not a total wreck.

View attachment 1522337

The emitter is the aforementioned MHS one which I built up using a piece of old dyson vacuum adapter and some trimmed down t-track grips. I added a few thumbscrews, including one with a bumpon to simulate the button (which I remember reading on here was how the original Parks was done?)

View attachment 1522338

The activation box was one place that I decided to hark back to a more OT look. I used the clamp from a Ziess Ikon flash. It's so bulky I thought it had a similar feel the fairly boxy one on the MJ saber.

As there are already plenty of circular/button/knob looking things on this hilt and as I've always liked clamp cards and bubble strips I opted to explore that route. Whilst looking through some of the circuit board pieces I have I found a ridged ceramic heatsink. I cut it to size and really liked the way it looked . It keeps the monotone colour scheme but the deep ridges emulate the stripes of the PCB clamp cards, I think I'll use this in future builds. The gaping voids in the Ziess clamp were filled with some satisfyingly well sized caps from a USB stick.

View attachment 1522339

One thing I'm still undecided on is the brass knob/covertec. A covertec just doesn't feel OT enough so if I do add anything I suspect it'll be more like the functional looking knob on the original Parks. For now I'm happy with results and it's got me thinking what other existing hilt designs could get a flashgun makeover.

Thanks for looking

View attachment 1522340
Excellent work with some truly awesome elements! I agree with PPP- that heat sink is cool!
 
Now that TCSS has a thin-neck system, I put together this Obi-wan mashup.

All the weathering and dark sections were achieved with Aluminum black before sealing with Rustoleum flat clear coat. There are some very minor dings and dents but I wanted to keep it relatively clean.

The chamber is mostly Goth-3Designs modular parts, with a couple PLA printed parts to hold the chassis PCB so it can be removed. I painted it with airbrushed enamel and used dry-brush acrylic for weathering. The crystal is real quartz and is lit by a single 3535 pixel. Thanks to the 'blade detect' feature of ProffieOS, the saber automatically changes to a crystal sound font when the chassis is removed and will no longer power up. A single button is mounted and counter-sunk in the cubes and the pommel features a D ring insert for belt wear.

979C0882-10B5-41AD-921E-8106560034CE.jpg

IMG_2364.jpeg

IMG_2362.jpeg


I also put together this small MHS V1/V2 mashup using Sur-Fin brass patina and more aluminum black.
It's a simple removable battery install (also using Proffieboard) and is just a hair shorter than a Graflex. Same recessed button as the thin-neck and a replica Kobold clip from WannaWanga. The glass eye is a 12mm cabochon set in a button bezel. It illuminates with the blade.
IMG_1879.jpeg

IMG_1871.jpeg

IMG_1899.gif
 

Your message may be considered spam for the following reasons:

If you wish to reply despite these issues, check the box below before replying.
Be aware that malicious compliance may result in more severe penalties.
Back
Top