There are large scale FDM printers, but most resin printers have a smaller print bed. Figure out what the longest piece would be, and that might control who can print this. If the blade is printed in ONE resin piece, then someone would need that X length resin printer to print the blade as one piece and hilt as one piece. Printing the blade in multiple pieces means joining them and work to remove the visible joint.
You are using an out of date browser. It may not display this or other websites correctly.
You should upgrade or use an alternative browser.
You should upgrade or use an alternative browser.
Prop Replica STL files Section Free Personal Use
- Thread starter Jintosh
- Start date
Edged
Well-Known Member
I forgot about the size restraints of resin printers. Looking at the pics on the link I provided if would seem the hilt is about 6” and the blade looks to be at least 10”. Doesn’t appear to be any tang going through the handle as he’s using metal rods to support the connection, but even 10” would be significant for most home resin printers, right?
perhaps someone would be able to optimize the print a bit in FDM, but those lines are really just part of the process, I suppose. They can’t be avoided completely.
perhaps someone would be able to optimize the print a bit in FDM, but those lines are really just part of the process, I suppose. They can’t be avoided completely.
I am new to the game but yes, the lines are an immutable law currently. I am just now getting down to learning the process for post print smoothing. The methods I have seen so far are sprays and paints, smooth applied canned creme versions of the same (uv resin) or the grotesque upscaling by 1 to 2 percent and sanding without filling (the ultra fast, down and dirty, supply the entire prop set for the zombie army fan movie you are making) but most detail is lost.I forgot about the size restraints of resin printers. Looking at the pics on the link I provided if would seem the hilt is about 6” and the blade looks to be at least 10”. Doesn’t appear to be any tang going through the handle as he’s using metal rods to support the connection, but even 10” would be significant for most home resin printers, right?
perhaps someone would be able to optimize the print a bit in FDM, but those lines are really just part of the process, I suppose. They can’t be avoided completely.
But this self imposed nightmare just got started because most fdm printed parts also have support attachment debri that is far worse than the lines. Only way around that is a perfectly planar flat bottom. In your case that would mean splitting the blade in half and gluing the two halves back together. Another process where resin stands supreme.
I have already stabbed my own hand processing my first ever 3d prints because I tried to clip away the support trees too quickly.
So, I offer this as an option, iif no one here has a good link to an rpf print service, look in your locale for public schools or colleges and check if they offer large scale resin printing for a fee. I found several that did when I was in Salt Lake. There are also art cooperatives in most areas and they will offer the same. The one I went to in salt lake was a "Maker Space" club. Most highschools will have one as well, dedicated to robotics or drama, usually. But they love recouping some of their money. It was maybe a tenth of the rates charged by Xometry and similar.
Pretty sure we have more than a few in the services forum, I know I have seen them but haven't found the link yet.
Edged
Well-Known Member
Thank you for the suggestions.
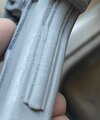
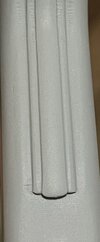
I have dealt with the lines in the past. I know they are unavoidable. Truth be told it, it challenged me, in a good way, to achieve a final outcome I was pleased with, but the example below was the worst of it and I was able to get into the edges with pencil files and slower went from 220 down to wet sanding with 2000 grit.
With the dagger I mentioned above, I feel like it would be a nightmare attempting to sand past the detail in that face area of the pommel. The rest would be doable, though.
I just know that while I’ve been able to accept the challenge on some kits, others I just gave up on. countless hours of sanding just wasn’t worth it in the end. I knew it would never live up to my standards so I abandoned them. I have a feeling that dagger, in FDM, wouldn’t end well lol
That took a lot of effort and it’s still not perfect.
Attachments
The idea of no initial sanding is what gets my attention because to me that sounds like no massive loss of detail.Oh my god! That’s incredible. I never even thought to use resin like that! Amazing.
I have had some decent success with this filament pack I ordered. Took a bit but I found out what was in my sample pack that came with the printer. It printed my first run at the Jod buckle and I was super excited but then loaded copper metallic silk and ended up printing a viable wood rasp. I would rather have the buckle and just purchase a wood rasp when I need one. My new filament came in 2 days back and I have gone crazy printing smooth stuff again. It prints better and it can handle ironing for a much smoother surface on flat objects. Very minor sanding and it is ready for paint (filler paint).
As for the Adam Ant buckle, I am at my limit for skill so I am posting another tonight in the hopes that folks will download and throw some experience into it. The one I posted the other day is the same but lower resolution. I still have not perfected the low res but smooth trick. The file should at least look wonderful even if the print has lines but to already have lines, in the file, that is just bizarre.
Update 3-16-25 with new stl but the text is worth the read as it describes issues I was having at this time that were resolved with help from this thread. I have replaced the stl file and the render picture below.
Previous text:
Here is one of the iterations of the Adam Ant buckle. I have not had any luck at all getting the image I see on the screen to actually export as same. It shows totally smooth and hides the double thickness seam that I placed for strength (the double thickness, not the seam, it can go away). If anyone has the ability to get this to actually save as a smooth file it should look like this when done:
Attachments
Last edited:
smithjohnj
Sr Member
In some cases I have had some print improvement by angling the object on the print bed. For example your rope has a strong 45 degree characteristic, perhaps some experimentation along that line might help.
Last edited:
Sorry, I should have given perspective on when the degradation happens. This loss of resolution is before printing. When I take the file out of meshmixer or Blender as an stl, the quality drops to obvious fractals where it had been smooth. Those two programs are offering "smooth" as an onscreen rendering only. Upon exporting, it shows what is really there or is dropping resolution greatly due to some export feature. Not sure which but when I look it up online, it seems I am certainly late to this realization and this quality issue versus onscreen presentation is an actual feature in Blender to keep file size low for video games. It renders the smoothness when it can be seen on the game but not when stored as an image file. I need the output to be true.In some cases I have had some print improvement by angling the object on the print bed. For example your rope has a strong 45 degree perhaps some experimentation along that line might help.
characteristic.
I have tried turning on the "sculpt base mesh when sculpting onscreen", have "apply" set as default instead of render visual and still nothing changes. Only massive changes will change the mesh underneath but smoothing affects it not at all.
skiffy
Sr Member
Greenmachines - I've been using Blender for many years and use it for modelling for print. As long as I have flat-shading selected I see the polygon structure - which is exactly as it will show when exported to a slicer like Cura or Prusa Slicer. If I have a sub-division mesh active, I'll apply it first to see what the actual polygon mesh will look like.
Might that help you?
Here's a screenshot of my current build with a shiny matcap added so you can more easily see that the left side image is flat-shaded and the right side image is smooth shaded. The left side shows the actual polygonal structure of the mesh that will be exported for print. As long as the 'flow' is correct there should be pretty minimal clean-up, but there will be some.
Last edited:
Greenmachines - I've been using Blender for many years and use it for modelling for print. As long as I have flat-shading selected I see the polygon structure - which is exactly as it will show when exported to a slicer like Cura or Prusa Slicer. If I have a sub-division mesh active, I'll apply it first to see what the actual polygon mesh will look like.
Might that help you?
Here's a screenshot of my current build with a shiny matcap added so you can more easily see that the left side image is flat-shaded and the right side image is smooth shaded. The left side shows the actual polygonal structure of the mesh that will be exported for print. As long as the 'flow' is correct there should be pretty minimal clean-up, but there will be some.
View attachment 1910179
Such a simple fix. Thank you so much. I told my wife it would be something like this. Because I am not rendering for video/gaming use, I really just want to know exactly what I really have and this is how. You will have to just imagine you got the full bowed head and clasped hands "THANK YOU". These kinds of questions are so difficult to take to the internet because I don't know the terminology and can't ask the question that will lead to the answer that actually can be interpreted by me. Professional jargon is such a very tall wall to get over.
I am going to start a Let's talk all things 3d sculpting/designing and printing/fabricating unless someone can point me to one that already exists. I try to be respectful of the original basis of a thread but I always end up back here blowing out the sides on tangent questions. I have a few really good links now and want to share. Anyone know of an open thread for this stuff?
skiffy
Sr Member
Thank you for your kind words, Greenmachine - Whether a thread exists or you make one - I'm happy to contribute and help out wherever I can.I am going to start a Let's talk all things 3d sculpting/designing and printing/fabricating unless someone can point me to one that already exists.
Modery
Member
My process isModery shared this with me yesterday. Brilliant all around video on post processing but when you see his paint shaker it was worth watching just for that.
- sand with 90/120, then work towards 320 (either with the palm sander I have or sanding paper)
- use the UV resin + baby powder mix
- sand again starting at around 180-250. Work upwards towards 599
- apply a primer. This helps to see if any further resin and/or sanding is needed
- if wanted, sand up to 1000, rarely 2000
For smaller details I also use these needle files
You have to be careful with Matcap materials, because the lighting is baked in any kind of engraving or fine surface detail will appear deeper/more pronounced than it actually will be in your 3d print. You should check it in multiple render materials- Zbrush is the worst culprit because the red clay matcap is the default. Just my 02, as it's bitten me in the rear more than once!Greenmachines - I've been using Blender for many years and use it for modelling for print. As long as I have flat-shading selected I see the polygon structure - which is exactly as it will show when exported to a slicer like Cura or Prusa Slicer. If I have a sub-division mesh active, I'll apply it first to see what the actual polygon mesh will look like.
Might that help you?
Here's a screenshot of my current build with a shiny matcap added so you can more easily see that the left side image is flat-shaded and the right side image is smooth shaded. The left side shows the actual polygonal structure of the mesh that will be exported for print. As long as the 'flow' is correct there should be pretty minimal clean-up, but there will be some.
View attachment 1910179
I had looked at meshmixer because it is made to be a dedicated slicer but if I export from it as stl and open in a different slicer the exact same issue arises, the smoothness is gone again. I really wish there was a button that said, "print view".You have to be careful with Matcap materials, because the lighting is baked in any kind of engraving or fine surface detail will appear deeper/more pronounced than it actually will be in your 3d print. You should check it in multiple render materials- Zbrush is the worst culprit because the red clay matcap is the default. Just my 02, as it's bitten me in the rear more than once!
I designed and printed a Heart Eyes "Kill Arrow" that is spring loaded. You just need 2 springs and a small nail that is ground down.
Heart Eyes - Kill Arrow Spring loaded by Squad Ghouls

Heart Eyes - Kill Arrow Spring loaded by Squad Ghouls
OasisSupernova
Sr Member
Everybody here is making the coolest stuff. Brabvo.....I designed and printed a Heart Eyes "Kill Arrow" that is spring loaded. You just need 2 springs and a small nail that is ground down.
Heart Eyes - Kill Arrow Spring loaded by Squad Ghouls
View attachment 1911952
If anybody ever finds an Anibus statue from Raiders of the Lost Ark that would be great. Lol
Similar threads
- Replies
- 8
- Views
- 4,120
- Replies
- 92
- Views
- 12,653
- Replies
- 19
- Views
- 33,851