I’m a total newbie to 3D design. I consider this complex when other would be able to whip this up in 20 min lolEverybody here is making the coolest stuff. Brabvo.....
If anybody ever finds an Anibus statue from Raiders of the Lost Ark that would be great. Lol
You are using an out of date browser. It may not display this or other websites correctly.
You should upgrade or use an alternative browser.
You should upgrade or use an alternative browser.
Prop Replica STL files Section Free Personal Use
- Thread starter Jintosh
- Start date
same here, just posted my first one very recentlyI’m a total newbie to 3D design. I consider this complex when other would be able to whip this up in 20 min lol
OK, this one has had me going now for a few weeks but finally completed this solid model of a hammer back and ready flintlock mechanism for pistol or rifle. Would look very legit with a slice of stone pinched in the clamp in a fold of leather or cloth.


An example of the flint and cloth:

An example of the flint and cloth:
Attachments
Last edited:
OK, this one has had me going now for a few weeks but finally completed this solid model of a ****** and ready flintlock mechanism for pistol or rifle. Would look very legit with a slice of stone pinched in the clamp in a fold of leather or cloth.
Hi. Please add a picture of a render of the object. I always have a render and the STL file so people can see it before downloading.
Is this in the design software or in the slicer?Hi. Please add a picture of a render of the object. I always have a render and the STL file so people can see it before downloading.
Is this in the design software or in the slicer?
Anything that just shows what it looks like. If you look at my posts, I usually add a picture that's from Zbrush and has color, even though the STL doesn't have color. I like to show what it COULD look like after you print and paint.
Will do, I have two but will check all and update retro. 2 updated. I think I got lucky on the third (my first upload) because I had been working in the file earlier that day and already had the render shots loaded.Anything that just shows what it looks like. If you look at my posts, I usually add a picture that's from Zbrush and has color, even though the STL doesn't have color. I like to show what it COULD look like after you print and paint.
Last edited:
I wanted to thank you for this. I had not yet really got to this stage of my learning process and was still battling with the software. After I had a truly smooth exported stl with decent face numbers, (another thank you to skiffy ) I then hit this exact scenario where flat to bed (on top surface) was crushing my soul, aka, making an obvious display of any non level areas by creating defined shelves between layers. My brain immediately ran back to your comment and another bad habit is out of the way.In some cases I have had some print improvement by angling the object on the print bed. For example your rope has a strong 45 degree characteristic, perhaps some experimentation along that line might help.
Last edited:
Jintosh, I have a new version of one of the buckles, smooth and with an upgrade to the spike/post. How do you want this loaded for consistency sake, in this thread? Should I overwrite the previous with the new image and attached file or post the new as new? Same buckle, just better coming off the printer.
Jintosh, I have a new version of one of the buckles, smooth and with an upgrade to the spike/post. How do you want this loaded for consistency sake, in this thread? Should I overwrite the previous with the new image and attached file or post the new as new? Same buckle, just better coming off the printer.
I go back and replace the file in the original post, add a message to the original post about what date the file was updated, and sometimes post a NEW message at the end of the thread saying the original file has been updated.
freaky01
New Member
Attachments
Last edited:
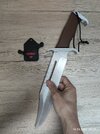
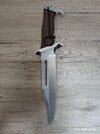
Did you use any particular top print or finish pattern in slicer settings? I saw the strength and quality settings but the shine seems linear or possibly concentric?
Great work! Very nice display piece.
Last edited:
Thank you, I just recently (2 weeks) ran into this issue and swapped back to plain white because I couldn't figure it out.Thank You!!!
To achieve a nice, even surface, all visible lines must be printed at the same speed. Silk PLA is very sensitive to this.
I have updated post 329 with a far smoother version of Adam Ant's spear tip buckle.
This square buckle is sized to match the onscreen proportional similarity to the speartip buckle. If you resize one to scale up or down by a specific percentage, you can duplicate that for this square buckle and they will continue to look appropriate regardless of 1.5inch, 1.75 inch or 2 inch belt strap width. This stl is sized to match the image of Adam at a 1.5 inch belt width. This square buckle has room above and below the 1.5 strap Adam is wearing so this buckle will have the same gaps if printed at 100 percent and used on a 1.5 inch standard belt.

I created this as a center swing pin rather than a side pin. Because of this I have left the pin out of the print. Brass craft rod in 3 to 4mm (approximately 1/8 inch) would be correct for a stronger belt but the 3mm would be far easier to shape. Most pins are slightly flattened at one tip and folded around a second length of brass to get the approximate round shape to slip over the center bar. Keep the bend open enough to do this. I fold mine over the other wire (extra length of the same wire you made the pin from) until the fold is parallel to the longer section (of itself). Slip this onto the center bar fully and check the length of the pin (must land on the flat face of the buckle correctly). When this length is correct, you can close the fold a little further and it will stay on the buckle. Because this is a metal pin on a plastic buckle, attempt to bend only the very end of the folded section to avoid clamping it down tight on the center bar. I will add pictures of all of the above as I finish my buckle.
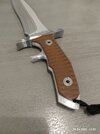
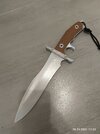
Here is the rendered image file:

and the print file is attached here at the bottom of this post.
One last caution on this print: let it cool completely before removing it from the print bed. Flat objects warp easily while cooling so it is best to allow it to cool while on the bed. Which of course reminds me that I print this face DOWN with no brim and no first layer expansion and no skirt. I did use tree supports, on print bed only, to support the bar. Printing face down ensures an entirely planar flat face that can be polished beautifully. Do not use raft either. My settings were .12 layer height, .2 line width on first layer, gyroid internal fill at 50% for strength.
I created this as a center swing pin rather than a side pin. Because of this I have left the pin out of the print. Brass craft rod in 3 to 4mm (approximately 1/8 inch) would be correct for a stronger belt but the 3mm would be far easier to shape. Most pins are slightly flattened at one tip and folded around a second length of brass to get the approximate round shape to slip over the center bar. Keep the bend open enough to do this. I fold mine over the other wire (extra length of the same wire you made the pin from) until the fold is parallel to the longer section (of itself). Slip this onto the center bar fully and check the length of the pin (must land on the flat face of the buckle correctly). When this length is correct, you can close the fold a little further and it will stay on the buckle. Because this is a metal pin on a plastic buckle, attempt to bend only the very end of the folded section to avoid clamping it down tight on the center bar. I will add pictures of all of the above as I finish my buckle.
Here is the rendered image file:
and the print file is attached here at the bottom of this post.
One last caution on this print: let it cool completely before removing it from the print bed. Flat objects warp easily while cooling so it is best to allow it to cool while on the bed. Which of course reminds me that I print this face DOWN with no brim and no first layer expansion and no skirt. I did use tree supports, on print bed only, to support the bar. Printing face down ensures an entirely planar flat face that can be polished beautifully. Do not use raft either. My settings were .12 layer height, .2 line width on first layer, gyroid internal fill at 50% for strength.
Attachments
freaky01
New Member
Attachments
Thank you so much for sharing!

***************************************
I haven't posted a freebie in a while, so here's one.
The haunted clock from The Haunted Mansion theme park attraction.
There are a number of variations out there, so this is my own variation.
***************************************
Free for personal use.
Attachments
Similar threads
- Replies
- 8
- Views
- 4,117
- Replies
- 92
- Views
- 12,647
- Replies
- 19
- Views
- 33,840