Obi-Wan’s Episode I Lightsaber - Modified Korbanth TPM OWK

Filandrius

Sr Member
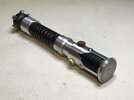
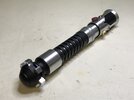
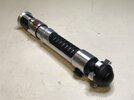
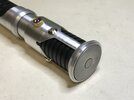
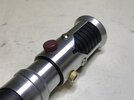
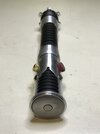
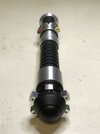
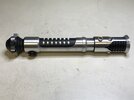
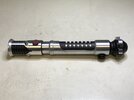
Hey everyone! Here's my latest lockdown project: a TPM OWK that I've modified to be as accurate to the screen-used hero prop as possible.

The greeblies that came with the kit were pretty much all discarded and replaced with found items (including the fender washer & steel rod in the emitter)

The kit itself was also modified a lot; for example, I've painted the anodized parts in flat black and replaced the cubes and the pommel tip.

Anyway, I'm pretty glad with the end result. Let me know what you think!
 

Attachments

  • IMG_3385.JPG
    IMG_3385.JPG
    1.2 MB · Views: 486
  • IMG_3386.JPG
    IMG_3386.JPG
    1.2 MB · Views: 496
  • IMG_3387.JPG
    IMG_3387.JPG
    1.2 MB · Views: 404
  • IMG_3388.JPG
    IMG_3388.JPG
    1.2 MB · Views: 722
  • IMG_3393.JPG
    IMG_3393.JPG
    1.1 MB · Views: 474
  • IMG_3394.JPG
    IMG_3394.JPG
    1.2 MB · Views: 402
  • IMG_3398.JPG
    IMG_3398.JPG
    813.4 KB · Views: 459
  • IMG_3399.JPG
    IMG_3399.JPG
    732.8 KB · Views: 352
  • IMG_3400.JPG
    IMG_3400.JPG
    1.5 MB · Views: 322
  • IMG_3401.JPG
    IMG_3401.JPG
    1.4 MB · Views: 575
Very nice!

Did you assemble the steel rod and washer so that they are removable or did you have to glue it down? I've got a couple of sabers where I'd love to try and replicate this more accurate look than using standard 1" blade plugs, which don't look as nice!
 
Very nice work! I've been planning a similar project and picked up one of these along with the more accurate replacement cubes and pommel cap but stalled out when tracking down better LED bezels... Do you have any recommendations for where to find thinner LED bezels like you used?

One other thing... It looks like you've maybe gone over the entire piece to smooth out and make more uniform the finish on the bare aluminum parts - did your K1 originally have an odd sort of brushed texture to the emitter shroud piece? I'd like to sand it down to make it look more like the rest of the aluminum on the saber, but being such a thin tube with no support at the end of those tabs I'm concerned about bending and ruining it -- can't exactly chuck it up on the mini-lathe. Also I'm not sure how much of a fight the clear anodization will put up.
 
Very nice!

Did you assemble the steel rod and washer so that they are removable or did you have to glue it down? I've got a couple of sabers where I'd love to try and replicate this more accurate look than using standard 1" blade plugs, which don't look as nice!
The emitter was, by far, the part I worked the most on. Yes, I had to glue down the washer & rod. The kit came with 2 emitter so I sacrificed one; I machined it so that the fender washer would fit, then I glued it in place. Then I glued the rod (only a short length) inside with a bunch of smaller washers for support. The emitter itself is removable but it’s permanently altered.
 
Last edited:
Very nice work! I've been planning a similar project and picked up one of these along with the more accurate replacement cubes and pommel cap but stalled out when tracking down better LED bezels... Do you have any recommendations for where to find thinner LED bezels like you used?

One other thing... It looks like you've maybe gone over the entire piece to smooth out and make more uniform the finish on the bare aluminum parts - did your K1 originally have an odd sort of brushed texture to the emitter shroud piece? I'd like to sand it down to make it look more like the rest of the aluminum on the saber, but being such a thin tube with no support at the end of those tabs I'm concerned about bending and ruining it -- can't exactly chuck it up on the mini-lathe. Also I'm not sure how much of a fight the clear anodization will put up.
For the bezels I went the same route as the screen-used prop: round 5mm LEDs that I shaved down until flat. I’ll get back to you with the exact LEDs I used.

Yes, I went over the entire piece to refinish the aluminum. I tumbled the parts then I achieved the brushed finish with some fine sandpaper (400 grit I think) by dry sanding until satisfactory. Since the parts are tubes, I just wrapped them in sandpaper in my hand and turned then manually. I did the same thing on the tabs but more carefully. Did it until the finish was uniform everywhere. Never even noticed that clear anodizing. ;)
 
Last edited:
Here's the LEDs I used: https://www.newark.com/vcc-visual-c...i/panel-indicator-white-8-1mm-12v/dp/40AH1851

They're perfect, IMHO. 5mm LED, 10mm chromed bezel (as you can see in my pics they're shinier that we see here) and the bezel has almost no lip. You just have to shave the round LEDs flat. Also the casing is a little long to fit inside the body, but that can be dremelled to length real easy.

BTW, since the goal was to replicate the screen-used hero, I didn't lose any sleep trying to make that finish perfect. The hero was pretty banged up, weathered & scuffed, so mine is too. It gives it a little authenticity and a lot of personality. ;)
 
Last edited:
They're perfect, IMHO. 5mm LED, 10mm chromed bezel (as you can see in my pics they're shinier that we see here) and the bezel has almost no lip. You just have to shave the round LEDs flat. Also the casing is a little long to fit inside the body, but that can be dremelled to length real easy.

I got some of the LED bezels you recommended and they look great! I noticed that the parts are larger diameter than the kit bezels, and walls on the new parts seem too thin to have enough material to turn down on a lathe to the smaller diameter. Did you instead drill to enlarge the holes in the body of the lightsaber?
 
I really love what you did here, the washer and steel rod look great. Up until now I never knew what was in those LED bezels... and its the LEDs shaved down. holy crap.
 
I got some of the LED bezels you recommended and they look great! I noticed that the parts are larger diameter than the kit bezels, and walls on the new parts seem too thin to have enough material to turn down on a lathe to the smaller diameter. Did you instead drill to enlarge the holes in the body of the lightsaber?
That's exactly what I did, yes. Also, I shortened the body of the bezels with a Dremel cutting wheel because they're too long to fit inside.
 
I really love what you did here, the washer and steel rod look great. Up until now I never knew what was in those LED bezels... and its the LEDs shaved down. holy crap.
That's exactly the kind of minute, obscure detail that makes me like props, and recreating them. :)
 
Just finished my similar build -- thanks again for the tips on the LED bezels and refinishing!

To help remove the anodization I did a few passes with oven cleaner before starting the sanding and polishing. For the bezels, there ended up being just barely enough room that they fit in place, using their original nuts, without being shortened other than trimming the wires (very tight fit, less than 1mm space at the center though).

Emitter was bored for a steel washer, though currently it just has a darkened aluminum blank tacked on the inside to back up the washer hole as I don't like to turn or part off steel on my little lathe - will eventually add in an actual steel disc or piece of rod like you used. I did have to turn down the two pommel pieces (original base and non-vented replacement cap) to remove several thousandths before painting as the replacement cubes fit was far too tight to avoid scratching paint when setting the cube alignment; did you run into that?

73B8200E-A89F-4763-8B21-1A4623C4D56F.jpeg
 
That saber looks insanely awesome. Great job. :)

Yes, I've run into that. But I like to live dangerously, and I just said to myself "try to fit it and if it scratches just repaint it" but I didn't need to. The fit was insanely tight but the paint didn't chip or scratch visibly. I guess I'm just lucky. ;)
 
This thread is more than 3 years old.

Your message may be considered spam for the following reasons:

  1. This thread hasn't been active in some time. A new post in this thread might not contribute constructively to this discussion after so long.
If you wish to reply despite these issues, check the box below before replying.
Be aware that malicious compliance may result in more severe penalties.
Back
Top