Obi-Wan Kenobi Episode 1 Resin Stunt Lightsaber Research

Dewy

Master Member
RPF PREMIUM MEMBER
Introduction
After the recently completed hero run with Anakin Starkiller, it should be apparent that I have an obsession with the Obi TPM lightsaber prop. However, that obsession is not limited to just the hero version. I have also amassed quite a collection of images of the various stunt sabers that were used. I wanted to create this post as a discussion of these stunt sabers and to outline my research and progress attempting to replicate the stunt sabers.

To help organize my thoughts I have broken down the stunt sabers into three logical groups, however there is a ton of variation between examples. As such, please understand that I am speaking in general terms and any broad statements I make apply to the average and not necessarily to every example.

Variations
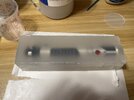
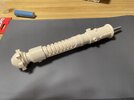
1) Detailed Resin Stunt
Picture1.png

Key Details:

  • Red button and brass knob are present in detail (knurling of both can be seen to varying degrees)
  • 6 pommel cubes are present though holes in cubes are generally filled (but remnants are still visible)
Major Variations:
  • All black grip vs. black & silver grip
  • Threaded rod for blade vs. no threaded rod
  • Wide variation in paint colors and method
  • Some have covertech added, some do not
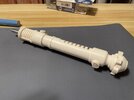
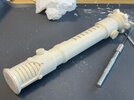
2) Featureless Resin Dueling Stunt
Picture2.png

Key Details:

  • Red button and brass knob are not physically present, but are painted on (remnants of brass knob hole can be seen)
  • No covertech
  • Pommel cubes have been removed
Major Variations:
  • Aside from variations in the paint and casting quality, these are generally fairly consistent in their major details
  • Sometimes missing one LED bezel
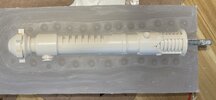
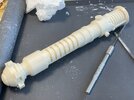
3) Metal Accented Detailed Resin Stunt
Picture3.png


Key Details:

  • Similar to “Detailed Resin Stunt” (above) but with added metal accents such as emitter bezel, fender washer, red button, brass knob, and LED bezels
  • All examples seem to have at least part of a threaded rod in the emitter
Major Variations:
  • Only two or three known variations have popped up
  • Variations consist of what metal details are added
Materials and Paint
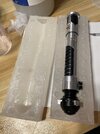
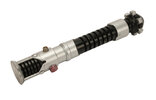
My assumption is that these were generally all based on off-white / yellow urethane resin castings. The amount of detail in the painting seems to vary widely. In general on top they all seem to have a metallic silver paint and satin or glossy black paint. It is unclear whether or not any type of clear coat would have been applied. However, underneath it appears some had obvious primer layers applied, while others seem to have the appropriate paint (black or silver) applied directly to the bare resin.
Picture4.png

The image on the left is a good representative sample of the two primary paints used, silver metallic and black with some amount of sheen. On the right is what I believe to be an example of one of the more carefully painted stunt sabers where it was clear they went through a multi stage process.

The paint scheme was not always consistent. As mentioned above the grip of the saber sometimes had a silver core, sometimes did not. The O-ring was generally left painted silver. The steps in the pommel were sometimes incorrectly painted silver. Etc. etc. etc.

Blades
Picture5.png

Key Details:

  • All episode 1 stunt blades were either fluorescent green or red/orange, the Obi TPM saber nearly always had a green blade
  • Fabricated from aluminum tubing, that was generally ~0.75”/~19mm outside diameter
  • Likely had an aluminum threaded insert to attach to the threaded rod in the saber
  • Most full length blades were further secured by set screws at base of blade
Major Variations:
  • Lengths varied from ~1m (for lightsaber dueling) to ~0.3m (for slicing droids, blaster deflection, etc.)
  • Wall thicknesses of aluminum tube varied
  • In general these were painted fluorescent green, though one notable example has what appears to be green textured tape
  • Some have what appear to be a clear heat shrink film applied for protection

In Post 2 I will start to detail my attempts at replicating a stunt saber and blade.
 
I want to thank thd9791 for his help researching and theorizing about the stunt blades. He has also done some awesome work in this area, hopefully he'll reply with his own findings and progress.

First I attempted to replicate one of the shorter stunt blades. I did buy some full length aluminum tube, but I haven't been able to find a fluorescent green paint that I'm happy with. In the mean time I did some work on a short red blade.

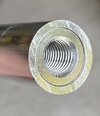
First I was lucky enough to find some 300mm long aluminum tubing that fit perfectly over an M10x1.5 threaded coupler:

IMG_0863.jpg

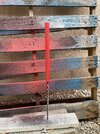
After that it was a matter of grabbing the brightest red paint I had and spraying it down.

IMG_0862.jpg

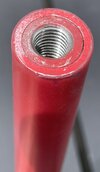
Once that was cured I applied a heat shrink wrap and since I didn't have a heat gun or a good torch, I just held the whole thing over my gas grill. :lol:

Here is a close-up of the end of the finished short red blade with the shrink wrap:
IMG_0865.jpg

A lot more to come on the blades, I have some green paint on the way and two 1m long aluminum tubes just waiting to be painted!
 
Last edited:
Next I wanted to tackle the really tricky part... the actual resin stunt saber.

I have zero experience with resin casting to begin with, but I am familiar with the process and have watched a ton of videos on the process.

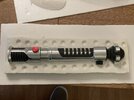
Below is a picture of my progress so far.

IMG_1089.jpg


I started with my own copy of the hero saber from the run. The first mold I made had the crooked emitter, however I also wanted to try embedding a threaded rod in the casting (since I believe that's how the originals were made) rather than inserting a threaded rod afterwards. In order to achieve that I used the straight emitter cap and made a second mold with a threaded rod protruding out. This would allow the mold to have some of the threaded rod, which would help with locating the rod when placing it in the empty mold.

From left to right in the image above:
  1. Master used for mold, shown here with the threaded rod (configuration for mold 2)
  2. Mold 1 Attempt 1: mold leaked, I had to quickly mix up more resin to supplement the leakage, but the initial pour was already curing so this one came out looking... bad
  3. Mold 1 Attempt 2: I was able to seal the mold better this time, but the mold was too small the amount of clamping force required to seal the mold distorted the saber. At this point I decided to stop screwing around and make a second, more substantial mold.
  4. Mold 2 Attempt 1: After spending an entire day prepping and making the second 2 part mold, my first pour leaked like a sieve. I aborted this pour when I got completely out of hand. I wanted to give up at this point. I then resolved to get a better backing material for the mold and I knew I needed a whole lot more rubber bands to keep the mold shut and prevent leaking.
  5. Mold 2 Attempt 2: I went big this time, with several pounds of fresh rubber bands I decided to attempt to embed a threaded rod. This one came out really well and made the whole process of building a second mold worth it. This casting had a slight misalignment between the halves and I could see there were some bubbles trapped in overhangs that I need to be more careful to avoid during pouring the resin.
  6. Mold 2 Attempt 3: I just pulled this one a couple hours ago. This is how it looks fresh out of the mold with all sprues and overflow spouts still attached (you can see the resin formed the threaded rod too). This one does not have a threaded rod embedded in it, but I was much more careful during the pouring process to slowly pour a little bit, swirl the mold, and slowly pour a little bit more. This eliminated MOST of the bubbles.
Throughout this process I decided I wanted to try to only care about this as much as the original prop makers would. I wasn't going for perfection, I was going for a level of quality that would be acceptable on a film cell (or digital frame). I think with these last two castings I have achieved that. They need a little bit of filler and sanding.

Below is an assortment of progress pictures.

Making Mold 1 - Master in clay:
IMG_1046.jpg

Saber submerged:
IMG_1060.jpg

Mold 1 Complete:
IMG_1061.jpg

Unfortunately I didn't take too many progress pictures for Mold 2, so here is the first successfull pull from Mold 2:

IMG_1084.jpg
 
Last edited:
That last one looks great! I'll take a half dozen :)
One thing to note. The originals were made with a jacket mold rather than a two-part mold. You pour silicon around the saber in a tube. Then you cut a line down the back and pull the original out. So, the whole mold is one piece and there is only one parting line running down the back
 
One thing to note. The originals were made with a jacket mold rather than a two-part mold. You pour silicon around the saber in a tube. Then you cut a line down the back and pull the original out. So, the whole mold is one piece and there is only one parting line running down the back
I guess that means Mold 3 coming soon…
 
Timing is everything. Just rewatched the TPM DVD documentaries and whatnot. Plenty of footage of Ewan, Liam, Ray, and their doubles rehearsing with those unpainted, beige-resin sabers!
 
This is so cool. I have never done any casting like this, but what about using a pressure pot to eliminate the bubbles? And I do think a jacket mold would be better--then there would only be one seam line down the back to clean up, like Dan said. IF you're up for doing a third mold, Drew... :)

I'd be down for one of these, as well as the black pieces, if you do those separately, to upgrade my Starkiller hero replica. It would be cool to do a replica of this resin hero that Propstore sold:
8ff988ee30a765dca6982ebad1f6d1e1.jpg

Regarding the paint, are there any leads on that so far? Any behind-the-scenes footage of their workshop showing what type of paint and masking techniques they used? I wonder if these hilts were simply rattle canned, or airbrushed.
 
This is so cool. I have never done any casting like this, but what about using a pressure pot to eliminate the bubbles? And I do think a jacket mold would be better--then there would only be one seam line down the back to clean up, like Dan said. IF you're up for doing a third mold, Drew... :)

I'd be down for one of these, as well as the black pieces, if you do those separately, to upgrade my Starkiller hero replica. It would be cool to do a replica of this resin hero that Propstore sold:
View attachment 1722979

Regarding the paint, are there any leads on that so far? Any behind-the-scenes footage of their workshop showing what type of paint and masking techniques they used? I wonder if these hilts were simply rattle canned, or airbrushed.
Pressure casting is a good deal more complicated and requires special equipment. Also a new mold would need to be made since it too would have to be cast under pressure so as not to distort when in the pressure pot.
 
Pressure casting is a good deal more complicated and requires special equipment. Also a new mold would need to be made since it too would have to be cast under pressure so as not to distort when in the pressure pot.
Not to mention it doesn’t appear pressure casting was used for these props. There are certainly plenty of flaws and bubbles.
 
Not to mention it doesn’t appear pressure casting was used for these props. There are certainly plenty of flaws and bubbles.

I was just brainstorming ideas that might make the casting process easier for you. Something like this. But yes, it doesn't appear that production used one due to all the bubbles and imperfections on the resin hilts.
 
Remember, kids, it just has to look good on camera. No surprise that they used some pretty rough castings with questionable paintjobs.

Also, since I did rewatch all of the TPM documentaries and webisodes, it should be noted that that resin Naboo blasters are shown being rattle-can spray-painted silver, at one point. Seems likely that the same method was used for the sabers.
 
Last edited:

Your message may be considered spam for the following reasons:

If you wish to reply despite these issues, check the box below before replying.
Be aware that malicious compliance may result in more severe penalties.
Back
Top