You are using an out of date browser. It may not display this or other websites correctly.
You should upgrade or use an alternative browser.
You should upgrade or use an alternative browser.
Obi-Wan Kenobi Episode 1 Resin Stunt Lightsaber Research
- Thread starter Dewy
- Start date
Excelsior
Well-Known Member
So Dewy... when are you going to buy a vacuum metallizing machine? We're gonna need some of these resin castings chromed up for a first-ever legit AOTC replica... 
Maybe something like this would be a (only slightly) cheaper option... "Liquid Mirror."
MIRROR - the world’s mirroriest mirror chrome paint
Youtube review:
Costs $$, looks great, but not sure how well it holds up to handling without some kind of clear coat. Needs to be applied with an HVLP gun or airbrush in thin coats, with proper surface prep/undercoats.
So Dewy... when are you going to buy a vacuum metallizing machine? We're gonna need some of these resin castings chromed up for a first-ever legit AOTC replica...
Maybe something like this would be a (only slightly) cheaper option... "Liquid Mirror."
MIRROR - the world’s mirroriest mirror chrome paint
Youtube review:
Costs $$, looks great, but not sure how well it holds up to handling without some kind of clear coat. Needs to be applied with an HVLP gun or airbrush in thin coats, with proper surface prep/undercoats.
I have looked into that and this: Easy Chrome - The World's Most Exotic Finishes
However, it seems like all of these products are too good to be true. The reviews and results are mixed. It seems like they work well in ideal conditions.
I think the best solution would be to work with a local vacuum metallization/plating shop in person. That way, in theory, I could be more involved and they can be more easily held accountable for results. I’ll need to do more research into all of this, but that’s way down the road. First I want to take this Episode 1 stunt saber project to conclusion.
When I get home from work I need to tape up the latest casting and start putting down same layers of silver.
I also need to get started with making the new mold, but before I do that I need to prep the saber I will be using as my master. The Smooth-On Mold Max 29NV is relatively low viscosity which means every possible crevice in the saber needs to be sealed with clay. On my previous molds, I only sealed the obvious major holes, and the slightly more viscous silicone was able to creep into nearly all the threaded connections, making disassembling the saber afterwards difficult. For example, I inadvertently had a mold of the threads on the LED bezels and the set screws beneath the pommel cubes. This new silicone is not only less viscous, but also ~2x as strong meaning if I’m not careful, the whole thing will essentially be permanently bonded together.
I also need to get started with making the new mold, but before I do that I need to prep the saber I will be using as my master. The Smooth-On Mold Max 29NV is relatively low viscosity which means every possible crevice in the saber needs to be sealed with clay. On my previous molds, I only sealed the obvious major holes, and the slightly more viscous silicone was able to creep into nearly all the threaded connections, making disassembling the saber afterwards difficult. For example, I inadvertently had a mold of the threads on the LED bezels and the set screws beneath the pommel cubes. This new silicone is not only less viscous, but also ~2x as strong meaning if I’m not careful, the whole thing will essentially be permanently bonded together.
corelliacreations does electro plating, they do good work.If we get to the point where we are looking at plating, this process looks very interesting:
corelliacreations does electro plating, they do good work.
Are they an RPF member?
yep, they post in project runs.Are they an RPF member?

3D Printing and Manufacturing Service Provider | Corellia Creations
Corellia Creations is a 3D printing and manufacturing service provider. We offer 3D resin SLA Printing services, CNC machining, Electroplating, 3D modelling design services, and vacuum casting.
 www.corelliacreations.com
Excelsior
Well-Known Member
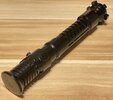
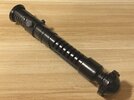
Ooh this one is looking good:
View attachment 1729223
View attachment 1729224
View attachment 1729225
That IS looking really close! Very cool to see the process coming along!
That IS looking really close! Very cool to see the process coming along!
I still need to try some of the paints Saberz recommended, but I am really happy with this stuff. It goes on so easy and is not picky about conditions. The black was sprayed on at 90°F, and the silver was sprayed on at 97°F. I noticed the Tamiya sprays are really picky about temperature/humidity.
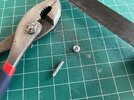
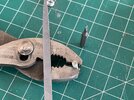
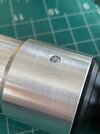
This is exactly what they did on the Hero Luke saber under the emitter lip. I mean.. it’s been nearly blanked since then, so someone ground it down afterwards but I have a feeling this was done for molding just like you did.While I’m waiting for paint to dry, I started prepping my master hero saber. Since I want to make the new mold without the covertech knob I needed to find an M3.5 screw that could hold the saber together. I couldn’t find any set screws, so I had to make my own. It’s not pretty, but it works.
View attachment 1729218
View attachment 1729219
View attachment 1729220
There is still clay in a bunch of grooves/buttons or holes on a lot of the prequel hero sabers when they were photographed
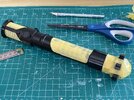
I spent most of the day prepping my master saber for mold making. It is incredibly tedious packing clay into every tiny gap that isn’t represented in detail on the production stunt sabers. However now the new cylindrical cut mold is in the pressure pot curing. Should be done in ~5 hours.
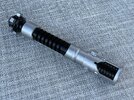
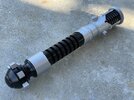
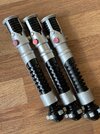
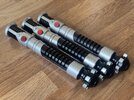
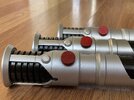
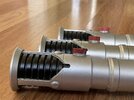
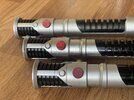
In the meantime I finished painting the latest casting. This is the first one that is fully painted with the custom spray paints I ordered. I haven’t had a chance to get the recommended dark red Rustoleum, but I did I take the advice of Saberz and mixed in some darker Tamiya reds.
For all these pictures from left to right or closest to farthest: custom sprays, Tamiya, Duplicolor:


Honestly, I think they all look great!! Really beautiful work.
Similar threads
- Replies
- 2
- Views
- 1,602
- Replies
- 2
- Views
- 835
- Replies
- 9
- Views
- 1,360
- Replies
- 2
- Views
- 1,591


