Obi-Wan Kenobi Episode 1 Resin Stunt Lightsaber Research

I spent most of the day prepping my master saber for mold making. It is incredibly tedious packing clay into every tiny gap that isn’t represented in detail on the production stunt sabers. However now the new cylindrical cut mold is in the pressure pot curing. Should be done in ~5 hours.

In the meantime I finished painting the latest casting. This is the first one that is fully painted with the custom spray paints I ordered. I haven’t had a chance to get the recommended dark red Rustoleum, but I did I take the advice of Saberz and mixed in some darker Tamiya reds.

For all these pictures from left to right or closest to farthest: custom sprays, Tamiya, Duplicolor:

View attachment 1729490
View attachment 1729491
View attachment 1729492
View attachment 1729493
View attachment 1729494
I do think your custom paints are closest to the pictures of the stunts I've seen (Obviously comparing photographs has its own set of problems), but man there really is something special about that Tamiya Silver

Edit: Spelling
 
Last edited:
I do think your custom paints are closest to the picture of the stunts I've seen (Obviously comparing photographs has its own set of problems), but man there really is something special about that Tamiya Silver
Yes, and that metallic Tamiya red makes me happy lol
 
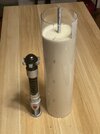
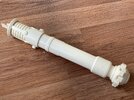
Well I have a new mold, in theory. The copious amounts of release spray were not enough to prevent the silicone from getting firmly stuck to the inside of the acrylic tube. I tried blowing compressed air between the tube and the silicone, but that didn’t help. I was hoping to avoid cutting the tube, but I knew this was a possibility. I’ll break out the Dremel cutting wheel tomorrow, in the mean time if anyone had any suggestions I’d love to hear them!

(Previous casting included for scale)
IMG_1278.jpeg
 
I actually poured a mold using PVC as the mold "box". I'd never do that again!! If I had to do that kind of mold again I would use cardboard shipping tubes. At least it would be easier to cut!!
 
Was that done with your compression chamber?

I actually have a full step by step process from the same source as before using PVC and I’ve done this very thing. I’m AMAZED there aren’t bubbles around your pour spouts if this was without a chamber

They look absolutely stunning
 
Was that done with your compression chamber?

I actually have a full step by step process from the same source as before using PVC and I’ve done this very thing. I’m AMAZED there aren’t bubbles around your pour spouts if this was without a chamber

They look absolutely stunning
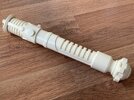
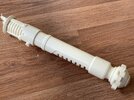
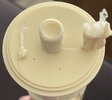
Yessir. I cured the mold in the pressure pot at 65 psig for 6 hours. Each casting will also be cured in the pressure pot at 60 psig for 30-60 minutes. This was what I think of as a “minimal effort pour”. I poured slowly, but I didn’t stop mid-pour to roll the mold and get resin into all the crevices like I usually do. I wanted to see how it would come out. The only place that has bubbles is the top face of the fender washer which would be sanded to remove the vent and pour spouts anyway.

IMG_1292.jpeg

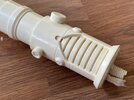
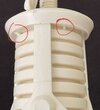
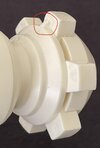
There are also a couple places where de-molding the master tore the silicone a little bit. This results and little blobs of excess resin. I’m not too concerned by this as it is easier to remove a little extra material than it is to add it back in. The silicone used for this mold has a cured Shore hardness of 29A, which is great because the mold is sturdy and can stand up by itself without support. The downside of that is it is somewhat difficult to open the mold and remove the casting. I think the ideal silicone would be in the 20-25A Shore hardness range. I’m also guessing the original prop makers used a slightly softer silicone because we know some of these castings came out bent. I’m guessing that is just a result of them not supporting the softer mold so it wasn’t straight/vertical when the resin cured. You can see the areas where the mold tore in the pictures below:

IMG_1293.jpeg
IMG_1294.jpeg

All that being said, I am incredibly happy with the results. I think I will keep this casting raw and unpainted, as this is exactly what I was striving for. I don’t want to get ahead of myself, but this is also very encouraging for me offering these up for sale.
 
Yessir. I cured the mold in the pressure pot at 65 psig for 6 hours. Each casting will also be cured in the pressure pot at 60 psig for 30-60 minutes. This was what I think of as a “minimal effort pour”. I poured slowly, but I didn’t stop mid-pour to roll the mold and get resin into all the crevices like I usually do. I wanted to see how it would come out. The only place that has bubbles is the top face of the fender washer which would be sanded to remove the vent and pour spouts anyway.

View attachment 1729979

There are also a couple places where de-molding the master tore the silicone a little bit. This results and little blobs of excess resin. I’m not too concerned by this as it is easier to remove a little extra material than it is to add it back in. The silicone used for this mold has a cured Shore hardness of 29A, which is great because the mold is sturdy and can stand up by itself without support. The downside of that is it is somewhat difficult to open the mold and remove the casting. I think the ideal silicone would be in the 20-25A Shore hardness range. I’m also guessing the original prop makers used a slightly softer silicone because we know some of these castings came out bent. I’m guessing that is just a result of them not supporting the softer mold so it wasn’t straight/vertical when the resin cured. You can see the areas where the mold tore in the pictures below:

View attachment 1729980
View attachment 1729981

All that being said, I am incredibly happy with the results. I think I will keep this casting raw and unpainted, as this is exactly what I was striving for. I don’t want to get ahead of myself, but this is also very encouraging for me offering these up for sale.


Yes we are waiting eagerly...

Personally I'm looking for the individual black pieces to be cast so I can swap them out on my metal Starkiller hero, and also a full hilt to do the Propstore resin hero w/metal bezel. Those at minimum.
 
On another note, I did hear back from a machine shop about the metal parts for the metal accented resin stunts. Their prices and turn-around-time were good if we can get to a sufficient quantity. The only thing I’m hesitant about is they require 100% payment upfront for smaller jobs like this. That doesn’t give me any leverage if there are quality issues. I’m waiting to hear back from more shops though.
 
Now it looks TOO good! You're gonna have to do a crappier job, Drew... we need more bubbles for accuracy. (just joking!)

You have me wanting to get into resin casting now. :)

:lol:

That was a thought of mine. I have definitely blown past my original goal of only caring as much as the original prop makers. I can always offer the option to not pressure cast if someone wants. Plus I’m sure I’ll eventually have some bad luck and a casting will come out nasty. This way I can up-charge for it being “more accurate”. ;)
 

Your message may be considered spam for the following reasons:

If you wish to reply despite these issues, check the box below before replying.
Be aware that malicious compliance may result in more severe penalties.
Back
Top