Nike MAG replicas (V2 and V3 only)

no wonder that story on the internet called it the hardest sneaker to retro

Tell me about it. I am about to file this in the "too hard basket" unless I can find some more 3mm NEO.

attachment.php


So this is just the shell sitting next to the V2. The toe was sewn and then the upper turned inside out which looks good, but you can't wear it due to it not having a liner. The point being, the shape looks good.

attachment.php


This one has not had the toe sewn up up yet and why is looks too long. This upper is lined and would be wearable. Here I have sat it on a V1 (US10) sole to compare the size next to the (US9.5) V2. As you can see, this MAG is taller at the same length. The problem here is not the upper, rather the V1 sole which seems to slop forward and makes the upper also lean forward. If it was sewn up like in the top image, I would look pretty neat. It is messy because I was no able to finish the pull holes properly and the cuff is just glued in position. The foam in the cuff is also too thick/wide, so the cuff does not quite sit properly.

Anyway, I am shelving this for now.
 

Attachments

  • 20150713_204652.jpg
    20150713_204652.jpg
    151.3 KB · Views: 1,946
  • 20150704_002046.jpg
    20150704_002046.jpg
    199 KB · Views: 1,961
I would really suggest making a foam liner and glueing the fabric to it, like the originals were and like I did years ago. You can leave out the toe box area.

attachment.php
attachment.php
attachment.php
attachment.php

attachment.php
attachment.php
attachment.php
 

Attachments

  • Dsc03454.jpg
    Dsc03454.jpg
    87.3 KB · Views: 2,080
  • Dsc03480.jpg
    Dsc03480.jpg
    111.4 KB · Views: 978
  • Dsc03483.jpg
    Dsc03483.jpg
    84.8 KB · Views: 967
  • Dsc03489.jpg
    Dsc03489.jpg
    131.6 KB · Views: 942
  • Dsc03410 (2).jpg
    Dsc03410 (2).jpg
    100.1 KB · Views: 957
  • Dsc03409 (2).jpg
    Dsc03409 (2).jpg
    85.1 KB · Views: 970
  • Dsc03405 (2).jpg
    Dsc03405 (2).jpg
    77.3 KB · Views: 998
As I said, shelved for now until the enthusiasm cloud passes :)

attachment.php


Good job!

Apparently the screen used shoes were build on that yellow furniture foam. The issue is (and even NIKE stated) the shoes were only intended to last for the filming.
EVA is pretty decent and I guess what the 2011 shoe is built on. How durable for an actual wear pair remains to be seen as even the 2011 release, whilst fully wearable, were really made a display pair.

So rather than EVA or furniture foam, I do want to use 3mm NEO because it is self supporting and flexible, water resistant etc. You can even sew it together. .

Regardless of the type of fabric used, I need to work out how to integrate these larger curves into the patterns so that I get the correct shape after being turned inside out. That is snag right now.
 
So the original patterns are fine if you just want the shape. With the mesh model glued to a 2nd layer, these work as they are.

attachment.php


However, if you want proper seams which involve sewing and turning parts inside out, then a re-think is in order to keep the correct shape. If you just sew on the pattern lines, the ears will be too thin.

attachment.php


So after some experimentation, I found that I needed to increase the sizes of some parts like the convex curve on the ear and the concave section on the collar. The challenge was to blend the mods in and still keep the shape.

attachment.php


After a bit of a think and based on how different materials fold and sit after been stitched and turned inside out, it seems that this is the actual sew lines one needs to follow to make the correct upper shape. What is interesting here is that it actually widens the lace box as well. To this properly would require tongues (or at least the first small part), cuffs and laces to be ready and on hand.
 

Attachments

  • Altered NIKE MAG Patterns.jpg
    Altered NIKE MAG Patterns.jpg
    145.9 KB · Views: 2,329
  • NIKE MAG Patterns.jpg
    NIKE MAG Patterns.jpg
    34.9 KB · Views: 865
  • Real Nike MAG Patterns Shell.jpg
    Real Nike MAG Patterns Shell.jpg
    405.9 KB · Views: 960
I decided I needed to something more on these. Excuse my roughness, this is an 8 hour speed build.

The upper is based on the footprint of the V2 US8 which is about 11" long. My new upper is 9.5" tall which is about 3/4" taller then the V2 US8.

attachment.php


This material I have used is not the best for this project as there is no stretch what so ever. I am only using it because I have a heap on a roll and for this type of R&D where many attempts have ended up in the bin, a no cost solutions don't cause too much up-set when they are thrown out or cut apart. The material is a UV stable vinyl mesh. It can be sewn or glued and this proves that this shoe can be made from materials other than cloth over foam. Although I have a proper #20 UV stable industrial cotton, my machine can't tension it, so I was left to use standard cotton which breaks really easy. To get around this, I found that by sewing each seam at least twice makes the seams much stronger and they do not break from simply pulling on the parts.

Although I modded the patterns to allow larger concave arcs, I still don't have them quite right. I will need to change the cutouts on the base of the collar and they are close to the right size, just slightly wrong shape. I also had issues with the way the cuff attached. I lost the profile on one side of the collars and because it is all sewn up now, I can't get in to push out the seam from the inside. This is wear a template that goes into the shoe and holds the seams in their proper shape would have been neat.

For some reason I also got puckering around the base of the lace box where the tongue attaches. On the inside, the material sits flat. I am not sure why it won't sit flat on the outside. The tongue is sewn to the inside layer on the toe, keeping the point of attachment invisible.

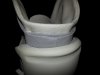
I have solved the hidden seam mystery on the collar. The cuff is sewn on to the liner before it is attached to the shell. I do not know why the Chinese can't figure that out if I can and I am not even close to being a shoe "expert". I was also able to keep the back of the liner as a single piece. I simply made the base line bend to allow extra material to make the hollow (from the inside) of the heel.

The top of the collar is sewn on last and when it flips over, covers the join from the liner to the cuff. It is neat the way it all works.

attachment.php

attachment.php


Apart from the height increase, these patterns also correct the placement of the seams where the back seam extends all the way to the collar and the inside seam sits between 2nd and 3rd laces. The laces are the only thing I am not sure about how to do. On the V2, there is two seams and laces come through between the two layers. On the real MAG, it seems that the laces come out between the two layers (shell and liner) only. Sure I could do this, but not sure how to get the thing turned inside out later. I purposely only attached the base on the tongue so it would not get in my way at this stage.

attachment.php


And a quick wear test. These fit good. It will be very cool if I can actually make a wear pair from a decent cloth or leather. Normally I do make pairs, but as this was a speed build, I have only made the right shoe upper. I will have a bit more of a think about how I can attach these laces and take my time on the next pair. They will be made from mesh, so what I might do is cut myself a pair of templates from the thin polyprop I have. The template only needs to help the upper hold its shape.

There was an issue with the original templates I was using and a print directly from SketchUp solved any scaling issues as the program will print a true 1:1 of the model.

I also went back in and added the alignment points and they make such a difference when attaching the footprint.
 

Attachments

  • 20150718_141645.jpg
    20150718_141645.jpg
    134 KB · Views: 771
  • 20150718_142245.jpg
    20150718_142245.jpg
    168.9 KB · Views: 849
  • 20150718_142303.jpg
    20150718_142303.jpg
    108.2 KB · Views: 817
  • 20150718_142345.jpg
    20150718_142345.jpg
    103.1 KB · Views: 852
Looking to order some v2s from aliexpress. Can someone tell me how they fit. I wear a size nine in normal nikes/jordans, but aliexpress only carrys a 8.5 and 9.5. Should i size up or size down? What do you guys think?
 
I found this chart which might help.

attachment.php


So those US8s that I have (the pink cards from inside the shoe) are 265mm long and when check them against the chart, you see it is actually a US8.5M.
 

Attachments

  • 2000px-Shoesize-adult-en.svg.png
    2000px-Shoesize-adult-en.svg.png
    106.4 KB · Views: 751
Ok after a heap of fails and finally some success, I have figured this out how the cuff is attached to give the illusive hidden seam that China can't get right on the V1, the V2 and now the HC. Even the MP MAG had this right.
SO CHINA, PAY ATTENTION!

OK so the RD has the rear seam extending all the way to the cuff. Note to self, keep the stitching tight here.

attachment.php


Excuse my rough cuff, but as you can see, the collar should have its own seam and the cuff is joined to the flap on the inside, not directly to the collar. Sure that seam on the V2 is hidden by the strap anyway, but the point is, IT AIN'T THAT HARD!

attachment.php


And the other side.

attachment.php


My Cuff is not actually thick enough and the fabric is not pulled down fully or even sewn yet, so the little raised part at the centre is not seen here but is present on both the foam substructure and skin.

attachment.php


Showing both sides

attachment.php

attachment.php


From the front.

attachment.php


As you can see here, the base of the cuff is visible and the part it is sewn to is the flap that folds over the collar (shown as deconstruction is the following images).

Cuff removed.

attachment.php


Now you can clearly see the flap. This is what the cuff is sewn to and this is also sewn to the liner so that when you pull on the cuff, it doesn't pull out of the collar. I'll probably sew this right through the neoprene substructure.

Collar flap before it is folded over the foam (or neoprene in my case) substructure.

attachment.php


The base or substructure is what gives the shoe its shape.

attachment.php


I have used 3mm neoprene because it is both self standing and can be sewn. It is also water proof and can be worn. It may get hot, will see. Because it has the same finish as the outer shell (which is 1mm neoprene), the substructure itself will act as part of the liner. The point of this exercise to examine the shoe construction and find out how it is made. I doubt I will ever wear this pair.

Hope this helps anyone wanting to take this on.
 

Attachments

  • 20150725_223908.jpg
    20150725_223908.jpg
    190.4 KB · Views: 680
  • 20150725_225900.jpg
    20150725_225900.jpg
    190 KB · Views: 748
  • 20150725_225756.jpg
    20150725_225756.jpg
    187.6 KB · Views: 726
  • 20150725_225708.jpg
    20150725_225708.jpg
    154 KB · Views: 721
  • 20150725_225101.jpg
    20150725_225101.jpg
    103.3 KB · Views: 707
  • 20150725_225030.jpg
    20150725_225030.jpg
    103.4 KB · Views: 680
  • 20150725_224752.jpg
    20150725_224752.jpg
    107.3 KB · Views: 718
  • 20150725_224649.jpg
    20150725_224649.jpg
    114.7 KB · Views: 696
  • 20150725_224059.jpg
    20150725_224059.jpg
    124.7 KB · Views: 737
  • 20150725_223945.jpg
    20150725_223945.jpg
    109.3 KB · Views: 681
awsome! I seriously need to get me a sewing machine. And a bigger apartment so I can actually spread things out to work on them like that. :D Good job, cavx.
 
@cavx Let's make a kickstarter project to send you in China ;)!!!

I'd be in for that. I went to China is 2009 and I loved the experience. The people were friendly and accommodating and the food was amazing. I was given the option to eat western food and choose to eat local food with the locals, which they really thought was great. You have not eaten Chinese food until you have been to China. We want RD and MAG and well at least I have had RD Chinese food. It is so bland here in Australia.

Once Cavx masters the patterns maybe he could work with airair and the Chinese to make proper shoes.

The Chinese can make some of the most precise stuff now. The optics in my anamorphic lens is a result of the last time I worked with Chinese nationals.

attachment.php

attachment.php


It would take a further 2 years R&D to get it to this stage refining the casing. Even the almighty "Made in Germany" ISCO III optics come from China.

awsome! I seriously need to get me a sewing machine. And a bigger apartment so I can actually spread things out to work on them like that. :D Good job, cavx.

I kind of wish I spend a bit more on this one. It was $300 and sews pretty much anything, but the key to sewing is a combination of the needle, the thread type and the tension used. The interesting thing about tension is that sometimes it is the way the machine is threaded.
 

Attachments

  • 1505292_738226629541141_538951849_n.jpg
    1505292_738226629541141_538951849_n.jpg
    56.2 KB · Views: 944
  • 10174869_738226746207796_1581696848_n.jpg
    10174869_738226746207796_1581696848_n.jpg
    34.2 KB · Views: 894
I also picked up my new NIKE and MAG machines letters today. Can't seen to upload at this time, but the MAG are 25mm tall Vs 20mm on the V2. I made myself 25mm tall letters and glued them to my shoes a few months back. Because I hand cut those, they never quite looked right, but the size increase looked better. So with machined letters, the new Heel Cups I am making will rock.
 
Don't why I could not attach these last night...anyway.

The machined letters
attachment.php


and a Blue-Tac test pull
attachment.php


So when made in a proper tinted rubber, these should look pretty sweet!.

The MAG letters are 25mm or 1" tall.
 

Attachments

  • 20150726_204654.jpg
    20150726_204654.jpg
    174.6 KB · Views: 881
  • 20150726_205026.jpg
    20150726_205026.jpg
    92.2 KB · Views: 882
The NIKE doesn't look right.

I agree. The N looks like a H on many of the photos I have seen. In this case I think the N is too wide. It a case of tracing the letters and it set up so the machine is following and cutting the centre line only.

I am not sure if I will use the NIKE. I just really wanted the larger MAG.
 
Up until now, I have been printing paper patterns, cutting them out, tracing them onto the material and it has been a lot extra work, so I thought I would make myself a plastic template set. Even though my break down of the many parts on the official patterns got down to about 12 parts, I honestly think now that with these 5 parts (tongue not shown), you can create a MAG shoe at the basic HC level - probably why they have stitching around the rim and can sell them so cheap. By using these 5 parts, the extra parts can be created for a more accurate version.

attachment.php
 

Attachments

  • Real Nike MAG Patterns Shell.jpg
    Real Nike MAG Patterns Shell.jpg
    405.9 KB · Views: 832
Sorry to just jump in and ask this but, can anyone recommend where I can purchase a nice replica pair of mags. I have been in talks with a lady in china who showed me a link to her shop but im a bit unsure about them as she told me the actual nike logo lights up too. But none of the photos on her site show this and I havent seen anyone mention a pair of replicas from china with this feature as standard. Sorry if this is in the wrong place im new here.
 
Back
Top