paulsboutique
Sr Member
Seeing as the hype of Romulus has now died down, and the also seemingly endless posts of who got the F44 out first, I thought id spend some time and have a go.
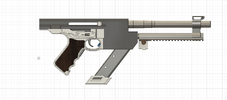
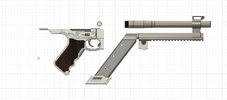
I also wanted to create a functional prop, again highlighting just what can be achieved with 3d design and printing. I didn't want it to be "just another lump of plastic with external only detail" . Will this lead to an overly complex build .... more than likely
First things:
Like the M41A, I would like to have an underlying design with shrouds over the top that can be disassembled and possibly customized.
Full sounds and lights with working counter.
working targeting screen.
removable mag and mag release.
two position trigger assembly as per the movie.
movable charging handle - as per movie.
options to have front grip and torch be removable and have other attachments ie : tacticool rail...
option to have a different stock ie: non Auto Aim
the rear stock to be sprung and opens when released including the wings - to replicate the movie.
Assembled with bolts and screws - little to no glue.
Internal design considerations:
-They don't go into the internal design in the movie except for mentioning the electronic rotating breech and the 450 round capacity.
This means its not an open bolt design like the Thompson, so mag placement is not critical and does not need to line up with the barrel.
- This build will possibly need an esp32 for targeting screen, an arduino, or a second esp32 for sounds management and the round counter, Mp3 board, speaker and battery.
Lots of electronics to fill if using off the shelf, so movable and functional parts will be hard to squeeze in.
Ok on to the design.......
I looked around at electronic firing and movable breech designs and settled on one from a very old " forgotten weapons" clip on youtube.
I cant remember what the actual design it was from - i will find it one day ...
Anyhow caseless ammo was loaded in from mag, gas blow back moved the breech into place with the round, and set the firing pin ready to strike.
So with this design in my head ... off i go