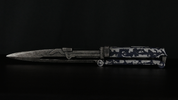
Now here we are, the finished replicas! Back when production on the kits started I knew I wanted to do a small number of finished vibroblades. I've made a fair amount of finished resin ones, but of course had to take a different approach working with metal.
I started by scuffing all the parts that would be getting primed with a fine grit sand paper. This allows the primer/paint to adhere a bit better to the metal. From there was one of the most time consuming parts of the process, the chipping. To achieve the chipping effect, I hand applied liquid mask on 45 individual parts. I did this over a few days instead of one sitting to stop from going insane haha.
After all the liquid mask was applied, I primed everything in self etching primer, painted with a custom mixed blue, and then hit it with a matte clear. With so many layers on top of the latex masking it was a bit harder to peel away than usual, but nothing time and care can't fix!
After the blue parts were done, I assembled all the parts and weathered them. For weathering I used oil paints as they stick to the metal better than acrylics. It's not invincible, but won't come off unless you're really rubbing at it. I also went in with some sharp sculpting tools to add scratches to the blue paint.
The final step was to glue in the wires, and then they were completed!
This has definitely been one of my favorite projects to work on and I'm very happy with how they came out! This run is only 15 replicas and at the time of writing this there are only 7 left. They're avaible via my website here:
Metal Mandalorian Vibroblade Prop Replica
Hopefully this quick post will help some people who are/will be working on finishing their own vibroblade as well!
")