Now that's podracing!
-
Welcome to the Project Runs Forum!
This forum is intended for interest gauging and active runs. Due to the transient nature of this forum, please keep all research and ongoing discussion in one of our main forums so your information is not lost.
Only Premium Members can start a new run.
You are using an out of date browser. It may not display this or other websites correctly.
You should upgrade or use an alternative browser.
You should upgrade or use an alternative browser.
Limited Run Dewy's and Anakin Starkiller's Qui-Gon Jinn lightsaber sign-up thread!!! PRODUCTION COMPLETE. Photos on pg 13
- Thread starter Anakin Starkiller
- Start date

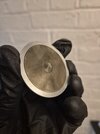
Looks brilliant! I love the extra sheen, I think it looks right. I have a couple moderate scratches in the ABS on mine, would you mind pointing out what yours looks like when you addressed them?Finishing off with 0000 steel wool on the shroud to randomize and matte it a bit (also used a dynamic file to blend a scratch along the side- but not everyone will have that issue)
View attachment 1952114
Chemical coctail left to sit only a few minutes…
View attachment 1952115
I love this display stand. The guy who makes them doesn’t always do the 3 tier very often with the spacing even.I have mine. Do you have yours?
Thanks as always for completing an awesome run!!!!!
View attachment 1952376
Great display!
That is a great displayI have mine. Do you have yours?
Thanks as always for completing an awesome run!!!!!
View attachment 1952376
Welcome back!Just got back from a trip abroad and anxiously awaiting my payment link, I am #65 on the run. Thanks so much for sticking through with this run to completion, can't wait to get this baby in my hands!!
Looks awesome!Received my Qui-gon at the weekend! Started adding a little customisation to the finish heat strained the emitter plate and threaded rod. I quite like the outcome!
ResurrectionBob
New Member
I had the same situation on mine, but when I flipped things around, the flared piece sits too low and the threaded rod sticks out past the washer. Do I need to add another washer underneath to get everything to sit so that the emitter will appear flush with the end of the rod?Took me a second to figure out why the emitter looked weird…
View attachment 1951543
The plate was on backwards
Ahh, that’s better…
View attachment 1951544
These really came out great!
View attachment 1951545
Outside of not being able to puzzle out that little issue, this thing is absolutely gorgeous!
Do you have a picture?I had the same situation on mine, but when I flipped things around, the flared piece sits too low and the threaded rod sticks out past the washer. Do I need to add another washer underneath to get everything to sit so that the emitter will appear flush with the end of the rod?
Outside of not being able to puzzle out that little issue, this thing is absolutely gorgeous!
I had the same situation on mine, but when I flipped things around, the flared piece sits too low and the threaded rod sticks out past the washer. Do I need to add another washer underneath to get everything to sit so that the emitter will appear flush with the end of the rod?
Outside of not being able to puzzle out that little issue, this thing is absolutely gorgeous!
I used a dab of epoxy to glue the threaded rod to the emitter plate. That way, they screw in as one piece, and I don’t have to worry about constantly fiddling with the parts to get the rod perfectly flush with the face of the washer when everything is assembled.
Meanwhile, I took the plunge, and made a few other mods:
*The aforementioned gluing of the rod to the washer.
*I also treated the face of the washer/rod with various grades of sandpaper, to give it that accurate, “run against a belt-sander to make the rod flush” look.
*I trimmed down the Covertec screw ever so slightly, because it didn’t screw in deeply enough to hold the plastic knob securely to the aluminum shroud.
*I gave the aluminum shroud a few treatments with various grades of sandpaper, superfine steel wool, and aluminum polish. This removed a few minor machining marks, and gives the shroud a subtly polished-but-used look, so it now matches the finish of my Obi-Wan TPM saber.
*I also did end up giving the plastic parts a shot of Satin Canyon Black, to match my Obi-Wan. The sheen of the paint better matches the look of the screenused props. Buffing the stock paint would probably provide a similar result, but it would take a lot more work.
Once the paint is fully cured, I may go back in and give the parts a light abrasion pass with superfine steel wool and sandpaper, just to give a slight sense of wear, and to make the finish a little less uniform and perfect.
moonwalker
Well-Known Member
What a stunner !

sakanade
Well-Known Member
I had the same situation on mine, but when I flipped things around, the flared piece sits too low and the threaded rod sticks out past the washer. Do I need to add another washer underneath to get everything to sit so that the emitter will appear flush with the end of the rod?
Outside of not being able to puzzle out that little issue, this thing is absolutely gorgeous!
You need to turn the rod a bit so it sits lower then after you put the emitter and washer it should be flush. Mine also arrived flipped and that's what I did to get it right.
I used a dab of epoxy to glue the threaded rod to the emitter plate. That way, they screw in as one piece, and I don’t have to worry about constantly fiddling with the parts to get the rod perfectly flush with the face of the washer when everything is assembled.
Meanwhile, I took the plunge, and made a few other mods:
*The aforementioned gluing of the rod to the washer.
*I also treated the face of the washer/rod with various grades of sandpaper, to give it that accurate, “run against a belt-sander to make the rod flush” look.
*I trimmed down the Covertec screw ever so slightly, because it didn’t screw in deeply enough to hold the plastic knob securely to the aluminum shroud.
*I gave the aluminum shroud a few treatments with various grades of sandpaper, superfine steel wool, and aluminum polish. This removed a few minor machining marks, and gives the shroud a subtly polished-but-used look, so it now matches the finish of my Obi-Wan TPM saber.
*I also did end up giving the plastic parts a shot of Satin Canyon Black, to match my Obi-Wan. The sheen of the paint better matches the look of the screenused props. Buffing the stock paint would probably provide a similar result, but it would take a lot more work.
Once the paint is fully cured, I may go back in and give the parts a light abrasion pass with superfine steel wool and sandpaper, just to give a slight sense of wear, and to make the finish a little less uniform and perfect.
View attachment 1954718View attachment 1954719
Looks great!
For the paint that you added, was that a Rustoleum enamel paint that you used? Did you need to prime it with anything else first?
Presumably you had no issues with the paint adhering and no chipping or crinkling?
Looks great!
For the paint that you added, was that a Rustoleum enamel paint that you used? Did you need to prime it with anything else first?
Presumably you had no issues with the paint adhering and no chipping or crinkling?
Rustoleum Satin Canyon Black. I just went for it, with no primer. No problems thus far with adhesion and whatnot.
If there is any problem, I'll just strip the parts to the plastic, prime, and repaint. But I doubt it'll come to that.
What a stunner ! View attachment 1954760
Was this one buffed?
moonwalker
Well-Known Member
Yup, 0000 steel woolWas this one buffed?
AnubisGuard
Master Member
Forgive my timidity, but everything on this saber unscrews, right? I gave the endcap a gentle twist and it didn't bulge, and I don't want to damage anything.
Yup, 0000 steel wool
The result isn't too far off from my paintjob.
Similar threads
- Replies
- 10
- Views
- 2,097
- Replies
- 535
- Views
- 85,316
- Replies
- 1
- Views
- 1,602
- Replies
- 29
- Views
- 5,847