Death Star Micro Tiles + Trench Run (STL files V8 available)

monsterpartyhat

Sr Member
Hi all,

[EDIT: December 3rd, 2022: Version 8 is available]
[EDIT: May 5th, 2022: Version 7 is available: Death Star Micro Tiles + Trench Run (STL files V7 available)]
[EDIT Oct. 6, 2021: Version 6 is available. Updates here: Death Star Micro Tiles + Trench Run (STL files V6 available)]
[EDIT: STL files are freely available if you want to print your own, see here: Death Star Micro Tiles + Trench Run (STL files available)]
[EDIT 2: Version 2: Death Star Micro Tiles + Trench Run (STL files V2 available)]
[EDIT 3: Version 3: Death Star Micro Tiles + Trench Run (STL files V2 available)]
[EDIT I don't know how man -- the latest version of the STL files is always available here: Death Star Micro Tiles - monster.party.hat]


Been a while since I did a build thread - I thought I'd try to rectify that with one of my current projects, since I got the inspiration directly from another thread here on the RPF. joeydee's 1/350 scale Death Star 2 project (1/350 Death Star II Porthole) was one of the things that got me inspired to think about getting an electronic cutting machine for scratchbuilding in the first place.

Fast forward a ways....I've built a whole lotta scratchbuilds by modelling them in SketchUp, then outputting the faces as SVG to be cut out of styrene on a Cricut Maker. A few weeks ago I made a door for a 1:144 scale scratch build out of layers of flat styrene -- that led to me making a whole bunch of Star Wars doors as prefabs to be used in future builds, and the process of building them up out of layers of flat pieces led me to start making Death Star tiles too.

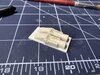
They're pretty close in scale to joeydee's -- I think mine are just a little bit bigger, at 20mm x 20mm for the basic 1x1 tile size (I like the math to come out even :D).

I'm eventually going to build a tiny Death Star 1 trench run, and some unspecified Death Star 2 surface section, with the red understructure and everything. Right now, I'm still making tiles, and I'm going to post up some photos in order to get a retroactive build log caught up.

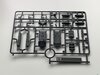
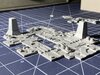
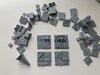
To get started, here's the current state of affairs, where I've got resin casts of a whole bunch of tile designs and one tower:

IMG_5279.jpeg
IMG_5292.jpeg

IMG_5330.jpeg
 

Attachments

  • IMG_5280.jpeg
    IMG_5280.jpeg
    1.8 MB · Views: 319
  • IMG_5326.jpeg
    IMG_5326.jpeg
    1.4 MB · Views: 323
Last edited:
To start with the first tile I made (I was just intending to make a couple at this point - hah! :lol:),probably the most iconic one, the sort-of-question-mark-sort-of-loop tile.

This is what they look like being modeled in SketchUp - I model each layer with accurate dimensions for the thicknesses of sheet styrene I make them out of (from .005" to .030", mostly).

Screen Shot 2020-09-01 at 5.51.18 PM.jpg


The garish colors are to make it very obvious which is which thickness, because the faces then need to be extracted and grouped by material to arrange for cutting.

Screen Shot 2020-09-01 at 5.51.47 PM.jpg


Once I've got them arranged, they're exported to SVG by a SketchUp Plugin (JoakimSoderberg/sketchup-svg-outline-plugin).

Then I import them into a draw program for optimization -- everywhere an edge intersects generates a separate line segment, which causes the cutter head to lift and reposition, so I have to replace segmented lines with unbroken ones for a more efficient cut. It's tedious, but doesn't take too long.

Screen Shot 2020-09-01 at 5.53.17 PM.jpg


From there I can export it to SVG again and import into the Cricut Design Studio software to send to the cutter.
 
Here's the end result for the first tile (before adding some filler to repair a ragged hole that turned out to be too small to cut in .020" styrene).

IMG_4862.jpeg


On top of Bandai's version (which is 74mm, or just under 3", to a side):

IMG_4861.jpeg


And next to a quarter for reference:

IMG_4863.jpeg


It's additionally detailed with little hand cut bits of styrene - I used round rods, half-rounds, and pieces of .005" to detail manually. The central panel lines dividing it into quadrants are also hand cut with a Tamiya scriber tool.
 
I don't have a lot of in-progress shots of each individual tile, but for the most part they all go together the same way. Each tile sits on a base of .060" styrene (the early ones were two layers of .030" - I cut a whole lot of base tiles to start, then I eventually found I had a partial sheet of .060"). Since the cutter cuts very precisely, I know each tile is the same dimensions and will tile accurately, and a base of .060" is NOT going to warp in any way.

This shot shows 3 finished tiles (again, with a lot of hand-cut tiny details, painstakingly applied with the top of a hobby knife and the help of magnifying glasses), plus one that just has the main layers cemented together but no detailing yet, and one with several of the layers just loose.

IMG_4875.jpeg

IMG_4878.jpeg
IMG_4882.jpeg
IMG_4883.jpeg
IMG_4890.jpeg


I used a pair of machinist's 3-2-1 blocks set at right angles to help make sure the layers were aligned accurately.
 
Continuing to catch up - once I finished those, I'd already started a few more - the "kit kat" module was a fun one to try to approximate, and I also got it into my head to make a few quarter size 10mm x 10mm micro tiles.

IMG_4895.jpeg


At this point I had 9 20mm tiles and 2 10mm tiles, and thought I'd stop at an even dozen. Hah!

E43086AD-6C07-4F63-8A00-7A40A71553CC.jpeg

IMG_4969.jpeg
IMG_4971.jpeg
 
The next tile is one of my favorites. It's one I made up, just playing with shapes that might fit in with the originals.

IMG_4960.jpeg


I incorporated a lot of photo etched brass - some mesh for texture inside a cutout. The brass mesh is made by Alliance Modelworks (AM Works Home page). The "T" layer below the mesh is .010" styrene, and the layer above is is .020" - the mesh is thin enough that the styrene just squishes around it once the Tamiya cement is applied (and the mesh was superglued in place first).

IMG_4961.jpeg


...and some unused pieces from the Paragrafix TFA Millennium Falcon set that worked perfectly as surface detail.

IMG_4965.jpeg


And here it is finished, with all the additional styrene detailing added on.

IMG_4968.jpeg
 
I made a few more tiles before setting up to make silicone molds. The Bandai U-Wing/TIE-Striker 1:144 set has a lot of pieces that make fantastic greeble, especially on the brown sprues with the hover tank and U-wing engines. I made a couple of tiles from the khyber crystal container and the U-wing engine nozzles (and I have a couple more yet still planned with other parts of the hover tanks).

IMG_5437.jpeg


To size the oval ring around the engine nozzles accurately, I got out my calipers and modeled the engines so that I had something to work off of in SketchUp.

Screen Shot 2020-09-03 at 6.17.48 PM.jpg


IMG_4998.jpeg
 

Attachments

  • IMG_5345.jpeg
    IMG_5345.jpeg
    1.1 MB · Views: 204
Oh yeah, and I made a tiny tower! It's less than 1.5" tall. It's constructed entirely of flat styrene - there's interlocking pieces inside to form the support structure for the exterior plates that are visible. Had to use a little filler on the corners, but it came out quite well overall.

I might make one more in a more ROTJ-style.

IMG_5111.jpeg


IMG_5110.jpeg
 

Attachments

  • IMG_5100.jpeg
    IMG_5100.jpeg
    1.6 MB · Views: 217
Hope you sell castings!

Thanks, but I'm afraid I'm not planning to! That's just way more of a time commitment than I have to devote to projects these days. I also don't have a pressure casting setup (nor the space available to set one up), which I would really want in order to get castings clean enough to feel good about selling.
 
OK - at this point I thought I was likely done (HAH! that's a theme. Don't build Death Star Tiles, folks, it's an addiction) and time to pour some silicone.

Step 1 - get something to use as a base for the mold master. I drew a 1" grid on it to align the tiles to (they're 20mm, leaving 5mm between tiles).
Silicone is so sensitive that the PENCIL LINES are visible in the mold. Crazy!

IMG_5250.jpeg


Glue everything to the base plate

IMG_5258.jpeg


Make mold boxes. The tower gets a separate mold box because it's so much taller. No sense wasting silicone! I usually use foam-core for mold boxes, but I'm all out, so I used some cardboard.

IMG_5261.jpeg


Put the gooey stuff in the box, then wait. This is Smooth-On's OOMOO 30, which sets in 6 hours or so, although I like to give it a solid 12 hours to cure.

IMG_5268.jpeg


First test casting. I molded some of my doors along with the tiles (Yeah, did I mention I'm making a whole series of iconic Star Wars doorways, rendered in flat styrene in 1:144 scale? No? It's for a new Disney ride - STAR DOORS. Hah, no. Thank you very much, I'll see myself out).

Right, where was I? Oh yeah, here. Mmmm, resin spillover. I use an old silpat baking sheet thing that was too torn up for baking to protect my work surface from resin spills.

IMG_5269.jpeg


Not bad! I'm reasonably happy with how it turned out. The very small fins I put on the tiles in places don't reproduce well, but I'm OK with that - I knew they would usually get bubbles in them without pressure casting. Although I could also use a resin with a longer set time to give bubbles more time to escape -- I'm currently casting with SmoothCast 300, which starts thickening in seconds, and can be de-molded in just 10 minutes.

IMG_5271.jpeg


Final step - SO. MUCH. SANDING.

IMG_5274.jpeg


SO. MUCH. SANDING.

IMG_5278.jpeg
 
Getting close to all caught up here. I made several sets of castings to have plenty of tiles to play with (SO. MUCH. SANDING).

IMG_5280.jpeg


I have a few older Cricut cutting mats that are no longer great for actually cutting with (the surface tackiness is gone, or they've been cut all the way through), but they're still usable as a base material to hold tile assemblies together. This is just a test taking advantage of what tackiness still remains on them to hold the pieces in place.

IMG_5301.jpeg


You can see that I cut a couple of the towers into the upper and lower sections. I designed them that way in order to get three distinct pieces out of one. That goes back to Joe Johnston's original concept design drawings -- "Deep reveals so that towers can be cut to different lengths".

page49.jpg


Messing around with how to keep the tiles aligned/build things out of them, I found that 4mm square styrene tubing is perfect. It also provides a solid place to anchor a vertical wall of tiles.

IMG_5288.jpeg
IMG_5292.jpeg


That sent me back to the reference material. This photo of the three-tiles wide trench model (which never appeared on-screen, but I love) comes from Lorne Peterson's "Sculpting a Galaxy" book.

35088416_4.jpg


Like I've done with other models that start in SketchUp to generate cutting patterns for the Cricut machine, once they're done or nearly done I go back to the digital model and add purely visual detail, so I can make more accurate mockups of arrangements. Here's one possible ANH trench, based very loosely on bits of different reference photos/

DS-Micro-Trench-Run.jpeg
 

Your message may be considered spam for the following reasons:

If you wish to reply despite these issues, check the box below before replying.
Be aware that malicious compliance may result in more severe penalties.
Back
Top