t2sides
Master Member
Hello All,
Sharing progress on an ongoing project that started this past summer.
My good friend Dan Durda (3DImpact) and I began the journey of mastering and casting the large 2' x 2' Death Star Surface tiles, utilizing original kit parts and attempting to get as accurate as we could. So far, we have completed 3 of the 6 tiles, and this thread will show the build progress on those to date. They include per Joe Johnston's sketchbook, Module 1 (Question Mark), Module 2 (Flat Tile), & Module 5 (Square Tower). The other 3 tiles are currently under construction ( a future thread)
For these first 3, we started with the basic base structures made out of wood, MDF and hi-density foam. Dan heroically took on Tiles 1 & 2, while I worked on Tile 5.
We added some laser scribed styrene in certain areas, and cleaned up bases to be ready for the parts layouts.
Using references of the original tiles, and nearly complete ID maps that several studio scale experts had previously created, we were on our way to start laying down parts.
After the parts were down, we made mold boxes, covered the tile masters in rubber, then poured a mother mold on top of that, and we had a huge casting box ready to go. We learned a lot in this process, including using a flexible foam for the mother mold, which turned out to be poor decision as our rubber was too thin, and pouring the expandable foam wound up deforming some areas of the casting - but now we know what to fix, correct, and eventually remake proper mother molds. That's the fun of 'trial and error' at this scale on a project like this!
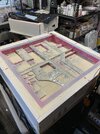
So, with that brief summary, here's an overview of the tiles so far...
Here's a quick preview of the end result to show the size/scale of these!

Here's the reference of the Tiles from Joe's Sketchbook to track tile naming.
Question Mark

Flat

Kit Kat

3 Fins

Square Tower

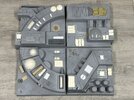
Starting with Module 1, here's the progression:
Progression of base tile, then parts layed out, then primered.

Here's Module 2 progression:


Primered:


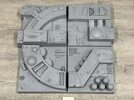
And Module 5:
Parts layout

Primered and out in the Sun - look like the Originals!!


The other 2 tiles ready for molding/casting....

And these in the Sun, shadows look so legit!


Next Post will show some of the molding and casting process...
Sharing progress on an ongoing project that started this past summer.
My good friend Dan Durda (3DImpact) and I began the journey of mastering and casting the large 2' x 2' Death Star Surface tiles, utilizing original kit parts and attempting to get as accurate as we could. So far, we have completed 3 of the 6 tiles, and this thread will show the build progress on those to date. They include per Joe Johnston's sketchbook, Module 1 (Question Mark), Module 2 (Flat Tile), & Module 5 (Square Tower). The other 3 tiles are currently under construction ( a future thread)
For these first 3, we started with the basic base structures made out of wood, MDF and hi-density foam. Dan heroically took on Tiles 1 & 2, while I worked on Tile 5.
We added some laser scribed styrene in certain areas, and cleaned up bases to be ready for the parts layouts.
Using references of the original tiles, and nearly complete ID maps that several studio scale experts had previously created, we were on our way to start laying down parts.
After the parts were down, we made mold boxes, covered the tile masters in rubber, then poured a mother mold on top of that, and we had a huge casting box ready to go. We learned a lot in this process, including using a flexible foam for the mother mold, which turned out to be poor decision as our rubber was too thin, and pouring the expandable foam wound up deforming some areas of the casting - but now we know what to fix, correct, and eventually remake proper mother molds. That's the fun of 'trial and error' at this scale on a project like this!
So, with that brief summary, here's an overview of the tiles so far...
Here's a quick preview of the end result to show the size/scale of these!
Here's the reference of the Tiles from Joe's Sketchbook to track tile naming.
Question Mark
Flat
Kit Kat
3 Fins
Square Tower
Starting with Module 1, here's the progression:
Progression of base tile, then parts layed out, then primered.
Here's Module 2 progression:
Primered:
And Module 5:
Parts layout
Primered and out in the Sun - look like the Originals!!
The other 2 tiles ready for molding/casting....
And these in the Sun, shadows look so legit!
Next Post will show some of the molding and casting process...
")