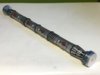
Limited Run Darth Maul TPM screen accurate lightsaber prop

Done and done. As far as I'm concerned, this kit is perfect. Looks exactly like the screen-used prop (i.e. looks great) and is a LOT heavier than I thought it would be. And it was a breeze to assemble (the O-rings were a bit of a challenge, but the pieces of string trick helped a lot) I used a 1.25" wide washer as the spacer, and both halves aligned perfectly. I love this thing.
 

Attachments

  • IMG_1268.JPG
    IMG_1268.JPG
    1.1 MB · Views: 373
Done and done. As far as I'm concerned, this kit is perfect. Looks exactly like the screen-used prop (i.e. looks great) and is a LOT heavier than I thought it would be. And it was a breeze to assemble (the O-rings were a bit of a challenge, but the pieces of string trick helped a lot) I used a 1.25" wide washer as the spacer, and both halves aligned perfectly. I love this thing.


Thanks a bunch. And thanks for the photos. I'm a pretty lousy photographer, so some nice shots will really help me promote my work :)
 
Quick trip to Home Depot and 10 minutes of cutting with a Dremel and I test fit mine together:

9E9081D0-AEEF-467F-B264-56A7DCAE7766.jpeg


I used a 3/8” washer as a spacer between the hilt pieces:

1F8AA31C-D247-48DE-A22D-6B942AC9716F.jpeg


I do have some alignment issues between the hilt prices but I think I can work this out:

7FB47B64-B3BF-4E73-AD95-B268B1D1FB18.jpeg


So far, I’m loving this kit.
 
Last edited:
Everyone can breath!!! I got a simple solution for those struggling with alignment issues

IMG_9263.jpg


IMG_9264.jpg


I like this nylon washer setup

IMG_9265.jpg


Video will be up tomorrow night, promise!
 
Solved my alignment issue...that was easy.

The key was I needed a third hand...

I loosened the end caps and asked my wife to hold one of the loosened ends to keep it from spinning. I then aligned the joint between the two hilt pieces with one hand and tightened the saber with my other hand by turning the other end cap while my wife continued to hold the other end cap tightly to keep it from spinning. The saber tightened up and lined up perfectly.

Done!

8CF5EF10-3805-424C-B070-4E58CD0332D9.jpeg


(The O rings, save for the center ring, were slid down into the incorrect positions in this shot)

So, it has everything to do with how the Saber is being aligned when tightening the pieces together. I almost guarantee that if you simply tighten both ends without simultaneously aligning the joint between the two hilt pieces, as you tighten, you’re going to have alignment issues.
 
Last edited:
I also find myself wondering how good of a match the paint on the red buttons is when compared to the actual props. Seems less of a candy red and more of a purple-y red when compared to the reference images. Not to knock the sheer awesomeness of this replica, of course, but there’s always room to accurize!


Thoughts?
 
The string trick for the O-rings was a life saver! I used a piece of narrow ribbon instead of string just to distribute the force a bit more - once the O-ring was in place I went around the circumference, lifting the O-ring a little every few millimeters to help it un-twist and remove those torsional stresses.

Before loading the washers onto the emitter caps I did about 3-4 wraps of blue masking tape onto the stems to better center them. Just enough that the washers couldn't wiggle around.

For the mid-saber spacer washer I used a 3/8x7/8x1/16 Neoprene (rubber) washer. I feel like the slight grip it has helped keep the middle seam aligned while tightening the emitter caps (no third hand needed).

BTW I found a brad hole style T-Nut at Lowe's that would make a good end for a half-saber (also pictured below). You'd just need to cut an additional 10" threaded rod and slightly enlarge the resin hilt bore so that it the T-nut will recess into the end.

Thank you for putting such an awesome kit together for us!

IMG_5889.JPG
IMG_5890.JPG
IMG_5891.JPG
IMG_5892.JPG
 
Last edited:
Back
Top