Vanitas
Sr Member
To anyone that's been involved in the main ANH DL-44 thread over the last couple years, you've probably noticed me slowly tinkering away at one of Field Marshall's steel ANH kits. To me the ANH Hero is one of my biggest 'unicorn' props, and the majority of my tenure on theRPF has been almost entirely centered around obsessively studying it.
Having gone through everything from Denixes to MGCs and even a MR Elite Edition, none of the base Mausers ever quite satisfied that raw sense of rightness that comes with something like a real C96, so when the accurate 1:1 Mauser Project was finally announced it was to me, like many others, a culmination of years' worth of efforts and a crowning moment of prop builder passion.
This particular build was done on one of the very first run of accurate Steel C96s, which came with both its own benefits and hurdles. All of the stamping and numbers were lacking and the contact point for the bull barrel was a bit further back than it should have been, but the machining sharpness was exceptionally clean and made for an exceptional foundation to only refine more and more.
After many months' of slowly refining the base Mauser, sanding out imperfections, reshaping minor pieces, modifying a few of the internal parts and even adding entirely customized sections, I finally had arrived at the point where I knew there was only one thing left to do:
Send the whole enchilada off to Scott for final assembly and finishing, of course!
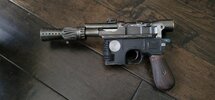
What I had finally arrived at was a somewhat odd amalgamation of parts; while Chris' steel C96 remained the primary base, I had tried and swapped out everything from real parts to different flash hiders, and even the MR Elite Edition Scope mount. Even now I still have numerous leftover parts from this build, and I could comfortably make a second or even a third ANH hero with all of the bits and bobs that I still have. Ultimately, what emerged from the settling dust was a Field Marshall steel C96 with a GREAT many modifications and parts:
• Customized Todd's Costumes screw-in bull barrel
• Todd's Costumes steel flash hider
• Customized Field Marshall steel scope mount
• Customized Field Marshall elite Hensoldt Wetzlar scope with aftermarket brass rings and magnifying lenses, hand stamped scope knob
• Real Mauser C96 hammer
• Reshaped and modified the Field Marshall trigger/trigger assembly system
• Modified the rails/hammer sear assembly to have the upper rest further forward and the hammer sit upright


While much more than this was done, these to me represent the greatest parts of the modifications I made to better distinguish my build and get at least that much closer to the original prop. The upper and lower were both hot blued and slightly rusted to give the faint appearance of pitting, which was crucial to help the entire C96 feel more beaten and weathered. The original sleeve barrel assembly was discarded outright, and after chopping the barrel off completely I hand-tapped and drilled the upper to accept a Todd's Costumes screw-in bull barrel (something which PoopaPapaPalps was quite helpful with; as he was only one of two other people here I know of who have done the same).

The scope mount was probably the one single piece that I spent the most time refining, as the sand cast mount comes rather rough from Field Marshall. But many hours worth of filing and grinding all paid off, and while I might eventually refinish the mount I'm currently happy enough with how smooth and crisp is ultimately came out (Note; I am aware of conflicting opinions of the finish of the original Hero's scope mount, but at least to me I am of the opinion that it was originally deep blued, and not painted). That being said, if the opportunity to ever acquire one of DEC's crisp machined steel/aluminium scope mounts ever presented itself, then I would take it in a heartbeat!


The rest of the build was more or less just fit and finish. Chris' elite scope was polished up to 2000 grit to take all of its machining grooves out before it was blued and then subsequently weathered by Scott, who also painted the knob and provided further ancillary weathering. He had also added the much-needed Mauser stampings and serial numbers to the C96, as well as an entirely different serial number for the lockframe and lower! At least to me I really wanted the whole thing not to perfectly match, as it that little bit more got closer to the sense of 'cobbled-togetherness' that the original surely must have had.


In its current physical incarnation, I would say that it is roughly ~95% complete. Some of the parts like the bolt, sight ramp and lock frame are all a bit too shiny for my current taste, so I am currently darkening them all a bit with diluted bluing compounds. I might try and encourage a bit of rust on those parts and them clean them back off a few times to get a bit of surface imperfections, if only so they look appropriately beaten as well. The screws in the scope mount's top caps also need to be darkened.
The paint on the lower is also a work in progress, as I am continuing to slowly chip away at the paint until I arrive at a result that is satisfactorily worn enough. I may also experiment with rusting the Todd's flash hider a bit too, as the pre-production image of the as-issued Bapty version of the prop seems to show it with a slightly rusty hue to me.
Thanks for reading; and a HUGE shoutout to all the awesome members of this community that've helped along the way!
The journey continues...
Having gone through everything from Denixes to MGCs and even a MR Elite Edition, none of the base Mausers ever quite satisfied that raw sense of rightness that comes with something like a real C96, so when the accurate 1:1 Mauser Project was finally announced it was to me, like many others, a culmination of years' worth of efforts and a crowning moment of prop builder passion.
This particular build was done on one of the very first run of accurate Steel C96s, which came with both its own benefits and hurdles. All of the stamping and numbers were lacking and the contact point for the bull barrel was a bit further back than it should have been, but the machining sharpness was exceptionally clean and made for an exceptional foundation to only refine more and more.
After many months' of slowly refining the base Mauser, sanding out imperfections, reshaping minor pieces, modifying a few of the internal parts and even adding entirely customized sections, I finally had arrived at the point where I knew there was only one thing left to do:
Send the whole enchilada off to Scott for final assembly and finishing, of course!
What I had finally arrived at was a somewhat odd amalgamation of parts; while Chris' steel C96 remained the primary base, I had tried and swapped out everything from real parts to different flash hiders, and even the MR Elite Edition Scope mount. Even now I still have numerous leftover parts from this build, and I could comfortably make a second or even a third ANH hero with all of the bits and bobs that I still have. Ultimately, what emerged from the settling dust was a Field Marshall steel C96 with a GREAT many modifications and parts:
• Customized Todd's Costumes screw-in bull barrel
• Todd's Costumes steel flash hider
• Customized Field Marshall steel scope mount
• Customized Field Marshall elite Hensoldt Wetzlar scope with aftermarket brass rings and magnifying lenses, hand stamped scope knob
• Real Mauser C96 hammer
• Reshaped and modified the Field Marshall trigger/trigger assembly system
• Modified the rails/hammer sear assembly to have the upper rest further forward and the hammer sit upright
While much more than this was done, these to me represent the greatest parts of the modifications I made to better distinguish my build and get at least that much closer to the original prop. The upper and lower were both hot blued and slightly rusted to give the faint appearance of pitting, which was crucial to help the entire C96 feel more beaten and weathered. The original sleeve barrel assembly was discarded outright, and after chopping the barrel off completely I hand-tapped and drilled the upper to accept a Todd's Costumes screw-in bull barrel (something which PoopaPapaPalps was quite helpful with; as he was only one of two other people here I know of who have done the same).
The scope mount was probably the one single piece that I spent the most time refining, as the sand cast mount comes rather rough from Field Marshall. But many hours worth of filing and grinding all paid off, and while I might eventually refinish the mount I'm currently happy enough with how smooth and crisp is ultimately came out (Note; I am aware of conflicting opinions of the finish of the original Hero's scope mount, but at least to me I am of the opinion that it was originally deep blued, and not painted). That being said, if the opportunity to ever acquire one of DEC's crisp machined steel/aluminium scope mounts ever presented itself, then I would take it in a heartbeat!
The rest of the build was more or less just fit and finish. Chris' elite scope was polished up to 2000 grit to take all of its machining grooves out before it was blued and then subsequently weathered by Scott, who also painted the knob and provided further ancillary weathering. He had also added the much-needed Mauser stampings and serial numbers to the C96, as well as an entirely different serial number for the lockframe and lower! At least to me I really wanted the whole thing not to perfectly match, as it that little bit more got closer to the sense of 'cobbled-togetherness' that the original surely must have had.
In its current physical incarnation, I would say that it is roughly ~95% complete. Some of the parts like the bolt, sight ramp and lock frame are all a bit too shiny for my current taste, so I am currently darkening them all a bit with diluted bluing compounds. I might try and encourage a bit of rust on those parts and them clean them back off a few times to get a bit of surface imperfections, if only so they look appropriately beaten as well. The screws in the scope mount's top caps also need to be darkened.
The paint on the lower is also a work in progress, as I am continuing to slowly chip away at the paint until I arrive at a result that is satisfactorily worn enough. I may also experiment with rusting the Todd's flash hider a bit too, as the pre-production image of the as-issued Bapty version of the prop seems to show it with a slightly rusty hue to me.
Thanks for reading; and a HUGE shoutout to all the awesome members of this community that've helped along the way!
The journey continues...
Attachments
Last edited:
")