You are using an out of date browser. It may not display this or other websites correctly.
You should upgrade or use an alternative browser.
You should upgrade or use an alternative browser.
Bandai 1/72 PG Millennium Falcon (also the Revell Germany rebox)
- Thread starter Jaitea
- Start date
Attirex
Well-Known Member
I, too, have the PG Falcon. I bought it soon as it was available here in the States, assembled 99% of it, sprayed a base coat of Guy's Reefer White and then.....haven't touched it since. I think like a lot of ppl here, I'm afflicted with Performance Anxiety. So many good builds here that replicate the studio model down to the millimeter that I can't possibly replicate. I consider myself to be slightly advanced to advanced in skill level, but then I think about how I'm going to make the streak marks, or get the grime just right, or do the chipping (hairspray technique or hand paint them?), or how can I get good blast marks (I've never been able to get good blast marks), and it goes on and on and then next thing I know I've moved on to another project. Seems like for whatever reason, the Falcon embodies both my Favorite Starship Ever *and* every weathering technique I'm NOT good at. Maybe should've thought of that before I dropped $400? Hm.
Help! I need therapy! Or a beer. Or something.
Help! I need therapy! Or a beer. Or something.
DerfOnarged
New Member
I, too, have the PG Falcon. I bought it soon as it was available here in the States, assembled 99% of it, sprayed a base coat of Guy's Reefer White and then.....haven't touched it since. I think like a lot of ppl here, I'm afflicted with Performance Anxiety. So many good builds here that replicate the studio model down to the millimeter that I can't possibly replicate. I consider myself to be slightly advanced to advanced in skill level, but then I think about how I'm going to make the streak marks, or get the grime just right, or do the chipping (hairspray technique or hand paint them?), or how can I get good blast marks (I've never been able to get good blast marks), and it goes on and on and then next thing I know I've moved on to another project. Seems like for whatever reason, the Falcon embodies both my Favorite Starship Ever *and* every weathering technique I'm NOT good at. Maybe should've thought of that before I dropped $400? Hm.
Help! I need therapy! Or a beer. Or something.
Man, I remember when I hesitated to start too! It was my first model attempt since middle school, and I was so intimidated. I just said, “F#^+ it!” and went for it. Just took my time, did a lot of research on various techniques, and 9 months later completed my dream model. Couldn’t be happier with how mine turned out! Just go for it!
robn1
Master Member
Use pastel chalks, applied with a brush (I believe they're available in pencil form as well). Streak it with a make up applicator. It's easy enough to remove and redo if you're not happy with it.I have! I've built a lot of Bandai's SW kits and think they've all turned out well....still have no confidence. Sad.
gt350pony66
Master Member
nah dude, I had a slight touch of the same anxieties. Watch some YouTube videos on the stuff you feel you're a bit shaky on and watch as many different methods as possible, try the ones you like and go with what works best for you. I just tried the hair spray thing for the first time on my PG. Anything you're not comfortable with, practice on something else. If you're like a lot of us, you've got an old MPC laying around, practice on that. Like you, I think I have above average skills and there's some things I excel at and some, I suck at...maybe a lot I suck atI, too, have the PG Falcon. I bought it soon as it was available here in the States, assembled 99% of it, sprayed a base coat of Guy's Reefer White and then.....haven't touched it since. I think like a lot of ppl here, I'm afflicted with Performance Anxiety. So many good builds here that replicate the studio model down to the millimeter that I can't possibly replicate. I consider myself to be slightly advanced to advanced in skill level, but then I think about how I'm going to make the streak marks, or get the grime just right, or do the chipping (hairspray technique or hand paint them?), or how can I get good blast marks (I've never been able to get good blast marks), and it goes on and on and then next thing I know I've moved on to another project. Seems like for whatever reason, the Falcon embodies both my Favorite Starship Ever *and* every weathering technique I'm NOT good at. Maybe should've thought of that before I dropped $400? Hm.
Help! I need therapy! Or a beer. Or something.

Dive in, go slow, take you time and ask questions. Everyone here is always glad to help out. In the 3 years I've been on here I've only encountered a couple of guys who were critical and condescending so don't worry that someone is gonna give you crap about your work. Remember, you're not building that 400 dollar thing for anyone but you and in the end, if you think it looks good, that's all that matters
Oh, and try this...cocktail shaker with half ice, a shot or more of coconut vodka, a heave squirt of coconut cream, fill the rest with lime-aid. shake it up good and enjoy...I rarely have beer anymore
gt350pony66
Master Member
I favor that method as wellUse pastel chalks, applied with a brush (I believe they're available in pencil form as well). Streak it with a make up applicator. It's easy enough to remove and redo if you're not happy with it.
Thanks, guys. Needed a pep talk.
I've heard pastels are a good medium for streaks, and, yeah, I just need to say "f--- it" and jump in. Hm.
I use oils and a brush to do streaking. Once you put down acrylic paint, mineral spirits (used to dillute oil paints) does not affect the plastic on Bandai kits. And it's easily removed if you do it on top of a clear coat, then clear coat it again when done.
robn1
Master Member
Something else I've seen but not tried yet is watercolor pencils. Same thing, draw the streaks on and spread with a brush or makeup applicator, easy to remove.Thanks, guys. Needed a pep talk.
I've heard pastels are a good medium for streaks, and, yeah, I just need to say "f--- it" and jump in. Hm.
Attirex
Well-Known Member
Taking lots of notes, thanks all! (fyi, also includes your drink ingredients, gt350, lol)
After I finish Partisan X-Wing project, I might start painting the Falcon's colored panels and just see where it goes from there. Maybe there will be some kind of momentum I can get rolling with.
After I finish Partisan X-Wing project, I might start painting the Falcon's colored panels and just see where it goes from there. Maybe there will be some kind of momentum I can get rolling with.
Hunk a Junk
Sr Member
I experimented with a variety of methods for the streaks, from freehanding them to painting them to using pencils. On the original, some of the streaks are darker, some are thinner, some are super light. Use your reference photos and pick a method that will best match.
A trick I think is really helpful is to use a Post-It note as a straight edge to make sure the streak is nice and straight. Put down the Post-It note using the tacky edge where you want the go, apply powdered pastel using a Q-Tip (I use the precision style from Target with a pointier end than regular Q-tips). Apply the streak from the top (or source) and feather it out down the Post-It edge. Then remove the Post-It and use the Q-Tip to soften the hard edge of the streak left from the Post-It. Voila! It also improves the look if you add a second Post-it at a 90 degree angle across the top of the source of the streak to make sure no powder gets above where the streak starts.
Always make the streaks lighter than you think it needs to be. Add all the streaks in a given area of the model and then check the area against reference photos. Then you can see which of your streaks you need to darken and which to leave alone. It's easier to darken a streak than it is to remove it or lighten it. Be patient. Continually step back from the model to see how everything looks and make sure to look at it under different lighting, especially in display (shelf) lighting.
gt350pony66
Master Member
I experimented with a variety of methods for the streaks, from freehanding them to painting them to using pencils. On the original, some of the streaks are darker, some are thinner, some are super light. Use your reference photos and pick a method that will best match.
A trick I think is really helpful is to use a Post-It note as a straight edge to make sure the streak is nice and straight. Put down the Post-It note using the tacky edge where you want the go, apply powdered pastel using a Q-Tip (I use the precision style from Target with a pointier end than regular Q-tips). Apply the streak from the top (or source) and feather it out down the Post-It edge. Then remove the Post-It and use the Q-Tip to soften the hard edge of the streak left from the Post-It. Voila! It also improves the look if you add a second Post-it at a 90 degree angle across the top of the source of the streak to make sure no powder gets above where the streak starts.
Always make the streaks lighter than you think it needs to be. Add all the streaks in a given area of the model and then check the area against reference photos. Then you can see which of your streaks you need to darken and which to leave alone. It's easier to darken a streak than it is to remove it or lighten it. Be patient. Continually step back from the model to see how everything looks and make sure to look at it under different lighting, especially in display (shelf) lighting.
excellent method, I'm about to start that phase and I think I'll employ your method as I use pastel powder as well
Toadmeister
Sr Member
I did the same sans the post-it and it turned out great.I experimented with a variety of methods for the streaks, from freehanding them to painting them to using pencils. On the original, some of the streaks are darker, some are thinner, some are super light. Use your reference photos and pick a method that will best match.
A trick I think is really helpful is to use a Post-It note as a straight edge to make sure the streak is nice and straight. Put down the Post-It note using the tacky edge where you want the go, apply powdered pastel using a Q-Tip (I use the precision style from Target with a pointier end than regular Q-tips). Apply the streak from the top (or source) and feather it out down the Post-It edge. Then remove the Post-It and use the Q-Tip to soften the hard edge of the streak left from the Post-It. Voila! It also improves the look if you add a second Post-it at a 90 degree angle across the top of the source of the streak to make sure no powder gets above where the streak starts.
Always make the streaks lighter than you think it needs to be. Add all the streaks in a given area of the model and then check the area against reference photos. Then you can see which of your streaks you need to darken and which to leave alone. It's easier to darken a streak than it is to remove it or lighten it. Be patient. Continually step back from the model to see how everything looks and make sure to look at it under different lighting, especially in display (shelf) lighting.
gt350pony66
Master Member
beauty!
jim357
New Member
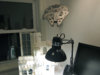
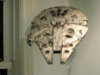
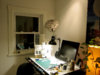
when I was a kid I used to see Falcon models hanging from the ceiling of hobby shops, I have a small little home office and considered doing
that, but didn't want to get into hooks in the ceiling and risking fishing-line to hang it, PLUS the top part is what I wanted to see, so I bought a mini LCD monitor wall mount, and built a custom wooden platform, worked perfectly..and I've angled it so I can see the top...suspended, but suggesting it's heading downwards, 'evading the Empire'
that, but didn't want to get into hooks in the ceiling and risking fishing-line to hang it, PLUS the top part is what I wanted to see, so I bought a mini LCD monitor wall mount, and built a custom wooden platform, worked perfectly..and I've angled it so I can see the top...suspended, but suggesting it's heading downwards, 'evading the Empire'
Attachments

gt350pony66
Master Member
Now I think that is just cool as ****!when I was a kid I used to see Falcon models hanging from the ceiling of hobby shops, I have a small little home office and considered doing
that, but didn't want to get into hooks in the ceiling and risking fishing-line to hang it, PLUS the top part is what I wanted to see, so I bought a mini LCD monitor wall mount, and built a custom wooden platform, worked perfectly..and I've angled it so I can see the top...suspended, but suggesting it's heading downwards, 'evading the Empire'
Similar threads
- Replies
- 13
- Views
- 3,787
- Replies
- 2,884
- Views
- 295,578
- Replies
- 44
- Views
- 17,506