1/72 Hoth Echo Base Hangar diorama

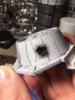
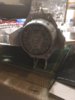
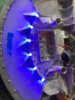
I find ultrasonic cleaners work... okay. At least the semi-industrial looking cleaner that I got. The first one I bought was a plastic ovoid toy, and it was useless junk. But often heavy wax buildups turn into this weird crumbly stuff that still requires mechanical action to remove.

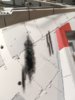
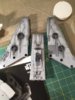
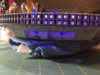
The best solution I find is to flow lots of hot water over the surfaces, and use a medium bristly paintbrush to gently rub every nook and cranny. Then do a final cleanup using isopropyl alcohol, again with a brush.
 
Last edited:
In find just a soak in Dawn removes 90% or more (at least from the shapeways stuff). The rest I use an old tooth brush, then put in the ultrasonic cleaner.

I'll try the alcohol wash for the really stubborn stuff next time
 
In find just a soak in Dawn removes 90% or more (at least from the shapeways stuff). The rest I use an old tooth brush, then put in the ultrasonic cleaner.

I'll try the alcohol wash for the really stubborn stuff next time

I like the ultrasonic idea, may look into that. I think this particular part just isn't translucent enough. If they were clear resin it'd be killer. Using the 2mm may be what it needs. I'm going to clean them again and scrape the inside more and see if that helps. If not I guess I'll experiment with the 2mm reds on some scrap plastic. I just wouldn't look forward to having to place and wire up all those LED's! I do want it right and am in no rush but I want to keep things moving along...and I want it to be stunning (y)
 
Hey Ross , the builds really coming along beautifully . Wanted to wish you and yours a very Merry Christmas and super exciting New Year mate (y)!
Hey thanks Ged! It's actually coming along better than I thought, but I'm taking it slow and bugging the hell out of Korban :lol: He's much further ahead on his and has already worked out the process on all the mods required to do what we're doing. So I might as well benefit from his forging ahead and figuring stuff out :D
And thank you, I wish the best of holiday to you and yours also. A very Merry Christmas to you my friend(y)
 
Past couple days work...battle damage on the docking collar...soldering iron works pretty good. I go slow and try to sculpt it best I can. Trying to follow the paint guide in the instructions but the pics are so bleeping small, trying not to over-weather it. still many miles to go. docking collars...big whoop right, lol. Finally pressed the front and rear lower sections together and the lower jaw. I hope I didn't forget anything...cause they ain't coming back apart. Front center landing gear in and light test, the second LED got me the look I wanted. Coming along nicely so far and having a lot of fun with it. Merry Christmas my friends
 

Attachments

  • pg122318a.jpeg
    pg122318a.jpeg
    44.5 KB · Views: 167
  • pg122318b.jpeg
    pg122318b.jpeg
    43.8 KB · Views: 173
  • pg122318c.jpeg
    pg122318c.jpeg
    67.8 KB · Views: 172
  • pg122318d.jpeg
    pg122318d.jpeg
    47 KB · Views: 174
  • pg122318e.jpeg
    pg122318e.jpeg
    55 KB · Views: 175
  • pg122318f.jpeg
    pg122318f.jpeg
    84.6 KB · Views: 166
  • pg122318g.jpeg
    pg122318g.jpeg
    44.8 KB · Views: 161
  • pg122318h.jpeg
    pg122318h.jpeg
    73.2 KB · Views: 172
  • pg122318i.jpeg
    pg122318i.jpeg
    84.6 KB · Views: 183
the port side front landing lights, had to really scrunch things down to fit under the mandible, but I reckon it'll clear. Chopped the back out of the first sidewall piece but that was the easy one. it all works...so far. On the starboard side, the one light seemed to land right in the center of an assembly tube, so I cut it down by half, and cut a channel for the LED to fit inside. I see no problems with it...yet.
 

Attachments

  • pglights1.jpeg
    pglights1.jpeg
    83.1 KB · Views: 150
  • pglights2.jpeg
    pglights2.jpeg
    49.1 KB · Views: 142
  • pglights3.jpeg
    pglights3.jpeg
    52.5 KB · Views: 164
  • pglights4.jpeg
    pglights4.jpeg
    78.6 KB · Views: 157
  • pglights5.jpeg
    pglights5.jpeg
    78 KB · Views: 151
That's what she said?...lol
LOL, yeah that's what they say...scream it sometimes too :lol:
Well I haven't done the top hull yet, I'm gonna take the MPC hull piece and replicate what I've done on the PG so far, and experiment with some blends that might bring a tan-ish hue to what I've already done with the PG lower WITHOUT having to strip it and re-do the whole MF...and no, that's not millennium falcon
 
Well, I did a lot more than the pics, but it was standard stuff not worthy of pics and words...docking collars, the first two sidewall chunks and so forth. Though I do have a couple pics of what I did with the landing lights in relation to. This was part my solution to not using any of the kit electrics, this of course is the engine lights. being as my build has either just landed or preparing for take off, the engine glow should be relatively dim. I think I got what I wanted on the first try. And of course the brilliant ESB maintenance pits by Age of Plastic (y)
 

Attachments

  • pgenglight1.jpeg
    pgenglight1.jpeg
    51.2 KB · Views: 127
  • pgenglight2.jpeg
    pgenglight2.jpeg
    76.7 KB · Views: 130
  • pgenglight3.jpeg
    pgenglight3.jpeg
    54.1 KB · Views: 122
  • pgenglight4.jpeg
    pgenglight4.jpeg
    105.7 KB · Views: 125
  • pgenglight5.jpeg
    pgenglight5.jpeg
    102.8 KB · Views: 124
  • pgenglight6.jpeg
    pgenglight6.jpeg
    141.9 KB · Views: 128
just a few pics of how i tackled this part so the mandibles will still go flush to the lower hull...and the first wall section i hacked up to accommodate them
 

Attachments

  • landinglights1.jpeg
    landinglights1.jpeg
    83.1 KB · Views: 129
  • landinglights2.jpeg
    landinglights2.jpeg
    49.1 KB · Views: 122
  • landinglights3.jpeg
    landinglights3.jpeg
    52.5 KB · Views: 128
  • landinglights4.jpeg
    landinglights4.jpeg
    78.6 KB · Views: 120
  • landinglights5.jpeg
    landinglights5.jpeg
    78 KB · Views: 123
nothing spectacular, just landing lights. Although I've got myself a process now that moves things along. i set up the LED's for each locations requirements as to where and how the electrodes need to be bent, solder on the resistor, get a clear path for the hot and ground wires, use the trusty Laserbond to set the LED's in place, attach the far end of a string of LED's to the wires, then mark the red wire with black and the black with with silver sharpie where i need to strip the wire back to connect everything. Worked great and it was fast...except the last two LED's in the string were duds! LOL :mad: of course it was an quick easy fix, it was just funny that it happened the first time out with my new process. now I'll be testing each one first(y):lol:
 

Attachments

  • pglights1.jpeg
    pglights1.jpeg
    78.4 KB · Views: 134
  • pglights2.jpeg
    pglights2.jpeg
    106.9 KB · Views: 126
  • pglights3.jpeg
    pglights3.jpeg
    75 KB · Views: 135
Back
Top