gt350pony66
Master Member
I sure thought about itChest cold? That's a great excuse to call off work and continue modeling!

I sure thought about itChest cold? That's a great excuse to call off work and continue modeling!
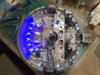
yep, Jessie James Decker...she's a lookerIs that what was on the TV in the background?
Hope you feel better
LOL, I know right? pokey freakin' Pete over herelooking good! Now hurry up and get it done so you can work on some other stuff...lol
I remember that one, Burgess MeredithIt's like that Twilight Zone episode where the guy gets nagged all the time by his wife for reading books, then he is last one left alive and winds up breaking his glasses while collecting all the books he can read
back on topic...paint chipping looks promising
Thanks man, not too terrible for the first try, lol. btw, I haven't about the taun taun, just got side tracked a little lately no rush, whenever you get time
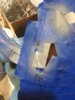
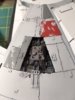
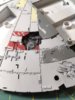
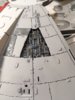
Ok, well...nothing spectacular save for this was my first official use of the hair spray method of paint chipping. I started off doing some practice on an old MPC hull to get the feel for it. previously i had used the water and salt method with nominal success. So with an old worn out toothbrush I got so-so results, those are the bigger areas. Then I decided to trim the curled soft ends off and get down to some stiffer bristles, you can clearly tell which areas those are, MUCH better results and control of what I was getting. I thought about a re-do on the areas I did before I trimmed the bristles, but it doesn't look that bad so I'm going to leave it, they probably shouldn't ALL look the same anyway. someone might get the idea all that stuff happened in the same incident...wouldn't want that
hey Ged, Thanks! No, I spayed it, all the masking was still on from the air brushing. I watched one youtube where the guy was doing random so he wet the whole area, did his scratching and then pressed a microfiber towel on it to absorb what was left of the water. He explained that once it was dry again the chemical process stops...seemed to work ok. But yeah, shot the areas with dull coat after I let it sit for like 30 minutes to completely dry. I got an area or two that i want to fix, don't like the size and shape of the bare spots, but that oughta be easy peasy. Rather than shoot again and re-do the scraping, I'm gonna thinly hand paint with a fine brush to fill it back in and make two side by side scrapes out of one big oneThose ‘ damaged ‘ areas look terrific Ross , congrats on the results .
With the hair spray chipping technique , I’m assuming you applied the hairspray in a controlled manner ( with a brush after decanting ? ) - what I’m wondering is after you’ve scrubbed away the areas you’ve wanted , what happens to the unscrubbed areas that still may have hairspray underneath the paint ? Are there any problems leaving them as is , until a final protective clear coat is applied ?
Cheers Ged