**** UPDATE FEB 2016: TFA edge connector clamp cards available ****
**** UPDATE JUNE 2016: TFA clamp covers and bottom plates available ****
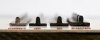
Hi all, let's start with some of my art work:


Not so long ago, not even a year, my obsession with lightsabers started with Obi-Wan's lightsaber from ANH. Since then I was hooked. Because I'm into CAD modeling as a design engineer, I wanted to build the most accurate 3D model of the OB1. I posted some computer renderings of the result on this forum back then, like the ones above. I was pleased with the result and when I had the chance I ordered the weathered OB1 replica from Roman's Empire which was truly amazing!
I quickly learned more about the other saber hilts from the original trilogy (Graflex!) and started to collect parts for my own builds. As a product developer I wanted to use my skills and add something to the replica prop building community and instead of buying the parts I needed, I developed my own. (I'm also very stubborn!). I made very accurate CAD models of all the parts, by measuring real parts and by reverse engineering from pictures of original props, and then used various fabrication techniques for the production.
The parts I made so far:
") I still have many to add to the list later!
I still have many to add to the list later!
I will try to give some background info on how each part came along:
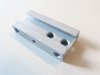
T-track
The references for the dimensions of the cross-section are archive pictures of the Vader MPP and Luke ESB and by using 3D CAD software for perspective matching and measuring. So I didn't take measurements from other replicas but based it purely on my own research.
Here is an screen grab of the perspective matching in 3D:


I invested in the tooling cost and in the production (extrusion); first in rubber (elastomer) but later in the screen accurate hard plastic (PVC). I now have plenty of profile for the rest of my life!!

The result is a beautiful and in my opinion a very screen accurate T-profile. I can cut it to any length. Here is a comparison pic (made by Sym-Cha):

D-ring with clip (or strap)
Very little is known about the shape of the D-ring and clip. They are therefore discussed intensely in other posts (here and here). Here you see a screen-grab in 3D to determine the correct size and shape in perspective as an overlay on the famous toe pic:


It took me MANY weeks to search for the correct D-ring, which I finally found in a small local shop. It is a 1” (25mm) ring, with an inner diameter of 0.9” (23mm), outer diam. 1 1/8” (28.5mm). The shape is very round (more than half a circle shape).
I then made a production run on the stainless steel clips based on Sym-Cha’s template, which proved accurate and which is considered to be pretty cool looking by many RPF members. You can attach the D-ring to the back of a Graflex with a vintage English rivet. Mine looks like this:


Exactra bubble-strip
The bubble-strip was based on real calculator bubble-strips from the Exactra 19 and 20. I first made a CNC machined version in PMMA which was extremely close to the original:

The top one is the original Exactra 20 bubble-strip and the lower one is my CNC version.
It was ‘uncut’ and could easily replace an original (don’t worry for fraud: I only made one and in case I will ever sell some, I will mark them as a replica). It is a bit pricey though to make in large quantities. Instead I did a run in casted resin. This one was based on the Exactra 19 and already pre-cut to fit a Graflex clamp. The result is very nice and accurate:

The bottom one is the resin casted version.
Maybe, later, I could perhaps start a production run in polycarbonate on a real injection molding tool. This is how the real strips were made, but the investment is high and the return on it is risky. I might have to sell hundreds to make it worthwhile. Let me know what you people think!
Kobold clip
UPDATE (dec-11): The Kobold Clip replicas are now ready and look stunning!
They are CNC machined from brass and have a nickel plated finish.


Belt clip
The metal belt clip (to carry your lightsaber around on conventions or in your house) was based on these pictures:


I thought it would be cool to produce a whole bunch of them (they were produced together with the D-ring clips). You can attach it to your Jedi belt with 2 rivets. In case you wonder: the belt should be 1 7/8” (=47mm) wide. This is my belt clip in stainless steel:


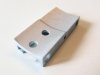
PCB Edge connector
The part clamped in Luke ESB lightsaber is a piece of a vintage computer’s edge connector. They say it's from an old HP multibus boards, like this one (I found this on the internet, it said Hybricon WW2):

I based my replica on this picture from the archive where the exact shape and size can be seen:

The 13 connector strips are rectangular shaped with a narrow bit on the right side. The PCB material is not commonly used anymore, but I have a good friend who managed to find the correct color and he produced the correct connectors for me. Here is the result:

That’s it! Thanks for your attention. Please let me know if I made any mistakes or if you think I can improve the parts. Let me know what you think and have a look on my website.
Roy
**** UPDATE JUNE 2016: TFA clamp covers and bottom plates available ****
Hi all, let's start with some of my art work:
Not so long ago, not even a year, my obsession with lightsabers started with Obi-Wan's lightsaber from ANH. Since then I was hooked. Because I'm into CAD modeling as a design engineer, I wanted to build the most accurate 3D model of the OB1. I posted some computer renderings of the result on this forum back then, like the ones above. I was pleased with the result and when I had the chance I ordered the weathered OB1 replica from Roman's Empire which was truly amazing!
I quickly learned more about the other saber hilts from the original trilogy (Graflex!) and started to collect parts for my own builds. As a product developer I wanted to use my skills and add something to the replica prop building community and instead of buying the parts I needed, I developed my own. (I'm also very stubborn!). I made very accurate CAD models of all the parts, by measuring real parts and by reverse engineering from pictures of original props, and then used various fabrication techniques for the production.
The parts I made so far:
- T-track profile; for the Graflex & MPP saber grips and E-11 stormtrooper blaster
- D-ring with clip; from Luke's ANH saber
- Exactra Bubble strip; used in many sabers
- Kobold clip (from the droid caller) used on Luke's ESB with a D-ring
- Belt Clip from Luke in ANH, ESB and ROTJ (maybe also good for other costumes)
- PCB Edge connector; clamped in the Graflex of Luke's ESB
I still have many to add to the list later!I will try to give some background info on how each part came along:
T-track
The references for the dimensions of the cross-section are archive pictures of the Vader MPP and Luke ESB and by using 3D CAD software for perspective matching and measuring. So I didn't take measurements from other replicas but based it purely on my own research.
Here is an screen grab of the perspective matching in 3D:
I invested in the tooling cost and in the production (extrusion); first in rubber (elastomer) but later in the screen accurate hard plastic (PVC). I now have plenty of profile for the rest of my life!!
The result is a beautiful and in my opinion a very screen accurate T-profile. I can cut it to any length. Here is a comparison pic (made by Sym-Cha):
D-ring with clip (or strap)
Very little is known about the shape of the D-ring and clip. They are therefore discussed intensely in other posts (here and here). Here you see a screen-grab in 3D to determine the correct size and shape in perspective as an overlay on the famous toe pic:
It took me MANY weeks to search for the correct D-ring, which I finally found in a small local shop. It is a 1” (25mm) ring, with an inner diameter of 0.9” (23mm), outer diam. 1 1/8” (28.5mm). The shape is very round (more than half a circle shape).
I then made a production run on the stainless steel clips based on Sym-Cha’s template, which proved accurate and which is considered to be pretty cool looking by many RPF members. You can attach the D-ring to the back of a Graflex with a vintage English rivet. Mine looks like this:
Exactra bubble-strip
The bubble-strip was based on real calculator bubble-strips from the Exactra 19 and 20. I first made a CNC machined version in PMMA which was extremely close to the original:
The top one is the original Exactra 20 bubble-strip and the lower one is my CNC version.
It was ‘uncut’ and could easily replace an original (don’t worry for fraud: I only made one and in case I will ever sell some, I will mark them as a replica). It is a bit pricey though to make in large quantities. Instead I did a run in casted resin. This one was based on the Exactra 19 and already pre-cut to fit a Graflex clamp. The result is very nice and accurate:
The bottom one is the resin casted version.
Maybe, later, I could perhaps start a production run in polycarbonate on a real injection molding tool. This is how the real strips were made, but the investment is high and the return on it is risky. I might have to sell hundreds to make it worthwhile. Let me know what you people think!
Kobold clip
UPDATE (dec-11): The Kobold Clip replicas are now ready and look stunning!
They are CNC machined from brass and have a nickel plated finish.
Belt clip
The metal belt clip (to carry your lightsaber around on conventions or in your house) was based on these pictures:
I thought it would be cool to produce a whole bunch of them (they were produced together with the D-ring clips). You can attach it to your Jedi belt with 2 rivets. In case you wonder: the belt should be 1 7/8” (=47mm) wide. This is my belt clip in stainless steel:
PCB Edge connector
The part clamped in Luke ESB lightsaber is a piece of a vintage computer’s edge connector. They say it's from an old HP multibus boards, like this one (I found this on the internet, it said Hybricon WW2):
I based my replica on this picture from the archive where the exact shape and size can be seen:
The 13 connector strips are rectangular shaped with a narrow bit on the right side. The PCB material is not commonly used anymore, but I have a good friend who managed to find the correct color and he produced the correct connectors for me. Here is the result:
That’s it! Thanks for your attention. Please let me know if I made any mistakes or if you think I can improve the parts. Let me know what you think and have a look on my website.
Roy
Attachments
-
Luke-ANH.1663.jpg1.3 MB · Views: 1,906
-
obi-wan-kenobi-lightsaber-weathered.1279.jpg1.6 MB · Views: 2,221
-
perspective-matching-roy-1.jpg199.2 KB · Views: 1,690
-
IMG_0484.jpg434.6 KB · Views: 1,558
-
IMG_0487.jpg487 KB · Views: 1,582
-
 T-track-01.jpg371.5 KB · Views: 1,358
 -
T-track-02.jpg448.7 KB · Views: 2,451
-
reverse-engineering-01.jpg213.8 KB · Views: 1,657
-
D-ring-3.jpg119.7 KB · Views: 1,551
-
D-ring-2.jpg256.1 KB · Views: 1,533
-
D-ring-1-e1414773926637.jpg35 KB · Views: 1,402
-
T-track-1.jpg74.9 KB · Views: 1,575
-
3-roys-bubble-strip-replicadown.jpg1.2 MB · Views: 1,730
-
PA109876.jpg5.9 MB · Views: 1,588
-
 roys-kobold-clip-replica-11.jpg426.2 KB · Views: 1,200
 -
 roys-kobold-clip-replica-.jpg390.6 KB · Views: 1,173
 -
Foto-20-07-14-11-10-19-e1413217205391.jpg35 KB · Views: 1,808
-
lick.jpg83.3 KB · Views: 1,899
-
belt-clip-2.jpg310.9 KB · Views: 1,332
-
belt-clip-preview.jpg7.5 KB · Views: 1,343
-
Hybricon-WW-2.jpg527.8 KB · Views: 1,700
-
Rare-LFL-Lucasfilm-Archives-Movie-Prop-Lost-Photos-Star-Wars-Indiana-Jones-Historic-Visit-Origin.jpg731.2 KB · Views: 1,686
-
PA319938.jpg78.4 KB · Views: 1,479
-
Luke-ANH-2.2056.jpg969.2 KB · Views: 1,641
Last edited:

