Tron Legacy Costume

Pretty small. I need 3 inch light strips to be lite and will need about 6 of them. Not including the even smaller lights, maybe 1 inch, at the very top center of each of her boots.

Obviously I can't or rather don't want some huge battery cage. Especially the boots. There will be no where to hide it well I guess clip it to each boot.

The SMD light strips are so perfect. Flat LEDs can cut the strip every 3rd light but now what power source can I use that is small enough to stick on my boots for instance? Chest area is easier to deal with cuz I can just tuck all the wiring on the inside of my latex armor.


The best solution I can offer is a small inverter built into the side of your boot. You don't need a powerful one to run 2 designs (one front / one back) of that size. When I rewired my costume I used very small wire that was pre-soldered with these 2-pin connectors.

In any case on the 17th you'll get a close look at my costume. Maybe there's a technique in there somewhere that you can use. Since the sheet is credit card thin and the wiring is very small you can probably conceal it within your boot, especially if you crafted some outer layer when you made them. The trick is to do the wiring before adding the outer layer, with all the connectors being right where you're hiding your inverter / battery pack.
66750_10150104563411399_616036398_7935483_6201847_n.jpg


67878_10150104563401399_616036398_7935482_4577268_n.jpg

63605_10150104575226399_616036398_7935866_7697443_n.jpg

154200_10150104563441399_616036398_7935484_5342275_n.jpg
 
Last edited:
those 23A batteries for car alarm remotes are basically a stack of watch batteries in 12v. I don't know the capacity though.
 
Last edited:
Been lurking here myself and have scanned many, many, many of your posts and gleaning some excellent ideas, only I'll probably end up just going with reflective tape at the premiere and likely upgrading to a light system before next Halloween. Biggest props, of course go to Annisse, whose amazing rendition of Quorra got me going on this idea to make myself a Tron Legacy costume.

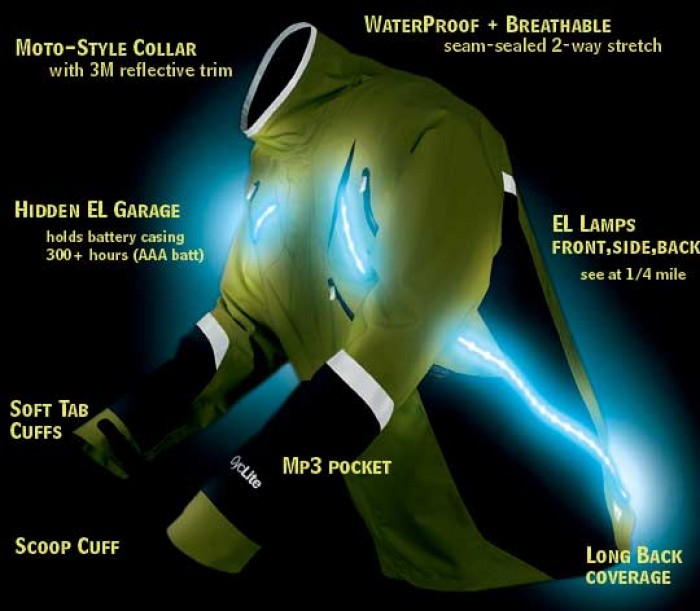
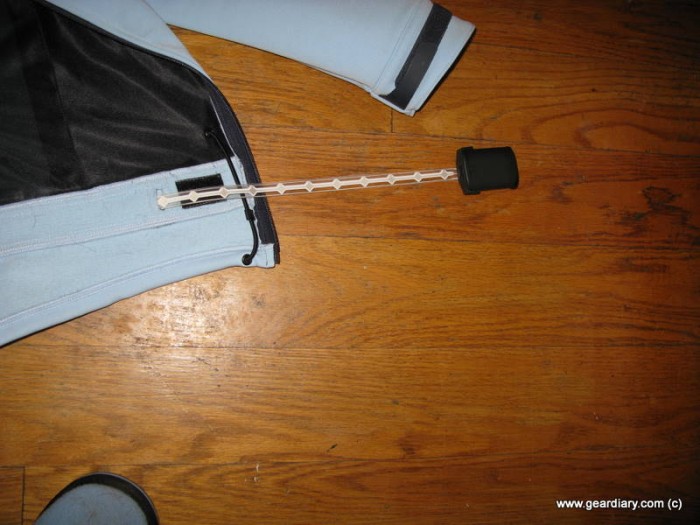
Anyway -- I just saw this jacket reviewed at GearDiary and thought its flat ribbon LED strip system would be PERFECT, if only the diffusion issues could get worked out and it was commercially available outside of the manufacturer's jacket.

Thoughts?

lighted-jacket-e1291427305650.jpg


IMG_0244-700x525.jpg
 
You all are doing great out there. Learning a lot from everyone's posts and getting my own ideas. Thanks for sharing all the hard work you all are doing. Lots of concept work that could be inspiring and useful for projects.

Quick note and then back to making magic. I got two Tron Deluxe Discs at Target for $14.99. So if you are gunning for one of these they are priced well, still available and worth it.
 
Ok, so I ran ALL OVER TOWN over the past 2 and a half days finding things for the costume.

I ended up finally finding a good IdentiDisc hub:

photo-1.jpg


And I also bought about eight 6mm foamies, four of the larger 2mm sheets, some modge podge, E-6000 Glue, and some Black PlastiDip spray. While I'm waiting for my wire and vest to arrive, I'm making my armor pieces. This is the first drawying I've made for my Armor Pattern. it is the shoulder pad and upper arm armor. It's more than a bit rough, but I figured I'd post it here in case someone who is better at orthographic projection can mod it for use, or if someone wants something quick and dirty to mod. I'm also making some leg armor out of the foamies, and I also need to make the outer rim for the hub for my back. Anwyay, progress is progress. Here's the Shoulder pattern:

http://s51.photobucket.com/albums/f357/jyhash/?action=view&current=armorscan2modified.png

( I made it originally 7" x 11" as those are my sizes, but when I uploaded it to photobucket it resized it. I can throw it up on mediafire if people want the full size file. I'll also put up the other PNG's of the leg armor and collar too, once they're done.)
 
Last edited:
Re: Tron Legacy Costume planning - Flyer to a TRON Movie Release Party in NYC!

OK, sorry this is a 'OFF Costume designing' subject here, but just wanted to relay info on any NYC area TRON costumers here: there's a BIG HYPE 'TRON' movie release party happening on Dec. 18! Flyer details are below:

3534-stimulate-12-18-2010-tron-party-nyc.jpg


From what the promoter said(from their FACEBOOK page and If it's TRUE/LEGIT) about this "** WE WILL HAVE AN ACTUAL TRON LIGHTCYCLE used in the movie on the premises ** as well as tons of giveaways- stay tuned!" - I'm gonna 'DEREZZ' and Go to THE GRID with HAPPINESS!!! I really gotta GET MY SUIT DONE NOW! :D
 
The best solution I can offer is a small inverter built into the side of your boot. You don't need a powerful one to run 2 designs (one front / one back) of that size. When I rewired my costume I used very small wire that was pre-soldered with these 2-pin connectors.

In any case on the 17th you'll get a close look at my costume. Maybe there's a technique in there somewhere that you can use. Since the sheet is credit card thin and the wiring is very small you can probably conceal it within your boot, especially if you crafted some outer layer when you made them. The trick is to do the wiring before adding the outer layer, with all the connectors being right where you're hiding your inverter / battery pack.

I will have one small inverter on my right boot so yes, totally get what you are saying here and can wire that work only thing don't want the risk of wires breaking being stuffed, hidden and going front to back.

I bought 4 CR-2032 3V batteries. Saw a YouTube video of wiring a cut down 3in. SMD Led strip. Going to solder the wires to these stack of batteries and tape the damn things on the boot. Lol! If this works great!!!

No time to deal with all that wiring work with El sheeting with all the other stuff I still need to finish.

Thank you for your help though!!! :)
 
Re: Tron Legacy Costume planning - Flyer to a TRON Movie Release Party in NYC!

O
From what the promoter said(from their FACEBOOK page and If it's TRUE/LEGIT) about this "** WE WILL HAVE AN ACTUAL TRON LIGHTCYCLE used in the movie on the premises **

Sounds like a neat event, especially if it is Disney backed.

The lightcycles were shot at my wife's mocap studio, and they were nothing but speedrail frames. From what I recall (and I could certainly be wrong), the only "screen-used" physical cycle is Flynn's WhiteCycle in the Safe House... Interesting if they brought it out.
 
Re: Tron Legacy Costume planning - Flyer to a TRON Movie Release Party in NYC!

Yeah, it really does read like a exciting event. I'm making plans to go anyway(lightcycyle surprise or 'not official' one) for it's just gonna be a heck of a TRON weekend no doubt. I'll do almost anything to escape THIS crappy 'reality' of today to be in some enviroment-like 'GAME GRID' party. :lol

Sounds like a neat event, especially if it is Disney backed.

The lightcycles were shot at my wife's mocap studio, and they were nothing but speedrail frames. From what I recall (and I could certainly be wrong), the only "screen-used" physical cycle is Flynn's WhiteCycle in the Safe House... Interesting if they brought it out.
 
Re: Tron Legacy Costume planning - Flyer to a TRON Movie Release Party in NYC!

OK, sorry this is a 'OFF Costume designing' subject here, but just wanted to relay info on any NYC area TRON costumers here: there's a BIG HYPE 'TRON' movie release party happening on Dec. 18! Flyer details are below:

3534-stimulate-12-18-2010-tron-party-nyc.jpg


From what the promoter said(from their FACEBOOK page and If it's TRUE/LEGIT) about this "** WE WILL HAVE AN ACTUAL TRON LIGHTCYCLE used in the movie on the premises ** as well as tons of giveaways- stay tuned!" - I'm gonna 'DEREZZ' and Go to THE GRID with HAPPINESS!!! I really gotta GET MY SUIT DONE NOW! :D

Yes, it's a legit party and when Xris SMACK! (to event host) says he has something on hand 99% of the time it hits and sticks. The event is at a place called Crash Mansion in NYC near Houston and Essex. The events from Xris SMACK! have been running for nearly 14 years and they are adding to this one with Blacklight systems by Kostume Kult and a special staged disc/saber battle by Thrills & Skills (i.e. some of the NYJedi group).

My crew and I (4-5 of us) plus all those that have jumped on the FaceBook invite list I sent out the other day, will be gathering at Crash Mansion some time around 9-10pm and hitting the blacklights like there ain't no tomorrow. Come hang and see the wonders, blunders, geeks, and freaks of NYC.
http://www.facebook.com/profile.php?id=100000674587093&v=app_2344061033#!/event.php?eid=161005520609675&index=1 there are still about 4000 invites unconfirmed, with about 300-360 already set in stone on FB (means a bunch more that do not confirm with FB normally).

if this link is not 'acceptable', please advise and I'll pull it. Just trying to give the greater NYC area people a direct look at the event info.
 
Last edited:
Hey folks,
Just an FYI, but I started my own thread over here to track the WIP that is my Tron Costume. I just didn't want to clog up this thread with tutorial postings, but I'll make sure and cross post important pictures for those who can't find the other thread or forget it's there.

~JYH

PS: ONLY 11 days left!
 
Question to all you costume makers, what is the best ways to adhere EVA foam armor to a fabric undersuit (like black lycra), am striking all sorts of problems with this.

I just started working with contact cement... it appears that it bonds completely to foam. I tried ripping the foam off the fabric for the test piece I used and it only the top half of the foam came off... the rest was still adhered to the fabric. Solid flexible bond.

There are two types of contact cement I THINK not sure if one is better than the other. Think one is water based the other is oil?

... after finding out my paint-can sized contact cement had expired I found a tiny bottle at target for like $6... looks sorta like runny elmers glue in the bottle.

Cheers for feedback, I got impatient and tried 3 different adhesives, the contact cement was a ok but I got good result with some upholstery adhesive & also with show glue! That was with EVA foam 3mm, I am tonight testing the 1.5mm, if it works my cheap n nasty Sam Flynn costume will be ready by party and I can start on my Mark II light up one.
 
I just started working with contact cement... it appears that it bonds completely to foam. I tried ripping the foam off the fabric for the test piece I used and it only the top half of the foam came off... the rest was still adhered to the fabric. Solid flexible bond.

There are two types of contact cement I THINK not sure if one is better than the other. Think one is water based the other is oil?

... after finding out my paint-can sized contact cement had expired I found a tiny bottle at target for like $6... looks sorta like runny elmers glue in the bottle.


If this is the contact cement you are using, not sure if you have one where you are, I know they are everywhere here in LA, Cali. but the 99 cent store has it. Don't over pay for that stuff, you are going to be using alot of it if you are using it to hold down all your wiring. I always stock up. Ppl are like vultures and the store is always sold out of it. Shows you that stuff is GOOD! ;)

5143aqaSlQL._SL500_AA300_.jpg
 
Hi everyone!

Last post about that jacket made me think about something I saw few weeks ago, different than EL Wire or Tape.
Indeed there is something, LED Light Diffusing Plastic Compounds

Not cheap I'm afraid, but makes me think about going the LED way. Maybe a LED strip with this diffuser would work even better. We wouldn't need a very bright LEDs, just a few from the cheapest ones.
Since is not cheap anyway, it may help someone willing to spend some more bucks.
I think it will last longer than EL Tape, since this tecnique would be more resistant.

Since English is not my first language, maybe someone would help me about 3M difusser film. Is this the same, or with the 3M the LED spots are still visible?

Thanks to all!
 
So here they are. All diffused and ready to adhere to my chest armor. The circles still need to be touched up as well as all the accents added to the pieces. Middle black ring in the circle and so on. About 20 hours of work just on the left and right side long strip pieces for my chest armor alone.

In my photos, these are being temporarily powered by and AC/DC adapter. Damn, I sure wish I could carry a wall socket with me and walk around having the El Wire powered this way. What a difference. The glow was incredible in my living room even with the lights on.

The side lights for the hip areas of my chest armor are not lite up yet. Still need to order some more plug n play connectors. I wound up having 4 plug n play connectors for the chest armor, one for each arm and one for the right leg. The wiring will all be traveling to one inverter which powers strong up to 35ft. of El Wire harnessed to the project box to my back. The 12V (8AA) battery cage will be hidden away in the "hump" hub behind the disk. Alot of plug n play extensions and wiring going everywhere around my back area, and I hope one doesn't get pulled out when I pose for a pic :$

Also threw in how I am making my hub, this is the part that will stick out of the back of a hole I am cutting into my latex chest armor, where the disk will sit, but really the hub will just be there for looks, my rare earth magnets are what is really going to hold that disk onto my back.

I cut it simply out of styrofoam with a heat knife to make it as even as possible. Using mod podge to paper mache the thing, and finally using Paper Clay to finish it, sand it down and paint it black then epoxy it on to the "hump" (bowl) that will be hidden under my chest armor. Paper Clay is awesome in case any of you have never worked with it. I discovered it this year to make my Ulala props. Paper Clay dries on its own hard no need to bake it. It is the awesomest clay I have ever worked with and will never go back! Have a look at my Ulala Space Channel 5 photo in my coplay album to see the props I made with it if you like.

These will be mounted on the next few days hopefully by Wed. or Thursday I should be done, not with everything but done mounting the lights.

I want to get this suit done so bad, it is driving me crazy!!!! :eek I am so impatient and excited about all this coming together more and more each day. Literally working my job then coming home working on this costume. No sleep till after Dec. 17th :wacko
 
Last edited:
So here they are. All diffused and ready to adhere to my chest armor.

Hiii I just joined the forums.

Quick question. How did you diffuse it? Frost spray paint? Shower curtain? Interfacing?
I really like your work. Everything is really complete and the finished product is looking real clean. You're gonna rooock next week B)
 
That's looking great!
I came up with an idea to keep the wires from dangling. I use 1/8" elastic bands from Joanne's. I glue one end to the foam and tie/glue the other end to the wire. At full extension, the band is all stretched out, but if I give it slack, the band will pull the wire back under the costume.
 
Back
Top