Tron: Legacy CLU helmet build

Re: CLU and Rinzler Helmet

Thanks, Crank729!

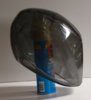
I had a lot of quality time with CLU over the Thanksgiving weekend. I am nearing the end of stage 2, with the mirrored side looking good. I still need to add the rear vent on the left side, then smooth it out a bit more.

Then on to stage 3 - adding details: light groove, tweaking the triangular indent, and side grooves. Not nearly as complicated as Quorra!
 
Re: CLU and Rinzler Helmet

Bandit - that day is getting closer... hope it's been worth the wait! =)

I'm 1/2 way done with stage 3 - need to lay out and cut the groove for the lights next.
 
Re: CLU and Rinzler Helmet

Putting the finishing touches on the groove for the light tonight.
Then a few coats of black and a few coats of clear gloss and LOTS of wet sanding! I might actually have a finished sculpt w/in a week!
 
Re: CLU and Rinzler Helmet

Ok, so it's not quite finished, but I am making progress! Wet sanded 400, 1000, 1500, then started the rubbing compound on the front and left side (right, in the picture) tonight. It's slow going but in the end it will pay off!
 
Re: CLU and Rinzler Helmet

Looks awesome as always! I imagine the symmetry would have been a gigantic pain to accomplish. As you said, though...it's worth it.:)
 
Re: CLU and Rinzler Helmet

Thanks Crank!

Polishing is finally done! And I hope to make the mold this week.

Happy New Year everybody!
 
Re: CLU and Rinzler Helmet

The helmet looks amazing! I'm really digging your cardboard-cutout technique. Everything looks perfect!
 
Re: CLU and Rinzler Helmet

Thanks guys! Really appreciate it.
Just finished laying down the silicone...Tomorrow will be plasti-paste. I mean, today. I need some sleep.
 
Re: CLU and Rinzler Helmet

Can you please build a WORKING Rinzler helmet for me? It's so beautiful, there is no way I could do that. Of course I would be willing to compensate(funding) for your time and efforts(though I hope you will be gentle lol) PLEASE let me know if you help me....you reply here and at shadowglissen@live(period)com
OH GOD I JUST CAN'T WAIT!
 
Re: CLU and Rinzler Helmet

Haha, thanks guys! Just finished the hard shell last night. I'll be pulling the mold off the sculpt tonight and will try to do a cast tomorrow...usually takes a good 3-4 days to cure up enough to demold. Then i'll snap some photos, get it lit up and finished and start a FS thread.
Almost there! =)
 
Re: CLU and Rinzler Helmet

Thank you!

3 days curing, and it is solid enough to demold. I'm pleased with the transfer of detail from the sculpt.

I'll let it cure for 2 more days before I dig in to the finishing work.
 

Attachments

  • CLU - cast1.jpg
    CLU - cast1.jpg
    284.5 KB · Views: 709
Re: CLU and Rinzler Helmet

Very cool! I still don't know how you can sculpt these from scratch!

Russ
 
Re: CLU and Rinzler Helmet

Thanks Russ! =)

Update:
Everything will be identical to how I make the Quorra helmets except for the lighting. It is proving to be much more complicated than Quorra. I can't just use EL wire, since CLU's light is much thicker. So my original plan was actually to use angel-hair EL wire, stacked 6 strands side-by-side to get the thickness. The angel hair wire has a thinner protective jacket, so there's less light drop-off between the stacked wires, and you can bend them tighter. Good theory, and it actually looked pretty good when done, but the whole process turned out to be very time consuming. Also, gluing down each wire is messy and makes it much easier to marr the cast in the process.

I've made another cast, and it will be ready to pull on Thursday. I'll be trying out a different lighting approach on that one, so we'll see!
 
Re: CLU and Rinzler Helmet

Awsome work buddy, gobsmacked at your sculpting skills :eek


As to your EL situation, it is possible to cut tape an re-join it if a small section of protective outer coating is removed to reveal the silver layer underneath.

Here's a few pics I took when I first had a go:


As long as one outer track and the middle are joined, the EL will work fine
bd55f47f.jpg


Up close, a fine line can be seen at the join...
625ed5b6.jpg


...but to a camera just two foot away...
d95996f5.jpg


No soldering was involved either as I found this on eBay:
683cfbe2.jpg


It needs something like apoxy as a coating to strengthen it a little once it's dry, but it cirtainly saves wrecking the EL with heat).


Another option is proper cuttable/tabbed EL sheets?
cf72d93d.jpg


Basically, as long as two of those tabs, or solder points (circled in red) are left in your pattern, the cut shape will light up, saves messing with the above method, and no join lines. Plus, you could make a template for the pattern and be able to use it again any time :thumbsup
 
This thread is more than 10 years old.

Your message may be considered spam for the following reasons:

  1. This thread hasn't been active in some time. A new post in this thread might not contribute constructively to this discussion after so long.
If you wish to reply despite these issues, check the box below before replying.
Be aware that malicious compliance may result in more severe penalties.
Back
Top