RamonvanVeghel
Active Member
Aaah yes that's another great idea! Thanks!You could try a black bias tape to cover the edges.
Aaah yes that's another great idea! Thanks!You could try a black bias tape to cover the edges.


Update us on this pattern. I'm getting ready to use this one too!I'm currently working on the gauntlets, plan on attaching these eva foam parts to leather gloves with leather strips and chicago screws. It's alot of work drawing, cutting, and sanding by hand but it's coming along. Currently busy with sanding the parts.
Thanks to Adam Savage and Bill from punished props for the templates which I'm using!
View attachment 1915094View attachment 1915095View attachment 1915096
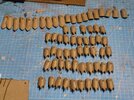
Yes, that's really too bad. If you're very close to your neighbor, as I assume, is not fun (it has happened to me alsoShort update: sanding 2 mm thick eva foam edges neatly is a pain in the ass and you probably shouldn't try it lol. I decided to cut the sharp points for the finger lames instead. They are now all cut, heat treated and roughly shaped.
I've done the hard part now, only the 5mm parts to go!
Kind of off topic but my neighbour really doesn't like the noise I make from my shed while working. We have a really small garden and shed, as well as the neigbours, so we just have to make due with the space we have. I always make sure to work at appropriate times as well and not too long. But she can just be unreasonable as hell and it's stressing me the hell out, making me feel like I have to tip toe around the house at times.
Sorry about the vent but it's really influencing my process sadly.
 ). If you're living in the city it might be problem also.
Yes definitely not fun lol, wish people could allow each other some more space.Yes, that's really too bad. If you're very close to your neighbor, as I assume, is not fun (it has happened to me also


Gauntlet is way coolYes definitely not fun lol, wish people could allow each other some more space.
I have assembled 1 of the gauntlets parts for a small test fit, and looks like the size is spot on, very happy with that. Definitely didn't want to redo all the work so far haha.
View attachment 1916032View attachment 1916033
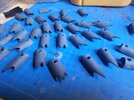
No problem is terms of moving your wrist/hand?Thanks! I have to attach all the straps to really test the gauntlets flexibility and movement. In the meantime I have finished the other (right) gauntlets thicker 5mm parts. Next step was sanding all the edges so they look like thinner metal instead of 5mm thick EVA foam:Gauntlet is way cool

.jpg")


I print in PLA and it's very sturdy once a rod is inserted!Thanks! I have to attach all the straps to really test the gauntlets flexibility and movement. In the meantime I have finished the other (right) gauntlets thicker 5mm parts. Next step was sanding all the edges so they look like thinner metal instead of 5mm thick EVA foam:
View attachment 1917068View attachment 1917069View attachment 1917058
Think I might reinforce some of the scoring lines with superglue to accentuate them a bit more. I have used contact cement only in these pictures but I think the lines could be a bit more dramatic.
I also found someone in the Netherlands that prints Witch Kings's swords so I was thinking about getting one printed. These are some pictures I was sent by them:
View attachment 1917067View attachment 1917066View attachment 1917065
It for sure looks good but only thing I'm worried about is sturdiness with it being PLA filament and 15% infill (I asked if he could bump it up to 20/30%). It comes with an internal space for internal rod so that is good, but I don't have much experience with 3D printed stuff.
They say it is sturdy enough with the rod, the only 'wobbly' part might be the very point of the blade because of the rod not being able to reach it well.
It will be printed in pieces and I would have to glue it together. Do any of you guys have experience with this kind of prop and material regarding durability and such? I could also make a EVA foam version myself but I don't think I'd reach this level of detail without a LOT of effort.
Good to hear! I was doing some research and found out that epoxy+ fiberglass or even a carbon fiber wrap is possible if I really want to make it sturdier, by coating the exterior with it, especially over glued seams and what not. Also the internal rod can be fixed inside the blade that way.I print in PLA and it's very sturdy once a rod is inserted!
My ringwraith sword also has a wooden rod through it. It also gives it a nice weight.
As far as the breaks that will need glued, a automotive filler primer like the one Rustoleam has will will be your bestfriend. Also get some high grit sandpaper and a glue of your choice that doesn't expand and that works with the filament. Some glues can eat the filament. Also get another gap filler as well to touch up any other seams that need fixed up.
You should also look up some videos on weathering if you're interested in making it look aged. Even giving it some texture. I use cinnamon usually for texture. YouTube has amazing videos. Train modelers, post-apocalyptic costumes, and Adam Savage are good places to start.
I use Kwik-seal filler too. remember to wet your finger just a tiny bit to get it really smooth.Good to hear! I was doing some research and found out that epoxy+ fiberglass or even a carbon fiber wrap is possible if I really want to make it sturdier, by coating the exterior with it, especially over glued seams and what not. Also the internal rod can be fixed inside the blade that way.
The epoxy would start eating the glue though if I would apply it too thick so I would have to be very careful doing that.
Don't know if I want to go that route but we'll see, it's being printed so I'm waiting to see exactly how sturdy it is with a rod inside when I get it. If it's too wobbly I might just do something like that.
Regarding filler, I have some kwik-seal filler if that works.
And ty for the suggestions, definitely going to make it looked aged or else it wouldn't look right imo. ; )


odd!Kind of offtopic but I'm not seeing your post, just a blank container where a post should be. Same when I checked your new post in your topics (nazgul and haldir) is this a known bug?