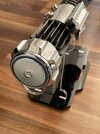
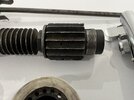
The Ultimate Ben Obi-Wan Kenobi Real Vintage Parts Lightsaber Group

onderon this is the rounded shape you need to look for when searching vintage bags or photo-equipment boxes :

D-Ring9.JPG


And here are some sizes which I used to have my custom D-rings made (not available any longer)

D-Ring01.JPG


Currently wannawanga sells a custom D-ring which most members are using :

Schermafbeelding 2023-02-13 om 00.00.38.png


The only time I found a real vintage D-ring with the correct shape was on a photo-equipment box :

Schermafbeelding 2023-02-13 om 00.05.00.png


Although it was slightly smaller than my custom-made D-ring :

Schermafbeelding 2023-02-13 om 00.04.10.png


Oh and the thickness to look for is about 2.5 mm ;)

Chaïm
 
Hi everyone. It’s Modelbuilder (Kevin Brace). Just wanted to share out my Real Parts Collection for an Obi Build. The last big piece I needed was the Derwent Balance Pipe and I was able to secure that from Diego’s 5th Engine Find. My transistors are ME DAT11s, so hope to upgrade them one day… and still need a vintage D ring. Other than this, I think I have everything I need to build a nice Saber…

IMG_6844.jpgIMG_6850.jpgIMG_6849.jpgIMG_6848.jpgIMG_6846.jpgIMG_6845.jpg
 
Last edited:
Hi Kevin, great collection of vintage parts ... well done. Are you going to try and remove those thick layers of paint from that otherwise fabulous grenade?

Chaïm
 
Hi Kevin, great collection of vintage parts ... well done. Are you going to try and remove those thick layers of paint from that otherwise fabulous grenade?

Chaïm
Thank you so much. That took several years to put together.

I am thinking I am going to leave “as is” - wanted to try to assemble without altering the original patina. Still undecided though…
 
Indeed what coolhanluked suggested ... I am the first to always shout leave it alone when it comes to patina however in some cases, like yours, the red paint is quite distracting from becoming a nice rustique lightsaber :

Obi-Wan Color.jpg


... if that grenade was mine I would try to remove the paint with soaking it in somesort solution, which would not need the use of heavy tools that go all the way to the bare steel, hence avoiding having to re-blue the entire grenade ... perhaps newmagrathea can be of assistance with some suggestions ... but do a dry fit first with pictures, so I can add you to my visual index :)

Chaïm
 
Nice collection ModelBuilder, the frag body looks like it's nice . I haven't found a good way to remove paint that isn't also going to remove blueing unfortunately. Using physical means (wire wheels, files, sandpaper) also removes the blueing. All the chemicals I've tried all remove the blueing as well. I prefer to not introduce chemicals myself because some can cause rusting and have to be properly removed and neutralized. That being said, I've not tried many chemicals. My preferred method is a small wire wheel on a rotary tool like a Dremel, not the big wire wheels like on a bench grinder (too aggressive). I like the wire wheel because you can pick and choose as you go, it stays dry, and it's not going to mar the metal. Honestly I think you'd want to do the whole thing because if you only did the red paint and re-blued that part it would look weird with the brown/tan paint. If it was just partially painted you could just do the painted part and re-blue, but the whole thing was painted. Either way you go it's going to be a mess. Wear a mask if you wire wheel, could be lead based paint. Or just leave it as is. Excited to see you put it together.
 
Hi everyone. It’s Modelbuilder (Kevin Brace). Just wanted to share out my Real Parts Collection for an Obi Build. The last big piece I needed was the Derwent Balance Pipe and I was able to secure that from Diego’s 5th Engine Find. My transistors are ME DAT11s, so hope to upgrade them one day… and still need a vintage D ring. Other than this, I think I have everything I need to build a nice Saber…

View attachment 1670716View attachment 1670717View attachment 1670718View attachment 1670719View attachment 1670720View attachment 1670721

Congrats buddy it's cool to see all the vintage pieces together, we'll find those transistors ;)
 
Indeed what coolhanluked suggested ... I am the first to always shout leave it alone when it comes to patina however in some cases, like yours, the red paint is quite distracting from becoming a nice rustique lightsaber :

View attachment 1670741

... if that grenade was mine I would try to remove the paint with soaking it in somesort solution, which would not need the use of heavy tools that go all the way to the bare steel, hence avoiding having to re-blue the entire grenade ... perhaps newmagrathea can be of assistance with some suggestions ... but do a dry fit first with pictures, so I can add you to my visual index :)

Chaïm
Very Good point. Let me dry fit it together and see what we have and go from there. I’ll post some pics!
 
Nice collection ModelBuilder, the frag body looks like it's nice . I haven't found a good way to remove paint that isn't also going to remove blueing unfortunately. Using physical means (wire wheels, files, sandpaper) also removes the blueing. All the chemicals I've tried all remove the blueing as well. I prefer to not introduce chemicals myself because some can cause rusting and have to be properly removed and neutralized. That being said, I've not tried many chemicals. My preferred method is a small wire wheel on a rotary tool like a Dremel, not the big wire wheels like on a bench grinder (too aggressive). I like the wire wheel because you can pick and choose as you go, it stays dry, and it's not going to mar the metal. Honestly I think you'd want to do the whole thing because if you only did the red paint and re-blued that part it would look weird with the brown/tan paint. If it was just partially painted you could just do the painted part and re-blue, but the whole thing was painted. Either way you go it's going to be a mess. Wear a mask if you wire wheel, could be lead based paint. Or just leave it as is. Excited to see you put it together.
Thanks for this information. I do have a downdraft table that should help with the dust should I go the wire wheel route. That plus a mask should help. Let me dry fit the pieces together and post some pics and then make a decision. Sounds like removing the paint is the way to go…
 
If you decide to remove the paint please let me know! I'm a professional metal worker and can can remove the paint and create a patina that will make the Hales look its age without damaging anything else or creating any unwanted marks from a wire brush or other abrasive.

The grenade in the first photo on the left is an old parks that I aged to make it look properly old. I did it so I could display my original left over parts with the left over Hales parts from my saber. It's an ancient chemical process where I convert hematite into magnetite to create a stable surface oxide which is what that grenade would have naturally developed over the last 100 years if left alone to age without paint.

008D2BD8-054A-4E21-8EAC-1A27FDF65D2E.jpeg
0E1E97D3-021A-4B0C-B2C1-15E64F264CF7.jpeg
2677E0D5-B557-493F-A969-505328477B34.jpeg
 
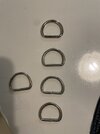
I bought an old military bag from the 70's because of the D rings on it. They are probably not 100% accurate but I think they are quite close to it.

public.jpeg

It had 4 rings 1 one them was opened and bent a bit, I tried to fix it but of course I couldn't. Strangely 2 are welded and 2 are not. Here is a photo of them, the topmost is the ring came with the AS DS2V2 kit.

IMG_0566.jpeg
 
Hi everyone, I considered a few days ago I will try to put together my own Anakin and Obi-Wan lightsaber as vintage as I can. I found this place while I was looking for parts. Since I’m from Hungary I find it quite impossible to fulfill this dream of mine, but I will try not to give up.
This was almost exactly 4 years ago. Today I consider my Real Vintage Obi-Wan done. But we all know by done we mean something like 99% done, and it cannot ever reach 100% :) There is always a better frag body, there is always a nicer balance pipe there is always a more accurate Exactra bubble or a much better windvane neck.

I got this ready a while back, but I messed up one of the ME transistors a little, and it bothered me, so I bought a new one just to feel satisfied. Today it arrived, I drilled it and epoxy a screw inside.

IMG_0163.JPEGIMG_0164.JPEG

After I put them together, I tried to roughly adjust everything in position and here it is. Together with its brother, an installed Roman Props MK1:
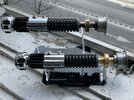
IMG_0167.JPEGIMG_0168.JPEGIMG_0170.JPEGIMG_0171.JPEGIMG_0173.JPEG

And some details of itself:

IMG_0174.JPEGIMG_0175.JPEGIMG_0180.JPEGIMG_0181.JPEG

This feeling must be very similar to win an Oscar so here is my speech:

I've never believed this day will come. But I got lucky, and I could score some really good stuff. Surreal to think about that I still have a full inactivated Browning .303 machine gun in the US that I couldn't figure out yet how to import here to the EU :lol:

I would like to thank DannyP91 for encouraging me to never give up. I was very close to not chase the holy grail parts further, but he pushed me through it and look what happened.

Thank you to the whole community, you keep amaze me with all your hard work and enthusiasm. It is really amazing to be a part of this.

And I want to thank to my Wife, who let me do this and patiently supported me day by day in the past 4 years when I was struggling, taking my packages during her home office work hours, never holding me back, never saying "no, please don't buy that" or "this has to stop" and always being happy with me when I found something. Thank you Kicsim!

Okay my 45 seconds has long gone, they are already playing music and taking away my mic :D

MTFBWY

IMG_0177.JPEG
IMG_0179.JPEG
 
Last edited:
Back
Top