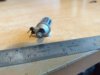
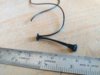
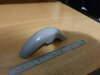
Here is the new oil filter, as well as the regulator plug and leads. Funny how life works. If I'd nailed the pin-striping months ago, I would have finished the build thinking it was accurate, only to find these two key details were missed.
You are using an out of date browser. It may not display this or other websites correctly.
You should upgrade or use an alternative browser.
You should upgrade or use an alternative browser.
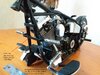
Terminator 2 Harley Fat Boy 1/6th scale
- Thread starter Kiwimike
- Start date

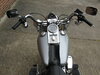
Some tweaking. I was never happy with how the footrest bar was mounted to the frame. Now the mounting rings really do pass through the bar, rather than just being glued (badly) to the back of the bar. Have a look at my last two posts and you'll see what I mean.
The California emission sticker also got a refresh as well. Made from Bare Metal Foil white decal paper for Laser Printers.
The California emission sticker also got a refresh as well. Made from Bare Metal Foil white decal paper for Laser Printers.
Attachments
Last edited:
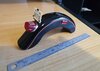
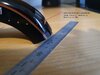
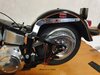
Finally got a finish that met my standards. Still working on the front fender and gas tanks but this rear fender is done.
The paint is Tamiya TS-14 Gloss black. I designed the pinstripe decals and got them printed by Custom Hobby Decals in Australia who did a great job. My biggest concern was that the stripes would look like decals, hence all the past experimentation in this build looking at different techniques.
My solution was to hand-cut the decals out so there was no clear carrier film. I then TS-13 clear coated the fender multiple times, let it dry for well over a week, then sanded and polished the surface including the decals to the final finish.
One last thing. Sometimes old plastic perishes. That's my current issue with the front fender. It has hairline cracks in it, which taking time for me to fix.
Attachments
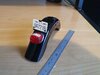
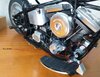
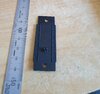
Small detail. These bolts are metallic, not gloss black as presented on the kit bike frame. Used two different types of metallic paint as the front two bolts appear shinier than the rear bolt.
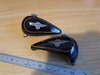
This is also the first shot of the assembled rear fender.
This is also the first shot of the assembled rear fender.
Attachments
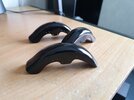
In order to get the pattern of eight openings in the front disc brake completed to a high level of detail/finish, I created a pattern which I used to produce a photo-etching mask. I then did a very deep etching, not all the way through the 1.2mm aluminium sheet but enough so that I had good accurate set of shapes which I could then finish off by drilling out and filing.
What did you use to etch the aluminium? I tried FeCl3, and it reacted like I was trying to deep fry an ice cube. NaOH etches aluminium but also removes any kind of etching mask so that's not an option.


Mark 3 version, which is an even smaller knot, made using Dyno plastic label tape. Compares with the knot size shown in this shot of an original 91 Gray Ghost. For those that are over "the knot" (including me) this should be the last posting of it. The third photo in this post is the larger Mark 2 knot which overshadows the eyelets.
Attachments

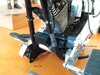
Interesting, as I battle with the front fender (see shot of the three versions I've made thus far which doesn't include the fourth that I scrapped) I keep noticing more bike details I hadn't noticed before. See screen grab with items circled in red. It's almost as if I'm meant to be struggling with the fender so I don't finish the bike before I identify all the additional details. At least that's what I'll keep telling myself... Anyone for some un-usued 1/6th scale front fenders?
Anyone for some un-usued 1/6th scale front fenders?Attachments
Similar threads
- Replies
- 7
- Views
- 1,700
- Replies
- 1
- Views
- 1,348
- Replies
- 14
- Views
- 13,086