Terminator 2 Harley Fat Boy 1/6th scale

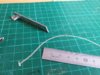
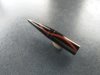
Here's my first official pinstripe paint test. The object is the sawn-off end of a large plastic knitting needle. TS14 Gloss Black, apply the mask then a light spray of the unmasked pinstripe areas with Tamiya chrome silver to give the final pinstripe colors a base surface to "pop" off. The pinstripes were then sprayed with two Humbrol Rail Colors, matt red and orange. The match to the actual pinstripe colors is pretty good, straight out of the tin. Not sure about the quality of the paint and whether I should use Matt paint. Finally a coat of Tamiya Clear. It's an okay test. The best thing is there's no decal film to worry about.
 

Attachments

  • 20190818_112752.jpg
    20190818_112752.jpg
    4 MB · Views: 174
Last edited:
Here's me re-working the pinstripe layout while I wait for the Tamiya masking sheets to arrive.

I dropped a bitmap of the actual bike into CAD software and then I traced around the pin-stripes. After all the messing around I'm going to try getting the masks for the pin-striping laser cut. Thankfully I spoke to a technician who understands how delicate the lasering process has to be so he will develop a cutting strategy that doesn't incinerate the requisite detailing on the masking sheet
 

Attachments

  • Screenshot (8).png
    Screenshot (8).png
    267.3 KB · Views: 308
Here's me re-working the pinstripe layout while I wait for the Tamiya masking sheets to arrive.

I dropped a bitmap of the actual bike into CAD software and then I traced around the pin-stripes. After all the messing around I'm going to try getting the masks for the pin-striping laser cut. Thankfully I spoke to a technician who understands how delicate the lasering process has to be so he will develop a cutting strategy that doesn't incinerate the requisite detailing on the masking sheet

Would be great if laser cutters weren't so damn expensive. Just to have one and play around with one would be sooo.... awesome :p
 
Here's a shot of the re-chromed exhaust system. I figured I could polish the gloss black to a smoother finish than before.
 

Attachments

  • 20191126_133915.jpg
    20191126_133915.jpg
    4 MB · Views: 133
Laser cut stencils for the pin-striping. Still not convinced these will work because of the laser cutting method which involved multiple horizontal passes so the curves aren't entirely flowing. I might hand-brush the pinstripes. Any advice on the best paint to use for hand-brushing would be gratefully received. I'd estimate the pinstripe thickness at less than 0.5mm.
 

Attachments

  • 20191126_140100.jpg
    20191126_140100.jpg
    3.9 MB · Views: 138
What kind of file was used for the laser cutter? If it was a vector file it should have followed the path of the pin stripes.
 
Weird looking heat shields they made for it.

How did you re-chrome it?
Stripped the components, painted gloss black, polished using 3000 grit, oventop non scratch cleaner then Maguiars scratch X2.0 liquid scratch/blemish remover. Finally, alclad chrome.
 
Last edited:
Here's a test using a four-blade system. I laid 40mm wide masking tape, cut around a template using the four blades, removed two stripes and ran a Tamiya chrome paint marker over the exposed lines.
 

Attachments

  • 20191127_181809.jpg
    20191127_181809.jpg
    4 MB · Views: 134
Slightly better test using the laser cut masks. I finally proved I could transfer the middle mask line, whereas previously it had failed to stick to the transfer film. Thanks for the heads up dr slurpee. I'll check if the cut was raster or vector.
 

Attachments

  • 20191128_190427.jpg
    20191128_190427.jpg
    1.4 MB · Views: 106
Okay, so the latest plan is to buy a cricut maker and use it to cut the pinstripes out of decal paper. Initial tests carried out by a very gracious person with a cricut Maker are proving positive. Masking was a bit of a bust really. The lines looked terrible and getting a good concentration of paint in such a tiny area (even with a silver base coat) was problematic.

Apart from the cost of the cricut (which I'll amortize over a bunch of other projects involving cutting!) I don't know why more people aren't using the machine to get rid of the dreaded clear decal film halo effect. In addition, there is now white toner available for bog standard HP laser printers so the inability to print white decals is now a thing of the past. This again should be shaking up the modelling world, but nah.....not so much.
 
Last edited:
I've emailed Bedlam Creations in MI. for a quote on the decals. I think the pinstripe colors are 076 Orange and 077 Red, as per the attached color chart, when compared with the attached photo of the actual bike.
 

Attachments

  • universal-products-premium-cast-opaque-pin-stripe-pinstripe-3-16-inch-0003-10.jpg
    universal-products-premium-cast-opaque-pin-stripe-pinstripe-3-16-inch-0003-10.jpg
    46.5 KB · Views: 151
  • Picture027.jpg
    Picture027.jpg
    103.4 KB · Views: 130
Check this out. stencil vinyl cut to shape on a Cricut Maker. I'll let you do the math on how fine these cuts are. What an amazing machine!
 

Attachments

  • 20200112_153347.jpg
    20200112_153347.jpg
    3.9 MB · Views: 111
I'm still glad I got the cricut, but now I'm looking at making my own film free decals.

Three steps. 1. Print the pinstripe design on sunnyscopa decal film-free paper using a color laser printer. 2. Apply "heat foil" to the decal using a laminator. This makes the decal opaque. I'm about to test white foil. I used some cheap Red metallic foil and while it made the pinstripes opaque they were quite metallic. 3. Using sunnyscopa adhesive, glue the design to the surface and peel off the decal carrier film. VERY promising test results. The decals are very thin too. If it works I will have nailed a technique for creating dry transfer decaling in the long term!
 
Last edited:
I'm still glad I got the cricut, but now I'm looking at making my own film free decals.

Three steps. 1. Print the pinstripe design on sunnyscopa decal film-free paper using a color laser printer. 2. Apply "heat foil" to the decal using a laminator. This makes the decal opaque. I'm about to test white foil. I used some cheap Red metallic foil and while it made the pinstripes opaque they were quite metallic. 3. Using sunnyscopa adhesive, glue the design to the surface and peel off the decal carrier film. VERY promising test results. The decals are very thin too. If it works I will have nailed a technique for creating dry transfer decaling in the long term!

Sounds great. Keep us apprised, would probably love to pay for some "cricut-printed" design. :cool:
 
Quick update. Many thanks to "Bsbbase" for spotting a big issue with the oil filter. The set-up that comes with the Tamiya kit is too advanced. I need to remodel, based on a frame-mounted oil filter. Something to do while I wait for my sunnyscopa shipment of white foil from South Korea. Looking to use this to back my laser printed decals so they are opaque.
 

Your message may be considered spam for the following reasons:

If you wish to reply despite these issues, check the box below before replying.
Be aware that malicious compliance may result in more severe penalties.
Back
Top