AstroChrisX
New Member
Hi guys! This is my first post so apologies for any faux pas!
I've been infatuated by the B-01 armour from Helldivers 2 ever since the launch trailer came out! It looks so awesome, so I've decided to start making my own set! There's been a few stumbling blocks here and there which I'll go into in a bit. If you're not aware of what the B-01 armour looks like, it's the default armour in the game and has a snazzy black and yellow paint scheme

It looks awesome (Although perhaps in the future I may do some other armours from the game too?? hmmmmmm)! The folks over at Galactic Armoury made some great 3D printable files so I hopped on and started printing! I printed everything out of PETG, 3 walls on everything because I just wanted everything to be nice and solid and just to prevent any warping that may or may not occur.
The goal of this was to create a really great costume, as accurate as I could possibly make it (This comes into play later)
This is also my first real foray into large scale printing of a costume or armour so there were definitely some teething issues. Fortunately I do have a pretty good printer, an Elegoo Neptune 3 Plus. So I don't need to split parts up to print pieces which is pretty convenient.
My first stop was to print the helmet first, the file is split into 3 parts or fully assembled; a face plate, helmet dome and helmet rear/bottom. This is where my first issue arose, I should have definitely printed it all as one piece, my printer could accommodate it so why not! Well I figured that it'd be easier to sand and finish all the parts first then assemble them together and the orientation of the parts I thought could be printed better split up. I'm not doing that again! I ended up with lots of support along the helmet dome and bottom interface which gave a few unsightly marks, I was still during this time trying to dial in my settings so there was also some lifting on the buildplate which caused a feature to be warped a little. However all in all it came out pretty well and the print quality (support surface notwithstanding) was pretty good! I'm still in the process of finishing the helmet but I first applied a layer of UV resin to smooth out a lot of the layer lines, then sanded, then applied some filler putty and sanded down, sanded down again and primed. I got a few imperfections I've filled again and it's currently waiting to sand it down to it's final state. I'm hoping the gloss paint scheme will hide the crimes so to speak!


Now onto the actual armour, I first started with the smaller pieces like the forearms, tacpad, shin armour etc. Tweaking my print settings before finally getting around to printing the torso parts. All in all there's 11 pieces to the torso armour with 2 very large parts that only just fit on my printer! Assembled together using CA glue and activator. I actually believe this combination is magic! I've never used it before but being able to instantly fix two parts together rock solidly is the best feeling ever! So far these parts were given a quick sand and then a layer of UV resin again. You can still see layer lines through the resin but you don't feel them, and the resin sands very nicely (With an appropriate full face respirator mind you). This is a nice technique I'll be continuing to use.


This is where the story switches gear a little...
So far I had printed almost everything, everything except the thigh armour. Enough that I wanted to start thinking about the soft parts, now because I wanted an accurate set of costume I wanted to have accurate soft parts. I believe this is where some other examples have been let down, I want to create something that you look at and think "yup, that's how it'd be done in real life". With that in mind I'm looking at creating a custom plate carrier/ballistic vest for this armour using cordura and spacer foam like you'd expect on a real bit of military equipment. I've seen other examples of this costume using duck cloth for parts or using a waffle pattern fabric, however looking at the reference pictures it looks like the majority of the soft parts were in cordura which makes sense, it's used to make backpacks and plate carriers today so they're likely to be using something similar in the future! This should give it an accurate texture that replicates the texture on the game model. I've started work on the template for the vest and it's coming along pretty well. There's lots of bits and pieces to the vest, this is just the front panel! It's made up of 7 'sub-panels' and each one has varying levels of padding inside.

This is a complicated vest to create so my mind started wandering and looking at the other parts of the soft parts of the armour, all seemed well until...
EVERYTHING FALLS APART
I was happy... I was content... then I had to go and have a look at some of the references I had collected. My biggest reference is a 3d model of the armour ripped from the game, I found it on the Helldivers 2 Archive channel on discord. It's a fantastic reference, fully textured and you can rotate it to any angle you want.
So looking at the reference 3d model I see that the shoulder pauldrons had a big soft pad under them which I was looking to replicate. But actually looking at the 3D prints I've done for the shoulders there's a large chunk of plastic where that pad should be... looking at the reference and print it's obvious to me now that it's not quite right. I should have really known since there's a buckle right there which wouldn't make sense to be on TOP of the hard armour, as soon as you crank down on it it'd start flexing the armour not cinch down on your arm!


You can see the difference between the 3d printed part and the reference. I've drawn on it where I need to remove material. I was looking at the part even closer now, I started noticing that some details are missing, or wrong (For example there's a bolt inside the feature on the front which is missing in the print, that feature looks very "sharp" on the print compared to the model, some parts are smooth where there should be an edge like the top of the pauldron and bevels are missing). Hmmm okay well maybe I can just trim this bit of plastic away and try to adjust the other issues but I should check the other parts just to be sure.
This was my downfall, to my surprise most of the parts are just wrong, the most egregious is the fact most of the soft parts are actually modelled into the hard parts, the first place I noticed this other than the shoulders were the shin armour pieces. Pretty much the entire outside of the part needs to be removed, unlike the shoulders however where the plastic to be removed on the shoulder is thin (Less than the wall thickness) the bits to be removed here were thick enough that the infill would be exposed around the entire edge of the part, effectively having the outside and inside skins held in place with just infill... that wasn't going to work.

So that was the shins, I also saw other issues with the shin, parts being the wrong shape, too thin, too fat, not detailed in some places. Let me take a look at the other parts then. Oh my... the knees, thighs, shoulders and most importantly the torso armour were all also wrong too. The torso being the biggest issue, there's actually a part of the back which was modelled as a hard part which is actually a soft part! Not to mention some other pretty major details that are just wrong.
THE INSANITY BEGINS
Okay well it's okay, maybe I can just modify the files a little. I come from a CAD background but I used 3DS Max maybe a decade ago... how hard can it be?
Well as it turns out... incredibly...
I've never used Blender before, so I was hitting the ground running. Pretty quickly it was found that 1) the 3d printed model files were derived from the ripped model from the archive 2) the 3d printed models were hard to modify given they had been subdivided and triangulated. I could have turned them to quads and decimated them but large details would probably have been destroyed.
So here's where the insanity comes in. I decided to just model the parts again from scratch. The benefit of this is two-fold. 1) I can make the armour accurate to my specification and 2) I can add some functionality that is sorely missing to the armour!
My first ever Blender part! Reference on the left, my part on the right!

Forgive the terrible modelling, if you saw some of the topology you'd blush... but I think it'll do it's job! Especially when getting printed through a 3d printer, some of the crimes will be hidden! The biggest thing here is that now the parts which are supposed to be sharp are sharp, details are added, soft parts are removed and the part is also ready for functionality... you may see that there's some bit's missing off of my model, specifically the hinge mechanism is missing and the silver piece at the top of the knee


Ahhhh Fusion 360... that's more my speed... So actually I've not missed them, but the functional parts I chose to design in Fusion simply for tolerance sake. The hinge mechanism will meld perfectly with the armour plates and there's an internal built in stop so they can't over extend but will spring back into position. I'm pretty proud of my first foray but there was definitely places to improve. Especially after printing out some more functional test prints I severely underestimated how strong PETG can be! So I may redesign these parts to be slimmer.
The shin and knee armour was a nice way to dip my toes into hard body modelling in Blender. It was necessary but also it's in a location not so easily seen so I can get away with a bit more! Next part however was to address the biggest source of inaccuracy... the torso
I want to just say that I'm really really happy with how this came out! I took what I learned from the shin and knee and applied it to the torso, for me the biggest thing this does is adds functionality to all of the extraneous plates on the torso and my personal favourite part... I HAVE A FUNCTIONAL CAPE ATTACHMENT SYSTEM.
Reference on the left, my model in the middle, the original 3d printed part to compare on the right

This insanity started because I wanted to get the soft parts sorted and measured, that was put on hold when I found out the original 3d prints actually had the soft parts modelled into the print. If I went off of the parts I printed I would have made the soft parts a several cm larger in most every dimension! It might not be obvious but if you look at the difference between my model and the 3d print there's large areas that are removed (Around the front between the abs plate and front, all around the side plates and all the way up the sides of the main front plate)
The other thing that I noticed pretty quickly was the inside of the neck was completely empty (If you put the chest plate on I can almost fit my fist between my chest and the inside of the plate! Helldivers must have HUGE pecks!) I've decided to model that back in which also give a location for the tubes between the back and front to go to. I'm also thinking about adding more functionality to that area as well... maybe a water reservoir for a cool-suit? There's a few small details I didn't model (Basically only small rivet heads) so that I can just sand the area flat nice and easily and not messing around tiny features that'd get worn away, I'll just glue these on later.

You can also see on the shoulder straps the cape attachment system! This part I am especially proud of, it's so damn satisfying! This all started because frankly I didn't like the detail on the shoulders anyway, and there was no real way to sand any of the parts to make them look half decent on the original, in the end the UV resin covered them and most of what little detail was there was gone, so I wanted a part I could print separately, sand all the nubbins off and glue it into place. Well eventually I figured why not make it work? It's just a simple latch, but this was my first time with compliant mechanisms on 3d prints, but I knew PETG was a good candidate anyway as it had a bit more flexibility.

So I mocked up a few different test pieces, this is my favourite part where I got to iterate quickly through different designs! My first test print (Top left) was not intended to clog the printer nozzle... and thus give me just a half finished part but actually it was invaluable because the latch still worked! So it gave me a sectional view of the inside of the mechanism as I inserted the cape insert. (Aha! Just as intended!) I just reprinted the original test (Second from left) to see if that made any difference to operation. That was paired with the first 4.4mm cape insert.
Just to clarify, the way this works is eventually the cape will be sewn to the end of the inserts (I may try to mold the capes into the inserts somehow but that's for future me to worry about), the inserts are pushed into the latch and the latch snaps down, just the wiry looking part of the latch is actually glued so the chunky bit can flex to snap. I have a video but can't figure out how to embed just yet!
The 4.4mm insert was just a proof of concept, "does the latch flex and snap over the insert without breaking?"... the answer YES! Quite well actually. However it was very tight, I could have sanded it down but I figured it'd be easier to just reprint it thinner. My next iteration I wanted the insert to pop out when you unlatch it. I suppose I could have glued some springs into the receptacle but that would be fiddly and might mess up, there's no chance I could fish it back out if it went wrong, so I figure if I'm using one compliant mechanism why not use another? So the 4.2mm insert includes a 1mm bow across the front that can squish, when you unlatch it should pop out! This also worked quite well especially with the thinner insert meaning it wasn't getting jammed up, but I wanted a little more oomph when it popped out. So I increased the bow radius and made it thinner again. The 4mm thickness was perfect, but my next problem was the increased bow meant that the latch actually snapped down into the area inside the bow. Giving you a false positive click so it'd just fall out super easily. So to fix that I added more nodules to the bow so the latch is constantly supported throughout travel. This works perfectly! It's also quite durable! I've been messing with it on my desk for a week at this point and it's gone through hundreds of cycles.
Finally I've also tested some hinges for the separate chest plates. Forgive the print, it looks rough but the part is incredibly strong! As it should be since it has a 6mm dowel pin going straight through it! With the layer orientation perpendicular to the axis of the shaft I'm confident that this will hold up to quite a lot of abuse! It certainly feels strong but I'd need to glue it to a test piece and try to break it to make sure! Importantly though it looks spot on to the in-game model despite having a rod going through the centre of it. Once it's painted silver it'll look much better!

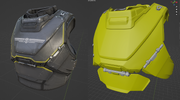
I've just finished the model for the back today so figured I'd start a build thread for once! The back is where I find the most egregious mistake on the original file to be. Again reference on the left, my model in the middle and 3d printed model on the right.

The issue here is there's an extra hard plate added to bottom of the 3d print that shouldn't be there! From the looks of it this part should be some sort of rubbery urethane attached to the vest itself (There's literally edge beading sewn over that part along the bottom and it carries on into the rest of the vest with no seams!) The way to look at the layers is to remember the perk that this armour has in game... "Extra-padding". if you look at the hard armour, check out the edges and then you'll see some padding and edge beading, the edge beading goes over that bottom 'plate' so it definitely isn't part of the hard armour! Also the shader gives it a matte finish like the other non-hard armour parts so there's that too!
Overall I'm really happy with how the 3d models have come out! I'm looking to start reprinting the parts soon so hopefully I'll update this thread in a short while with more pieces!
Hopefully this isn't too long, let me know if you have any questions!
Chris
I've been infatuated by the B-01 armour from Helldivers 2 ever since the launch trailer came out! It looks so awesome, so I've decided to start making my own set! There's been a few stumbling blocks here and there which I'll go into in a bit. If you're not aware of what the B-01 armour looks like, it's the default armour in the game and has a snazzy black and yellow paint scheme
It looks awesome (Although perhaps in the future I may do some other armours from the game too?? hmmmmmm)! The folks over at Galactic Armoury made some great 3D printable files so I hopped on and started printing! I printed everything out of PETG, 3 walls on everything because I just wanted everything to be nice and solid and just to prevent any warping that may or may not occur.
The goal of this was to create a really great costume, as accurate as I could possibly make it (This comes into play later)
This is also my first real foray into large scale printing of a costume or armour so there were definitely some teething issues. Fortunately I do have a pretty good printer, an Elegoo Neptune 3 Plus. So I don't need to split parts up to print pieces which is pretty convenient.
My first stop was to print the helmet first, the file is split into 3 parts or fully assembled; a face plate, helmet dome and helmet rear/bottom. This is where my first issue arose, I should have definitely printed it all as one piece, my printer could accommodate it so why not! Well I figured that it'd be easier to sand and finish all the parts first then assemble them together and the orientation of the parts I thought could be printed better split up. I'm not doing that again! I ended up with lots of support along the helmet dome and bottom interface which gave a few unsightly marks, I was still during this time trying to dial in my settings so there was also some lifting on the buildplate which caused a feature to be warped a little. However all in all it came out pretty well and the print quality (support surface notwithstanding) was pretty good! I'm still in the process of finishing the helmet but I first applied a layer of UV resin to smooth out a lot of the layer lines, then sanded, then applied some filler putty and sanded down, sanded down again and primed. I got a few imperfections I've filled again and it's currently waiting to sand it down to it's final state. I'm hoping the gloss paint scheme will hide the crimes so to speak!
Now onto the actual armour, I first started with the smaller pieces like the forearms, tacpad, shin armour etc. Tweaking my print settings before finally getting around to printing the torso parts. All in all there's 11 pieces to the torso armour with 2 very large parts that only just fit on my printer! Assembled together using CA glue and activator. I actually believe this combination is magic! I've never used it before but being able to instantly fix two parts together rock solidly is the best feeling ever! So far these parts were given a quick sand and then a layer of UV resin again. You can still see layer lines through the resin but you don't feel them, and the resin sands very nicely (With an appropriate full face respirator mind you). This is a nice technique I'll be continuing to use.
This is where the story switches gear a little...
So far I had printed almost everything, everything except the thigh armour. Enough that I wanted to start thinking about the soft parts, now because I wanted an accurate set of costume I wanted to have accurate soft parts. I believe this is where some other examples have been let down, I want to create something that you look at and think "yup, that's how it'd be done in real life". With that in mind I'm looking at creating a custom plate carrier/ballistic vest for this armour using cordura and spacer foam like you'd expect on a real bit of military equipment. I've seen other examples of this costume using duck cloth for parts or using a waffle pattern fabric, however looking at the reference pictures it looks like the majority of the soft parts were in cordura which makes sense, it's used to make backpacks and plate carriers today so they're likely to be using something similar in the future! This should give it an accurate texture that replicates the texture on the game model. I've started work on the template for the vest and it's coming along pretty well. There's lots of bits and pieces to the vest, this is just the front panel! It's made up of 7 'sub-panels' and each one has varying levels of padding inside.
This is a complicated vest to create so my mind started wandering and looking at the other parts of the soft parts of the armour, all seemed well until...
EVERYTHING FALLS APART
I was happy... I was content... then I had to go and have a look at some of the references I had collected. My biggest reference is a 3d model of the armour ripped from the game, I found it on the Helldivers 2 Archive channel on discord. It's a fantastic reference, fully textured and you can rotate it to any angle you want.
So looking at the reference 3d model I see that the shoulder pauldrons had a big soft pad under them which I was looking to replicate. But actually looking at the 3D prints I've done for the shoulders there's a large chunk of plastic where that pad should be... looking at the reference and print it's obvious to me now that it's not quite right. I should have really known since there's a buckle right there which wouldn't make sense to be on TOP of the hard armour, as soon as you crank down on it it'd start flexing the armour not cinch down on your arm!
You can see the difference between the 3d printed part and the reference. I've drawn on it where I need to remove material. I was looking at the part even closer now, I started noticing that some details are missing, or wrong (For example there's a bolt inside the feature on the front which is missing in the print, that feature looks very "sharp" on the print compared to the model, some parts are smooth where there should be an edge like the top of the pauldron and bevels are missing). Hmmm okay well maybe I can just trim this bit of plastic away and try to adjust the other issues but I should check the other parts just to be sure.
This was my downfall, to my surprise most of the parts are just wrong, the most egregious is the fact most of the soft parts are actually modelled into the hard parts, the first place I noticed this other than the shoulders were the shin armour pieces. Pretty much the entire outside of the part needs to be removed, unlike the shoulders however where the plastic to be removed on the shoulder is thin (Less than the wall thickness) the bits to be removed here were thick enough that the infill would be exposed around the entire edge of the part, effectively having the outside and inside skins held in place with just infill... that wasn't going to work.
So that was the shins, I also saw other issues with the shin, parts being the wrong shape, too thin, too fat, not detailed in some places. Let me take a look at the other parts then. Oh my... the knees, thighs, shoulders and most importantly the torso armour were all also wrong too. The torso being the biggest issue, there's actually a part of the back which was modelled as a hard part which is actually a soft part! Not to mention some other pretty major details that are just wrong.
THE INSANITY BEGINS
Okay well it's okay, maybe I can just modify the files a little. I come from a CAD background but I used 3DS Max maybe a decade ago... how hard can it be?
Well as it turns out... incredibly...
I've never used Blender before, so I was hitting the ground running. Pretty quickly it was found that 1) the 3d printed model files were derived from the ripped model from the archive 2) the 3d printed models were hard to modify given they had been subdivided and triangulated. I could have turned them to quads and decimated them but large details would probably have been destroyed.
So here's where the insanity comes in. I decided to just model the parts again from scratch. The benefit of this is two-fold. 1) I can make the armour accurate to my specification and 2) I can add some functionality that is sorely missing to the armour!
My first ever Blender part! Reference on the left, my part on the right!
Forgive the terrible modelling, if you saw some of the topology you'd blush... but I think it'll do it's job! Especially when getting printed through a 3d printer, some of the crimes will be hidden! The biggest thing here is that now the parts which are supposed to be sharp are sharp, details are added, soft parts are removed and the part is also ready for functionality...
you may see that there's some bit's missing off of my model, specifically the hinge mechanism is missing and the silver piece at the top of the kneeAhhhh Fusion 360... that's more my speed... So actually I've not missed them, but the functional parts I chose to design in Fusion simply for tolerance sake. The hinge mechanism will meld perfectly with the armour plates and there's an internal built in stop so they can't over extend but will spring back into position. I'm pretty proud of my first foray but there was definitely places to improve. Especially after printing out some more functional test prints I severely underestimated how strong PETG can be! So I may redesign these parts to be slimmer.
The shin and knee armour was a nice way to dip my toes into hard body modelling in Blender. It was necessary but also it's in a location not so easily seen so I can get away with a bit more! Next part however was to address the biggest source of inaccuracy... the torso
I want to just say that I'm really really happy with how this came out! I took what I learned from the shin and knee and applied it to the torso, for me the biggest thing this does is adds functionality to all of the extraneous plates on the torso and my personal favourite part... I HAVE A FUNCTIONAL CAPE ATTACHMENT SYSTEM.
Reference on the left, my model in the middle, the original 3d printed part to compare on the right
This insanity started because I wanted to get the soft parts sorted and measured, that was put on hold when I found out the original 3d prints actually had the soft parts modelled into the print. If I went off of the parts I printed I would have made the soft parts a several cm larger in most every dimension! It might not be obvious but if you look at the difference between my model and the 3d print there's large areas that are removed (Around the front between the abs plate and front, all around the side plates and all the way up the sides of the main front plate)
The other thing that I noticed pretty quickly was the inside of the neck was completely empty (If you put the chest plate on I can almost fit my fist between my chest and the inside of the plate! Helldivers must have HUGE pecks!) I've decided to model that back in which also give a location for the tubes between the back and front to go to. I'm also thinking about adding more functionality to that area as well... maybe a water reservoir for a cool-suit?
There's a few small details I didn't model (Basically only small rivet heads) so that I can just sand the area flat nice and easily and not messing around tiny features that'd get worn away, I'll just glue these on later.You can also see on the shoulder straps the cape attachment system! This part I am especially proud of, it's so damn satisfying! This all started because frankly I didn't like the detail on the shoulders anyway, and there was no real way to sand any of the parts to make them look half decent on the original, in the end the UV resin covered them and most of what little detail was there was gone, so I wanted a part I could print separately, sand all the nubbins off and glue it into place. Well eventually I figured why not make it work? It's just a simple latch, but this was my first time with compliant mechanisms on 3d prints, but I knew PETG was a good candidate anyway as it had a bit more flexibility.
So I mocked up a few different test pieces, this is my favourite part where I got to iterate quickly through different designs! My first test print (Top left) was not intended to clog the printer nozzle... and thus give me just a half finished part
but actually it was invaluable because the latch still worked! So it gave me a sectional view of the inside of the mechanism as I inserted the cape insert. (Aha! Just as intended!) I just reprinted the original test (Second from left) to see if that made any difference to operation. That was paired with the first 4.4mm cape insert.Just to clarify, the way this works is eventually the cape will be sewn to the end of the inserts (I may try to mold the capes into the inserts somehow but that's for future me to worry about), the inserts are pushed into the latch and the latch snaps down, just the wiry looking part of the latch is actually glued so the chunky bit can flex to snap. I have a video but can't figure out how to embed just yet!
The 4.4mm insert was just a proof of concept, "does the latch flex and snap over the insert without breaking?"... the answer YES! Quite well actually. However it was very tight, I could have sanded it down but I figured it'd be easier to just reprint it thinner. My next iteration I wanted the insert to pop out when you unlatch it. I suppose I could have glued some springs into the receptacle but that would be fiddly and might mess up, there's no chance I could fish it back out if it went wrong, so I figure if I'm using one compliant mechanism why not use another? So the 4.2mm insert includes a 1mm bow across the front that can squish, when you unlatch it should pop out! This also worked quite well especially with the thinner insert meaning it wasn't getting jammed up, but I wanted a little more oomph when it popped out. So I increased the bow radius and made it thinner again. The 4mm thickness was perfect, but my next problem was the increased bow meant that the latch actually snapped down into the area inside the bow. Giving you a false positive click so it'd just fall out super easily. So to fix that I added more nodules to the bow so the latch is constantly supported throughout travel. This works perfectly! It's also quite durable! I've been messing with it on my desk for a week at this point and it's gone through hundreds of cycles.
Finally I've also tested some hinges for the separate chest plates. Forgive the print, it looks rough but the part is incredibly strong! As it should be since it has a 6mm dowel pin going straight through it! With the layer orientation perpendicular to the axis of the shaft I'm confident that this will hold up to quite a lot of abuse! It certainly feels strong but I'd need to glue it to a test piece and try to break it to make sure! Importantly though it looks spot on to the in-game model despite having a rod going through the centre of it. Once it's painted silver it'll look much better!
I've just finished the model for the back today so figured I'd start a build thread for once!
The back is where I find the most egregious mistake on the original file to be. Again reference on the left, my model in the middle and 3d printed model on the right.The issue here is there's an extra hard plate added to bottom of the 3d print that shouldn't be there! From the looks of it this part should be some sort of rubbery urethane attached to the vest itself (There's literally edge beading sewn over that part along the bottom and it carries on into the rest of the vest with no seams!) The way to look at the layers is to remember the perk that this armour has in game... "Extra-padding". if you look at the hard armour, check out the edges and then you'll see some padding and edge beading, the edge beading goes over that bottom 'plate' so it definitely isn't part of the hard armour! Also the shader gives it a matte finish like the other non-hard armour parts so there's that too!
Overall I'm really happy with how the 3d models have come out! I'm looking to start reprinting the parts soon so hopefully I'll update this thread in a short while with more pieces!
Hopefully this isn't too long, let me know if you have any questions!
Chris