You are using an out of date browser. It may not display this or other websites correctly.
You should upgrade or use an alternative browser.
You should upgrade or use an alternative browser.
Star Destroyer #3
- Thread starter ringa
- Start date
-... . .- --..
Sr Member
Mmm hmmm, just look at those L'eggs.
Rick, maybe the timing is off, but don't forget that Jason and Mike are working on a Sealab casting run. Pretty sure one of the parts I loaned them is the same one you need for your engines.
Rick, maybe the timing is off, but don't forget that Jason and Mike are working on a Sealab casting run. Pretty sure one of the parts I loaned them is the same one you need for your engines.
ringa
Well-Known Member
As always, clinical work Rick, so neat in applying those ribs, ok, so im a neatfreak lol.
They look great clear, even without primer, would be an honor to ever see this in the flesh.
Lee
Lee, I'd love for you to see it someday, especially since you donated the brass parts!
After doing 3 eggs, I wish I had more because I've gotten pretty good at it, I could replace the first attempt. But then, I have to wait until I paint them to see if they'll look better.
ringa
Well-Known Member
Mmm hmmm, just look at those L'eggs.
Rick, maybe the timing is off, but don't forget that Jason and Mike are working on a Sealab casting run. Pretty sure one of the parts I loaned them is the same one you need for your engines.
Thanks, Kevin. I was just talking to Charles, and he was convincing me I should just scratch build them. I might give that a try first.
ringa
Well-Known Member
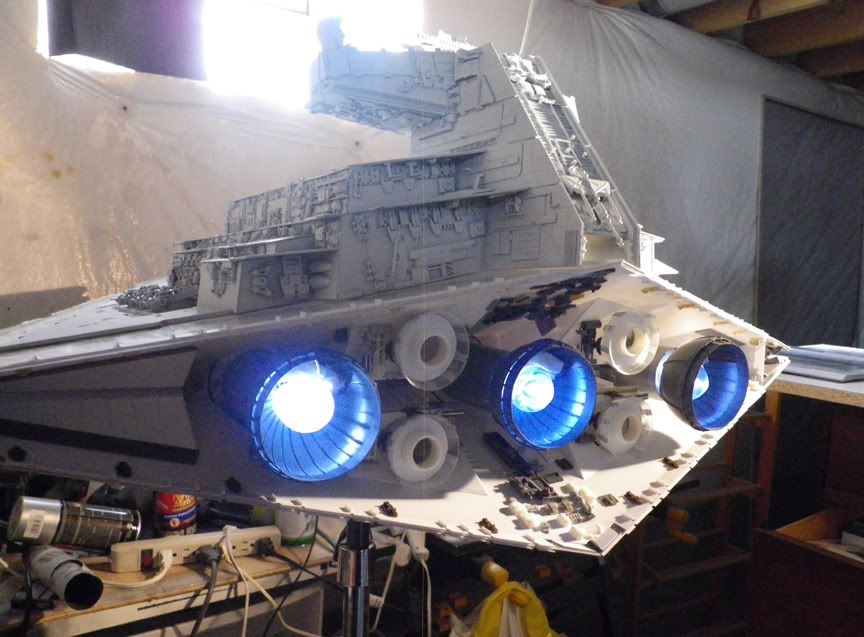
Such wonderful detail:eek Those engines are beautiful.
Thanks, Randy. I think I'll be happier with them when I have them painted and in place with the lights on (I hope). We'll see. I just finished the last one tonight. Can't put them all together just yet until I get more parts in the mail.
ringa
Well-Known Member
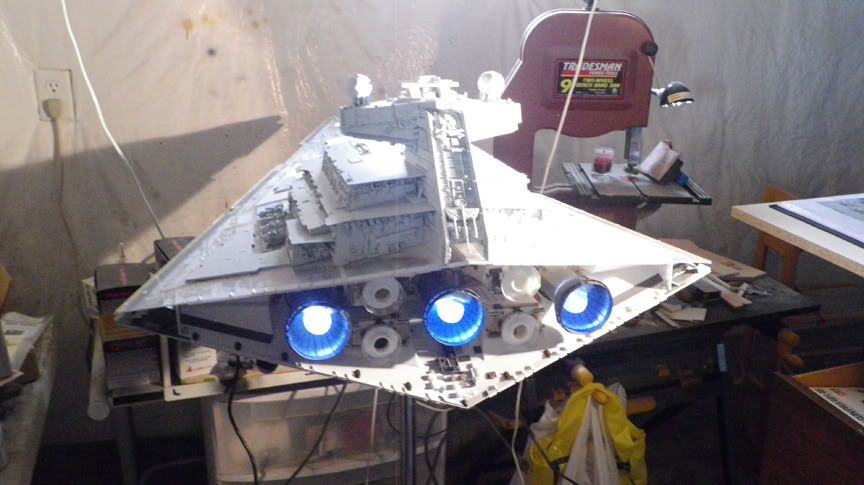
Here's the latest. The eggs are primed and will be painted white soon. They are not attached yet. The secondary engines are.
As you can see, I have 4 of the same gun. Whenever I can find the base part for the different fourth gun, I will replace what I have.
Not much more to do before I can paint and finish it!
As you can see, I have 4 of the same gun. Whenever I can find the base part for the different fourth gun, I will replace what I have.
Not much more to do before I can paint and finish it!
ringa
Well-Known Member
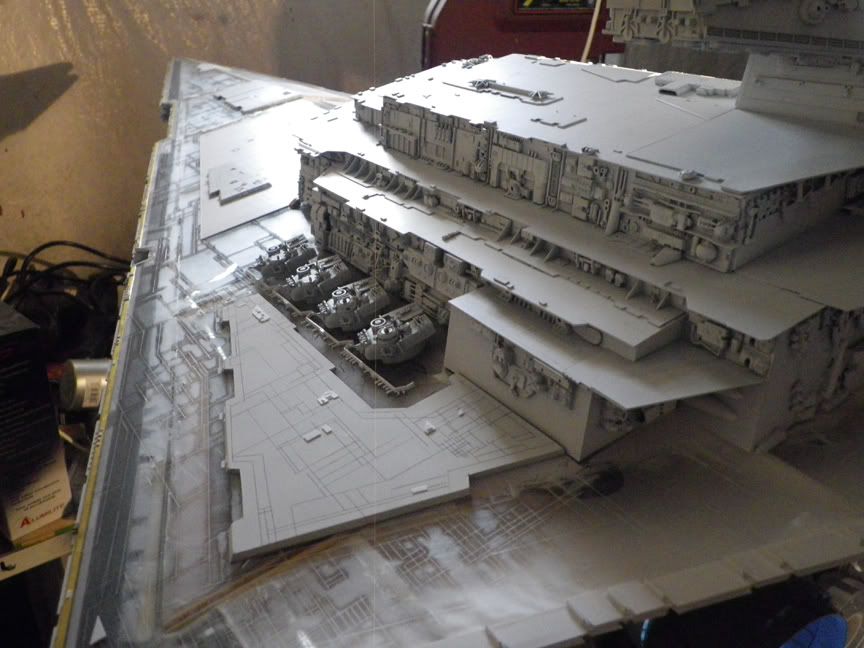
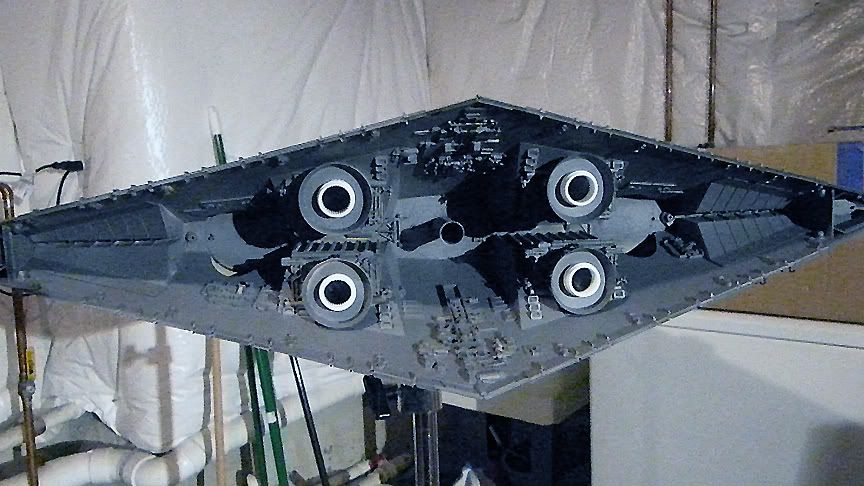
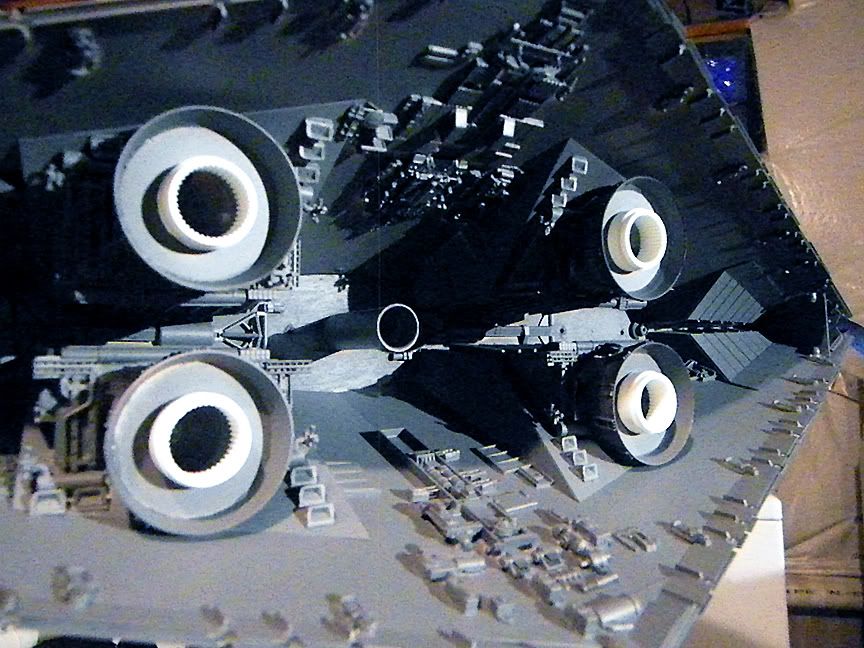
I finally got a kit I was waiting for in the mail. It has parts I need for the bottom hull and the engine area. They are in rubber as of now.
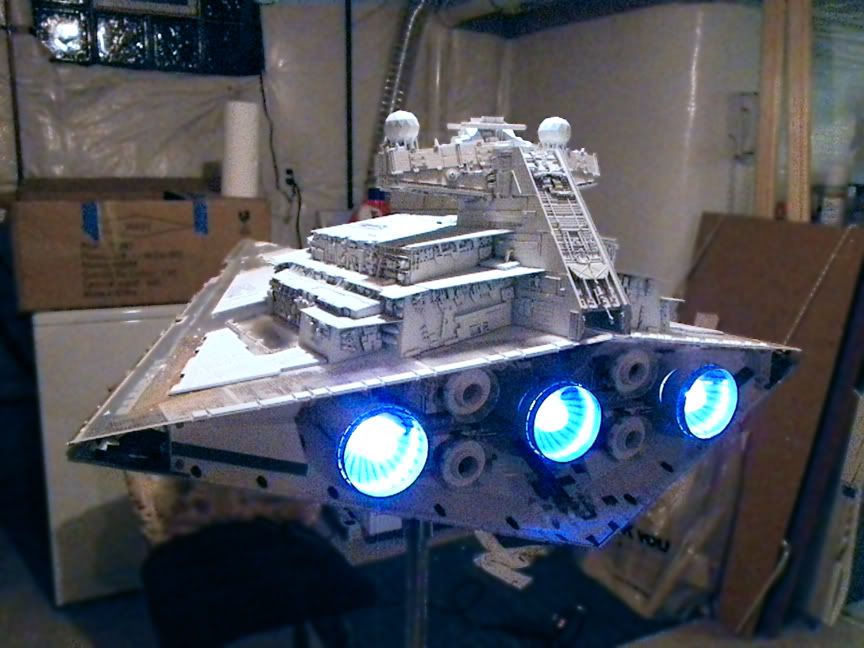
I painted the L'Eggs eggs white, and the test below shows they are opaque, especially the clear ones, which now have no light bleeding through...
There are two things that will make or break this replica; proportions are most important, followed by the right "feel" to its overall appearance.
To me, there is something about the fact that the original Star Destroyer is hand made, and that it has its imperfections that says something about the power of movie magic... because the Star Destroyer looks so GREAT on film; so majestic and ominous as it stretches into endless space overhead, then looming menacingly closer from the front. Then, like a shark, it swallows the 6-foot long Blockade Runner model in its gigantic docking bay, which in reality is not much more than 5 inches wide!
Thus is the spectacular illusion of miniature FX that so captured my imagination when I was a young boy watching Star Wars for the first time in 1977. And this is why the ANH Star Destroyer has always left an impression on me, making it my favorite filming model.
Because the model is hand made, there is a lot of asymmetry. So, it is near impossible to be 100% accurate replicating it. But it's not impossible to be very close. In being close enough involves having the right "feel" to the overall look. Part of the original model's charm, IMHO, is the hand-made look with all its asymmetry. That's why it's important that my replica have the hand-made look too. If I had all the parts laser cut and more symmetrical, it would lose some of what makes the original so appealing to me.
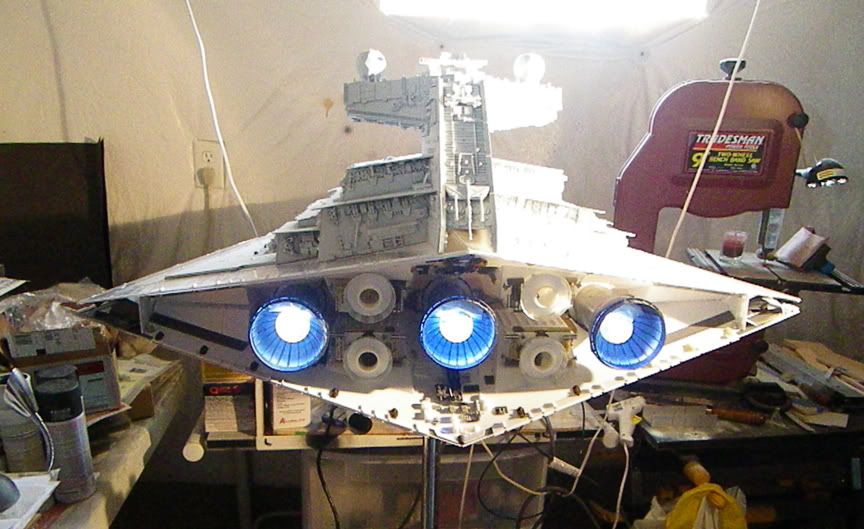
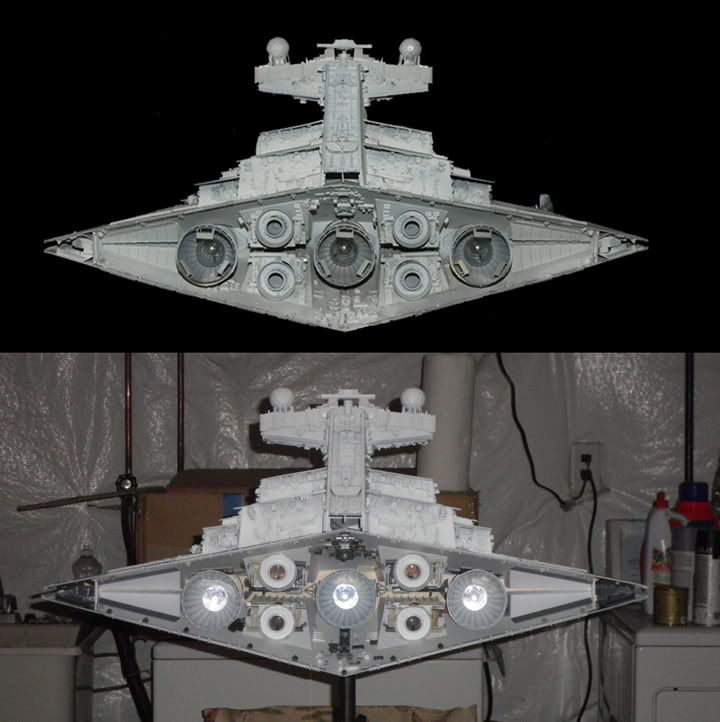
Because I have never seen the original filming model in person (ironically, even though my second Star Destroyer model replaced the real one in the "Action!" museum tour––I was contacted after it was removed), I am never entirely sure how close I am to the original's proportions from each angle. So far it looked very close from the front, but I was more concerned, and hopeful that it would look as good from the back, where the hull proportions would be much more noticeable if they were off by even just a quarter inch.
When I put a photo the real model over mine in a very similar camera angle, I was very pleased and relieved...
I painted the L'Eggs eggs white, and the test below shows they are opaque, especially the clear ones, which now have no light bleeding through...
There are two things that will make or break this replica; proportions are most important, followed by the right "feel" to its overall appearance.
To me, there is something about the fact that the original Star Destroyer is hand made, and that it has its imperfections that says something about the power of movie magic... because the Star Destroyer looks so GREAT on film; so majestic and ominous as it stretches into endless space overhead, then looming menacingly closer from the front. Then, like a shark, it swallows the 6-foot long Blockade Runner model in its gigantic docking bay, which in reality is not much more than 5 inches wide!
Thus is the spectacular illusion of miniature FX that so captured my imagination when I was a young boy watching Star Wars for the first time in 1977. And this is why the ANH Star Destroyer has always left an impression on me, making it my favorite filming model.
Because the model is hand made, there is a lot of asymmetry. So, it is near impossible to be 100% accurate replicating it. But it's not impossible to be very close. In being close enough involves having the right "feel" to the overall look. Part of the original model's charm, IMHO, is the hand-made look with all its asymmetry. That's why it's important that my replica have the hand-made look too. If I had all the parts laser cut and more symmetrical, it would lose some of what makes the original so appealing to me.
Because I have never seen the original filming model in person (ironically, even though my second Star Destroyer model replaced the real one in the "Action!" museum tour––I was contacted after it was removed), I am never entirely sure how close I am to the original's proportions from each angle. So far it looked very close from the front, but I was more concerned, and hopeful that it would look as good from the back, where the hull proportions would be much more noticeable if they were off by even just a quarter inch.
When I put a photo the real model over mine in a very similar camera angle, I was very pleased and relieved...
Rick......just WOW, that comparison is just superb, as i said before, its the angles you have put down here, that just make this one shine all the more.
The way you feel about the ANH ISD, yeah, i hear you, i get the same feelings from the TESB Hoth props, those few scenes on Hoth still stick in my mind, which is why i build what i build.
Its just great to see you pouring so much love into a prop that changed your life and the way you look at "spaceships" lol.
lee
ringa
Well-Known Member
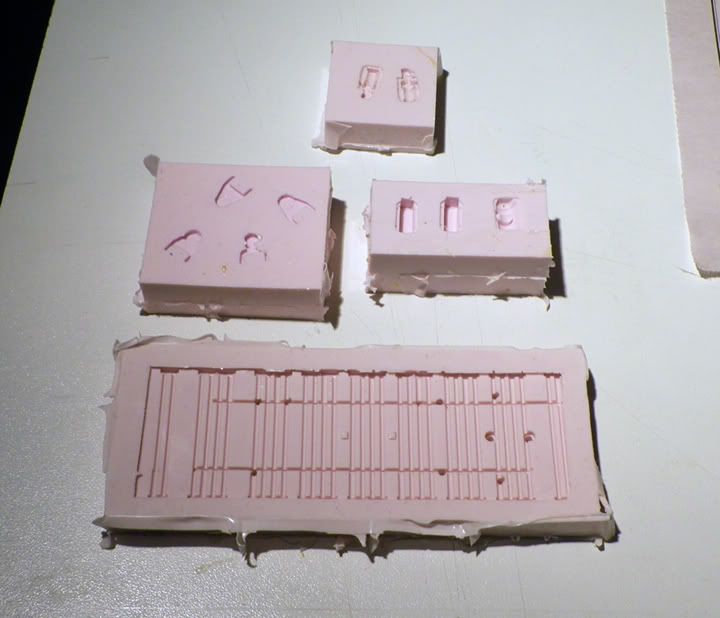
This installment is more for those who are just starting out who want to learn about resin casting. More experienced model makers know all about this, and more.
If you are thinking of building a studio scale model, you know you have to get your hands on some very rare, hard to find, and very expensive kits. It is important to learn how to save time and money by copying parts you need more than one of.
I just got in the mail one of those rare kits. It comes with two small parts that my Star Destroyer needs 20 of. So, those two parts, plus others are currently in rubber.
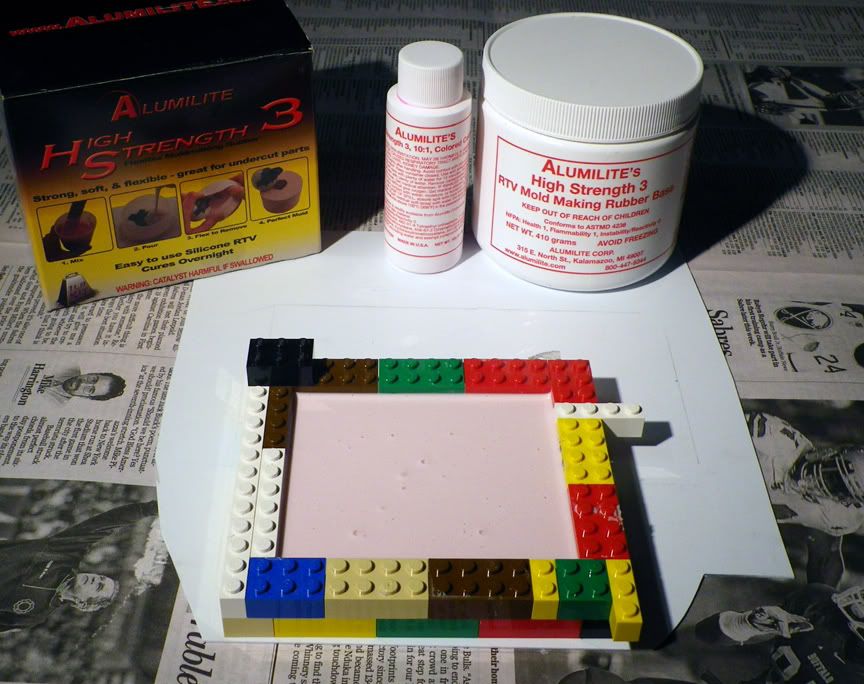
I never played with Legos as a kid, but they come in handy when you need a customized container to hold the silicone mix. This way you can build a reusable container to suit the part(s) you are casting so you are not wasting rubber. This is a tip I read somewhere, and this is how I cast all my small pieces.
I use double-sided adhesive sheets, cut to size and stuck to a throw-away piece of plastic. I then stick the parts to be copied on the adhesive, leaving enough around the edges to stick the Legos to it as well. The adhesive keeps the parts from floating in the mixture, and seals the containment area, or silicone will leak from underneath. It is also cost effective to cast as many different parts at a time.
The Alumilite brand I'm using here requires a 10 to 1 mixture of rubber and catalyst to cure properly. The resin requires 1 to 1.
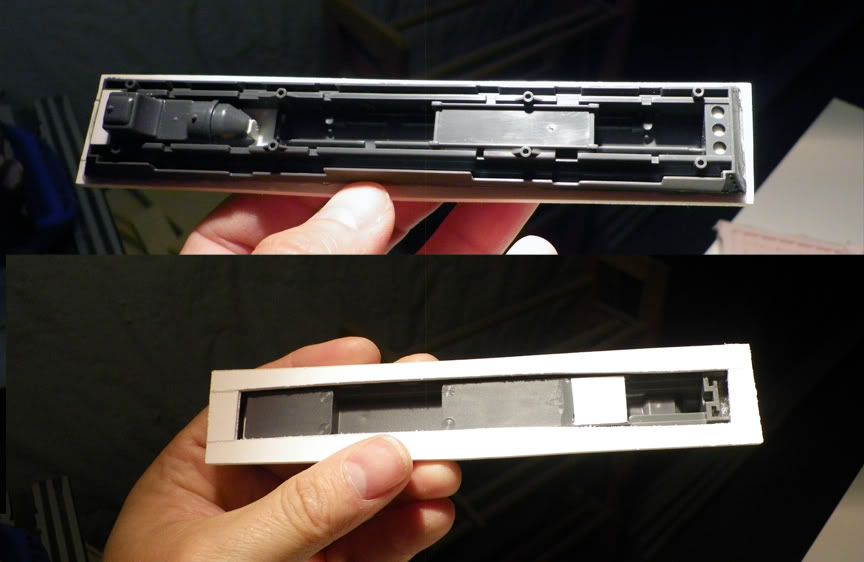
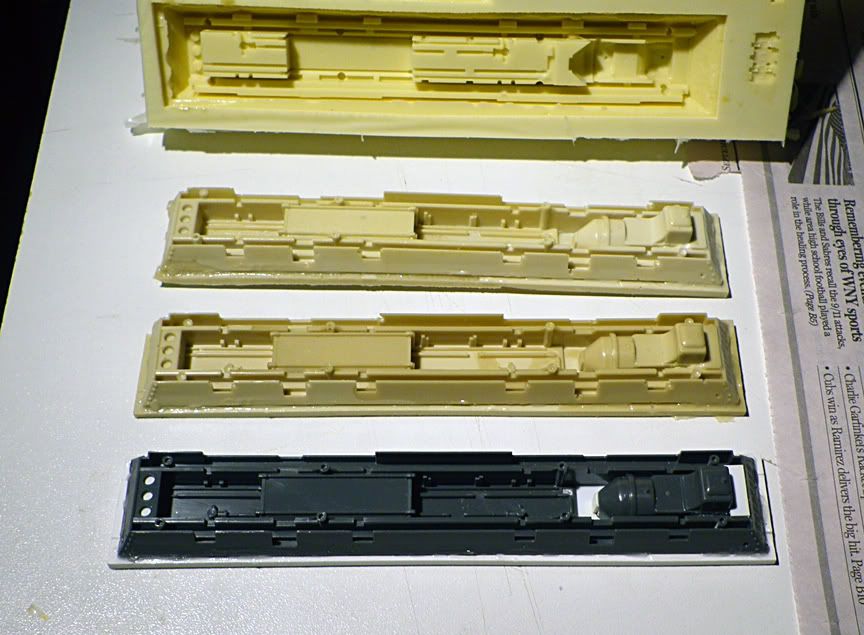
Before beginning, it's important to prep the parts being cast. The Star Destroyer uses multiples of this 8-Rad part (many filming models of that era did). This part, below, first had to have its sides removed with a hobby knife or saw. It also has many openings that have to be plugged up. I noticed the outer edges on this part are higher than some details in the middle, so it doesn't lay flat on those edges. It was necessary to build up the outer edges with plastic so they were higher than the inner details.
Depending on the cure time of the silicone you use, it could take a day or a few hours before you are ready to cast pieces in it. The pink mix will take about a day, but for this 8-Rad part I used the yellow mix, which meant I was copying it the same day. The pink mold is softer and more flexible than the yellow. They are both durable, and will last through many castings before they lose their usability.
A good thing about resin castings is that they are easy to work with. If you haven't tried it yet, resin takes a mere 3 minutes to harden, so you don't have to wait long to have all your needed pieces.
There are experts here in dealing with resin that have more advanced ways of doing things, pressure casting, etc. But if all you need are a few parts using a one part mold, or you just want to learn the basics, this could be a good starting point for you.
Hope this helps those who always wanted to try it!
If you are thinking of building a studio scale model, you know you have to get your hands on some very rare, hard to find, and very expensive kits. It is important to learn how to save time and money by copying parts you need more than one of.
I just got in the mail one of those rare kits. It comes with two small parts that my Star Destroyer needs 20 of. So, those two parts, plus others are currently in rubber.
I never played with Legos as a kid, but they come in handy when you need a customized container to hold the silicone mix. This way you can build a reusable container to suit the part(s) you are casting so you are not wasting rubber. This is a tip I read somewhere, and this is how I cast all my small pieces.
I use double-sided adhesive sheets, cut to size and stuck to a throw-away piece of plastic. I then stick the parts to be copied on the adhesive, leaving enough around the edges to stick the Legos to it as well. The adhesive keeps the parts from floating in the mixture, and seals the containment area, or silicone will leak from underneath. It is also cost effective to cast as many different parts at a time.
The Alumilite brand I'm using here requires a 10 to 1 mixture of rubber and catalyst to cure properly. The resin requires 1 to 1.
Before beginning, it's important to prep the parts being cast. The Star Destroyer uses multiples of this 8-Rad part (many filming models of that era did). This part, below, first had to have its sides removed with a hobby knife or saw. It also has many openings that have to be plugged up. I noticed the outer edges on this part are higher than some details in the middle, so it doesn't lay flat on those edges. It was necessary to build up the outer edges with plastic so they were higher than the inner details.
Depending on the cure time of the silicone you use, it could take a day or a few hours before you are ready to cast pieces in it. The pink mix will take about a day, but for this 8-Rad part I used the yellow mix, which meant I was copying it the same day. The pink mold is softer and more flexible than the yellow. They are both durable, and will last through many castings before they lose their usability.
A good thing about resin castings is that they are easy to work with. If you haven't tried it yet, resin takes a mere 3 minutes to harden, so you don't have to wait long to have all your needed pieces.
There are experts here in dealing with resin that have more advanced ways of doing things, pressure casting, etc. But if all you need are a few parts using a one part mold, or you just want to learn the basics, this could be a good starting point for you.
Hope this helps those who always wanted to try it!
ringa
Well-Known Member
Lee, I'm really glad you and others are enjoying this as much as I am sharing it!
Rick......just WOW, that comparison is just superb, as i said before, its the angles you have put down here, that just make this one shine all the more.
The way you feel about the ANH ISD, yeah, i hear you, i get the same feelings from the TESB Hoth props, those few scenes on Hoth still stick in my mind, which is why i build what i build.
Its just great to see you pouring so much love into a prop that changed your life and the way you look at "spaceships" lol.
lee
Rick, its good to see you posting your journey on casting parts. When i started out on the Droid, i was very worried about it, heed this, its way easier than you think guys, and the Alumilite gear is pretty idiot proof with bubble free castings very possible on your first go, just manipulate that mold once poured, and itll set up superbly.
lee
lee
A
Ardrich Keybus
Guest
That is just too cool! You did a fantastic job making that.
ringa
Well-Known Member
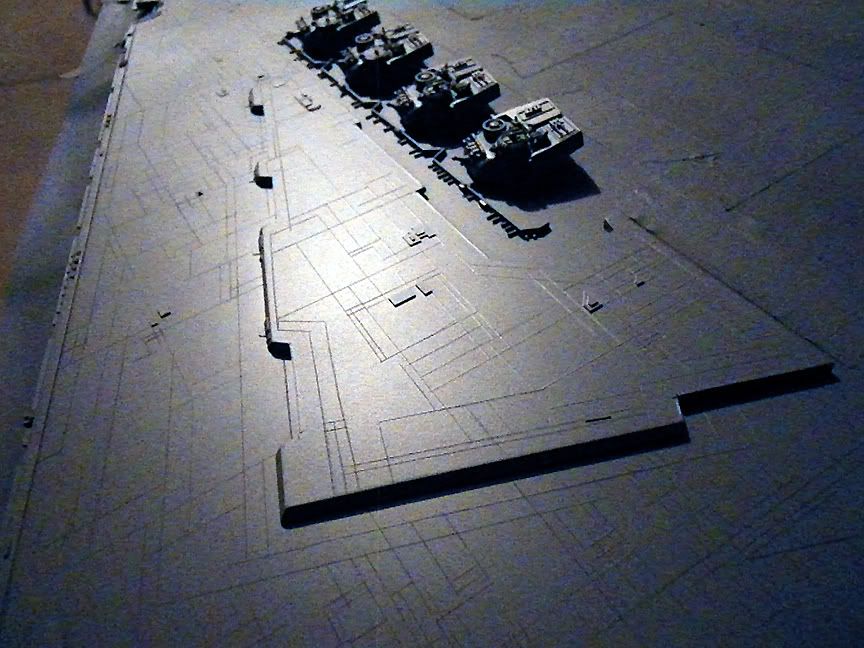
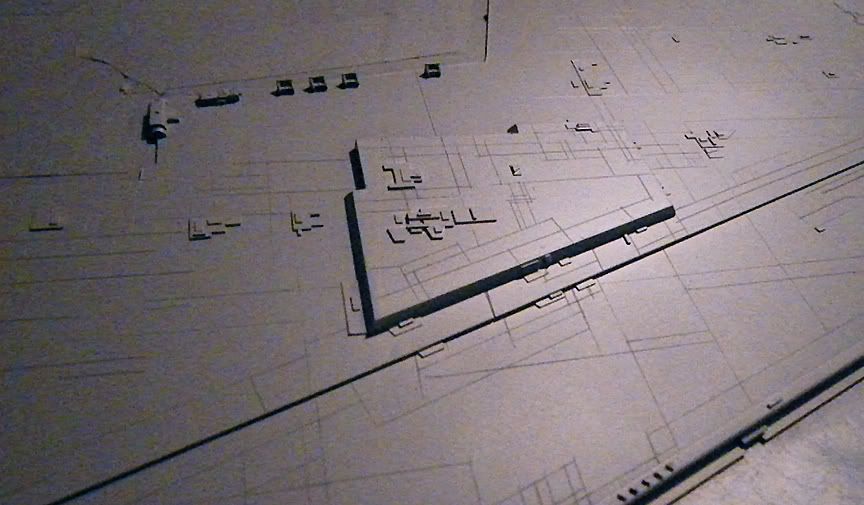
Now that I have some missing parts, I went back to the bottom hull. One of the parts I just made a mold of is now cast, cut and glued in place. Still need the 'dish' looking part from the 1-24 Panther G to complete this detail, but at least I have something where there was nothing before...
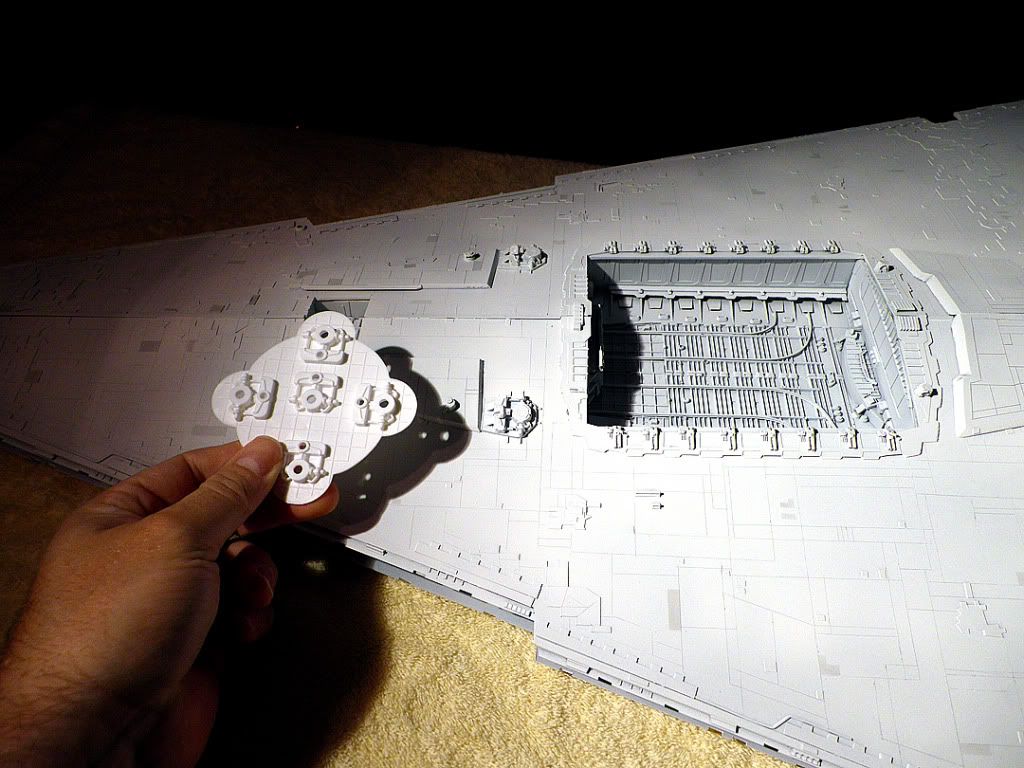
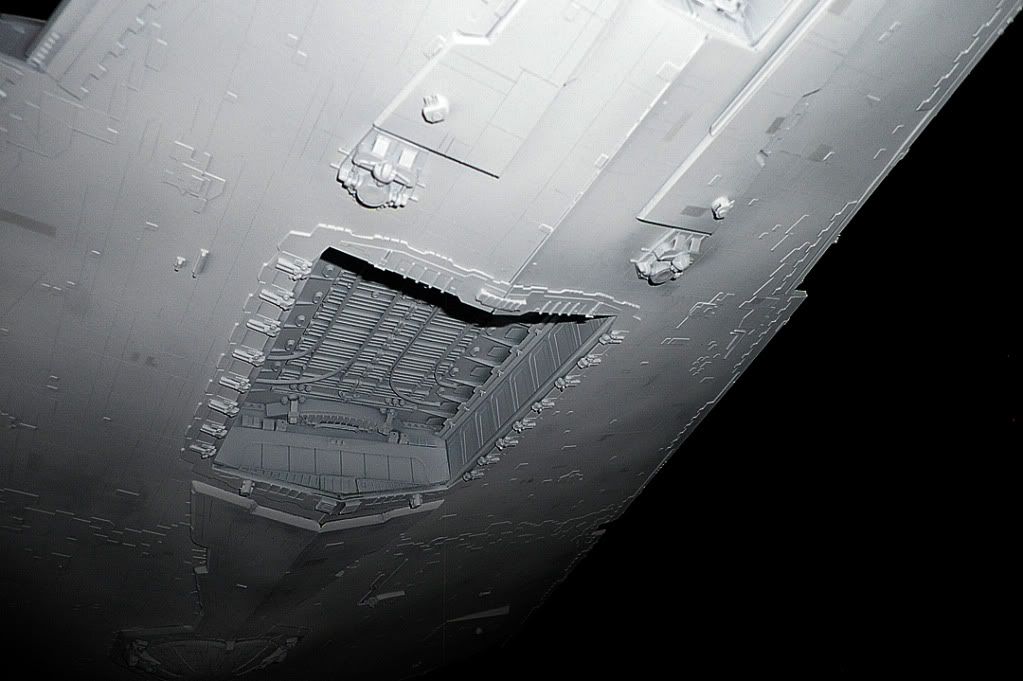
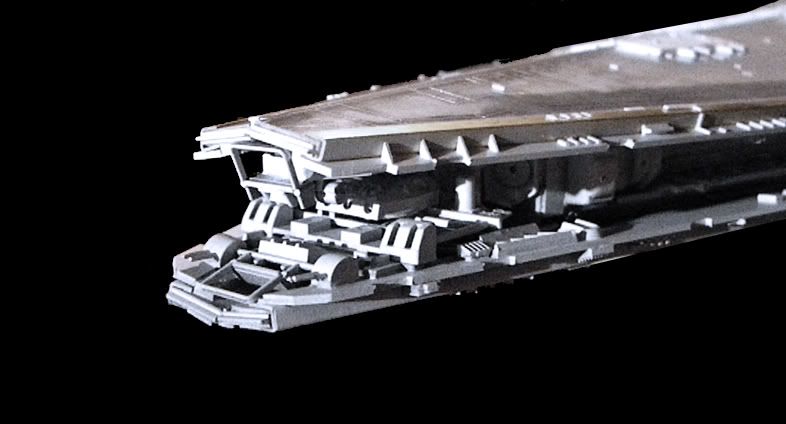
I also took the time to add more detail to the top of the nose...
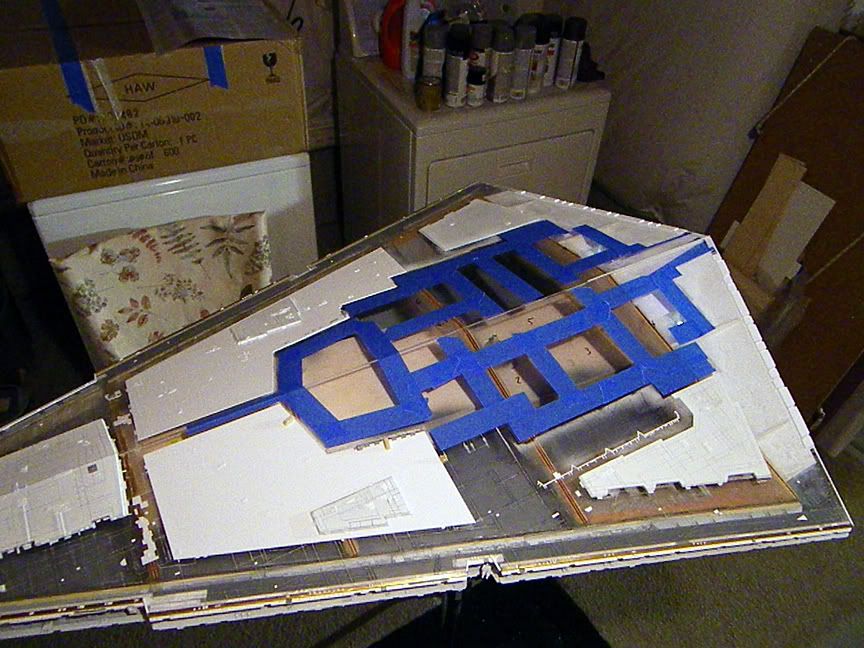
I've begun masking the top hull where the superstructure will go so I can finally paint it!
I also took the time to add more detail to the top of the nose...
I've begun masking the top hull where the superstructure will go so I can finally paint it!
MonsieurTox
Master Member
Love the pics Rick, dont finish it too early, I need the motivation given by your progress to work on mine lol
Flawless work ! :thumbsup
Flawless work ! :thumbsup
ringa
Well-Known Member
Love the pics Rick, dont finish it too early, I need the motivation given by your progress to work on mine lol
Flawless work ! :thumbsup
Don't worry, the best is yet to come!
Thanks Julien!
MonsieurTox
Master Member
Yeah painting and all the penciled lines are a tedious job ! Good luck ")
Similar threads
- Replies
- 22
- Views
- 1,031
- Replies
- 10
- Views
- 1,204
- Replies
- 17
- Views
- 1,893