You are using an out of date browser. It may not display this or other websites correctly.
You should upgrade or use an alternative browser.
You should upgrade or use an alternative browser.
Snowspeeder build. 3D print w/ a little scratch build fun
- Thread starter mjhenks
- Start date
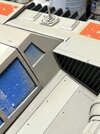
Lighting circuit board arrived. 9-12v input. Each channel can handle 4-6 led’s and each has a pot to adjust the blink rate. LEDs shown are for testing.

Alot of leds. White, Red, Blue and Green.

Testing. Goal will be to put the LED near the fiber optics and run the red/black wire to the rear where the board will be.

Looking at this production photo of Luke. This inspired my rear cockpit.
What is in there holding the canopy up???
Hmmm… Let’s see what I can do.

Prototype here. What do you all think?


It needs some refinement but it works. Sucky for side window visibility.
Alot of leds. White, Red, Blue and Green.
Testing. Goal will be to put the LED near the fiber optics and run the red/black wire to the rear where the board will be.
Looking at this production photo of Luke. This inspired my rear cockpit.
What is in there holding the canopy up???
Hmmm… Let’s see what I can do.
Prototype here. What do you all think?
It needs some refinement but it works. Sucky for side window visibility.
Time to stuff all that wiring into the body. Well at lease most of it.
Front Cockpit and right side are tied together and installed together. This is where i figured out i am going to be in trouble. I had to clear out a bunch of material in both sides to get the side panels to route.

Here you can see what was cleared out. Had to burry the LED's and fibers back there and then get the power wires to the rear.

It is all in the rear and here i am trying to install the seat. Its wires come out the side so i had to fish it thru the already closed out side panel to the rear. You can see the fish line there with the tape to pull thru.
Here is where i convinced myself that there was no way i would get all the wires in there, wired and stuffed into the back. Just no room to work.
So... Back to de-constructing the rear of the model.

Making a mess. The top rear plate was separate to the body so removed it and dug underneath into the rear cockpit foot well. You can see there the two power input 3.5mm phone jacks.. Will be using only one.

Much better. All the wires in the back and after i start trimming to length the PCB's can go down there too. Will try and magnet that panel down for access later.

And now for closing all the cockpit gaps. The whole parameter is filled in and sanded. Primer and re-paint is next, You can see in the rear some scales holding the magnets in place flush while the glue dries.

Pleased with the progress. The end is in sight although my weakest skill is coming up. Weathering...
Front Cockpit and right side are tied together and installed together. This is where i figured out i am going to be in trouble. I had to clear out a bunch of material in both sides to get the side panels to route.
Here you can see what was cleared out. Had to burry the LED's and fibers back there and then get the power wires to the rear.
It is all in the rear and here i am trying to install the seat. Its wires come out the side so i had to fish it thru the already closed out side panel to the rear. You can see the fish line there with the tape to pull thru.
Here is where i convinced myself that there was no way i would get all the wires in there, wired and stuffed into the back. Just no room to work.
So... Back to de-constructing the rear of the model.
Making a mess. The top rear plate was separate to the body so removed it and dug underneath into the rear cockpit foot well. You can see there the two power input 3.5mm phone jacks.. Will be using only one.
Much better. All the wires in the back and after i start trimming to length the PCB's can go down there too. Will try and magnet that panel down for access later.
And now for closing all the cockpit gaps. The whole parameter is filled in and sanded. Primer and re-paint is next, You can see in the rear some scales holding the magnets in place flush while the glue dries.
Pleased with the progress. The end is in sight although my weakest skill is coming up. Weathering...
Last edited:
An update. Been chipping away at the wiring and painting.
Wires are all in place. Figuring out the blink rate of each panel has been a pain.
Cockpit threshold is sealed, smooth and painted.

Made a magnet cover for the wiring. It was just too painful to wire otherwise.

Test fitting the canopy

I can already see the guns getting broken off at some point so i buried magnets in both sides of the gun/mount and attached them that way. The align well and break off if needed.

Test fit it all and getting ready for more painting and weathering

Light panels painted. At this point i am sure i am departing from cannon but then again my cockpit already did that. The pictures i look at and other builds start to confuse on what is right/cannon and what looks good. My model, my way from hear on out.")

Tape off the butt end for some darker shades.

Looking good.

Much better. Test fit the spoilers.

Another test fit. Why not. Realize my wood dowel guns are a but heavy. The guns really should have a front support back to the body to be "real" and stay there in flight. The air flow would make them terribly inaccurate and likely to break off. I am doing everything i can to refrain from "fixing" that. To start i will change the wood out for some plastic tubing to make things lighter. We will see.
There really should be supports out there....

Unrelated but Studio Scale. Made these for another builder. Turned out good. If you know, you know.

Wires are all in place. Figuring out the blink rate of each panel has been a pain.
Cockpit threshold is sealed, smooth and painted.
Made a magnet cover for the wiring. It was just too painful to wire otherwise.
Test fitting the canopy
I can already see the guns getting broken off at some point so i buried magnets in both sides of the gun/mount and attached them that way. The align well and break off if needed.
Test fit it all and getting ready for more painting and weathering
Light panels painted. At this point i am sure i am departing from cannon but then again my cockpit already did that. The pictures i look at and other builds start to confuse on what is right/cannon and what looks good. My model, my way from hear on out.
Tape off the butt end for some darker shades.
Looking good.
Much better. Test fit the spoilers.
Another test fit. Why not. Realize my wood dowel guns are a but heavy. The guns really should have a front support back to the body to be "real" and stay there in flight. The air flow would make them terribly inaccurate and likely to break off. I am doing everything i can to refrain from "fixing" that. To start i will change the wood out for some plastic tubing to make things lighter. We will see.
There really should be supports out there....
Unrelated but Studio Scale. Made these for another builder. Turned out good. If you know, you know.
Last edited:
Wow! Looks AMAZING.
I am having trouble still adapting it to the cold. hehe....Coming to an end; eager to see that bird ready for take-off
Went ahead and applied the decals, did some damage and tried my hand at weathering. Not done but close. Probably all i need now is some wash but if you see something please let me know.
After air brushing work.

Working on installing glass. PITA. The blue tape i had on the rear cockpit messed up a little. May have to turn that into battle damage.

Hard to heat up a screw driver and drive it into your model but sometimes even the best pilot hits something on the way to battle.

Tried to fill the gouge with silver paint and then streak around it.

Overall bottom

One side after the glass was installed

Bottom intake. Using Kool Shade where i could.

The back end. Not happy with the gun. Probably re-paint. Also not sure how to do the cables to the gun and still allow it to rotate some. Any ideas? Guitar strings are too stout.

Overall with cockpit open

Hard to photograph the lights. Not super pleased with the lighting but at least there is some.

A few more things to fix. almost there.
After air brushing work.
Working on installing glass. PITA. The blue tape i had on the rear cockpit messed up a little. May have to turn that into battle damage.
Hard to heat up a screw driver and drive it into your model but sometimes even the best pilot hits something on the way to battle.
Tried to fill the gouge with silver paint and then streak around it.
Overall bottom
One side after the glass was installed
Bottom intake. Using Kool Shade where i could.
The back end. Not happy with the gun. Probably re-paint. Also not sure how to do the cables to the gun and still allow it to rotate some. Any ideas? Guitar strings are too stout.
Overall with cockpit open
Hard to photograph the lights. Not super pleased with the lighting but at least there is some.
A few more things to fix. almost there.
Last edited:
Panavice mounted to a piece of wood? That’s what I use to wall mount my studio scale models.Any tips on a table top tripod would also be appreciated.
Your SnowSpeeder looks absolutely amazing!!
Thank you all.
Interior of my SS Snow Speeder. 80% scratch built. Dash Lighting is not turned on. There are 62 fiber optics in there.
Also not cannon. I was inspired by a mix of production stills, screen grabs, what seemed right and using the greeblies I had.
Most of the dials are WWII plane 3D decals.
I was heavily influenced by this production still on the level of detail the rear cockpit would have had.
Similar threads
- Replies
- 3
- Views
- 415
- Replies
- 13
- Views
- 392